RickLightning
Well-known member
- Thread starter
- #1
TDLR:
Nice quality camera, installation doesn’t blend in with vehicle like competitor, hardwire kit takes time and effort to install. Currently $219.99 which is very competitive, and the quality is quite good, with 4K.
This is a compensated review – I received the RedTiger F17 Elite camera for no charge after agreeing to write a review and post it here. At no time was I asked to write a positive review, merely to write a review.
I am not a “modifier”, i.e. I don’t tweak my vehicles a lot. I have used FORScan for minor stuff, otherwise the modifications to the Lightning are limited to installing Ford mudflaps, license plate frames, a tonneau cover from Diamondback, mats a bedmat from Husky, a backseat cover, a hitch from MaxxHaul, and using CarScanner on trips. I have never used a dashcam in my life. I am also not a photo editor, not photographer.
I had been thinking about a dashcam for a while, but never moved forward, until now.
Some things to mention upfront. First, working on the Lightning's internal fusebox is not fun. It’s located where the passenger’s right foot would be, so you have to lay on the floor and then look towards the right. Not fun gyrating my over 60 year old body into that space. I received the camera on Friday, November 21st, one of the last nice days here, but didn’t get to working on the installation until temps started to fall and snow (early for us) came down, and Thanksgiving interfered. Much of the installation work was done with temps in the 20s and 30s, not fun. Cold hands combined with cold windshield and back window glass fogging up when installing wasn’t fun, nor was my cold hands pulling off body panels and putting them back.
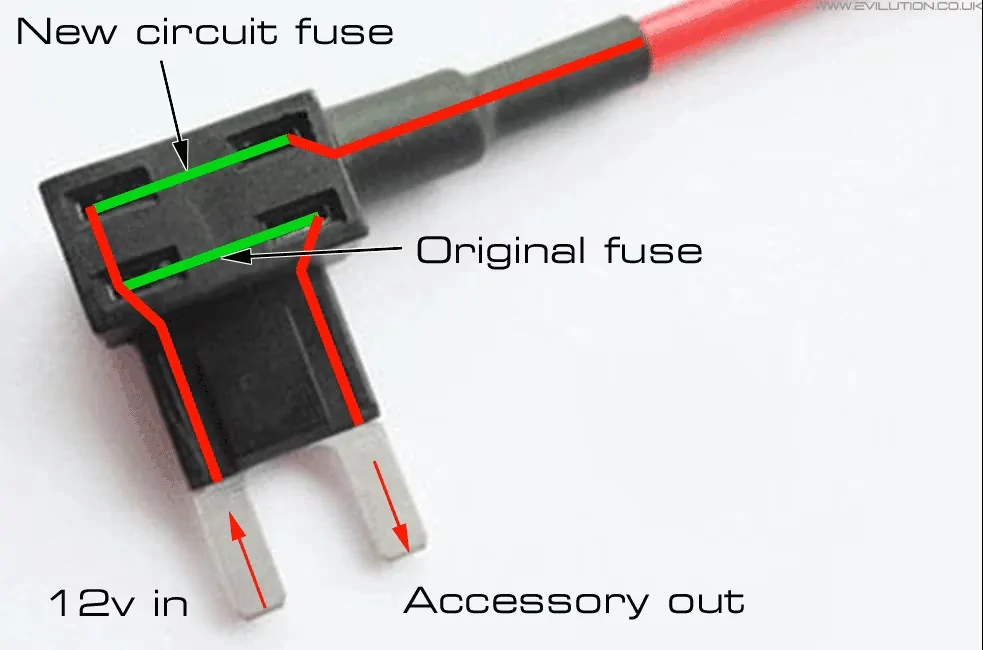
Back in the day, I would install things in vehicles by running a ground wire, and a 12v wire with an inline fuse. Gone are those days, with all sorts of modules running things. Using Add-A-Circuit fuse taps is new to me, I spent some time learning about them. What I learned that was important are two things. First, the original fuse goes in the bottom slot. Second, the power comes up the outside leg to the new circuit, which matters. I also figured out that if I was using an unused location with a 5 or 7.5amps fuse, and the new circuit is 15amps, then the original fuse can’t be less than 15amps (at least that’s what I reasoned), so I had to find ways to accomplish that.

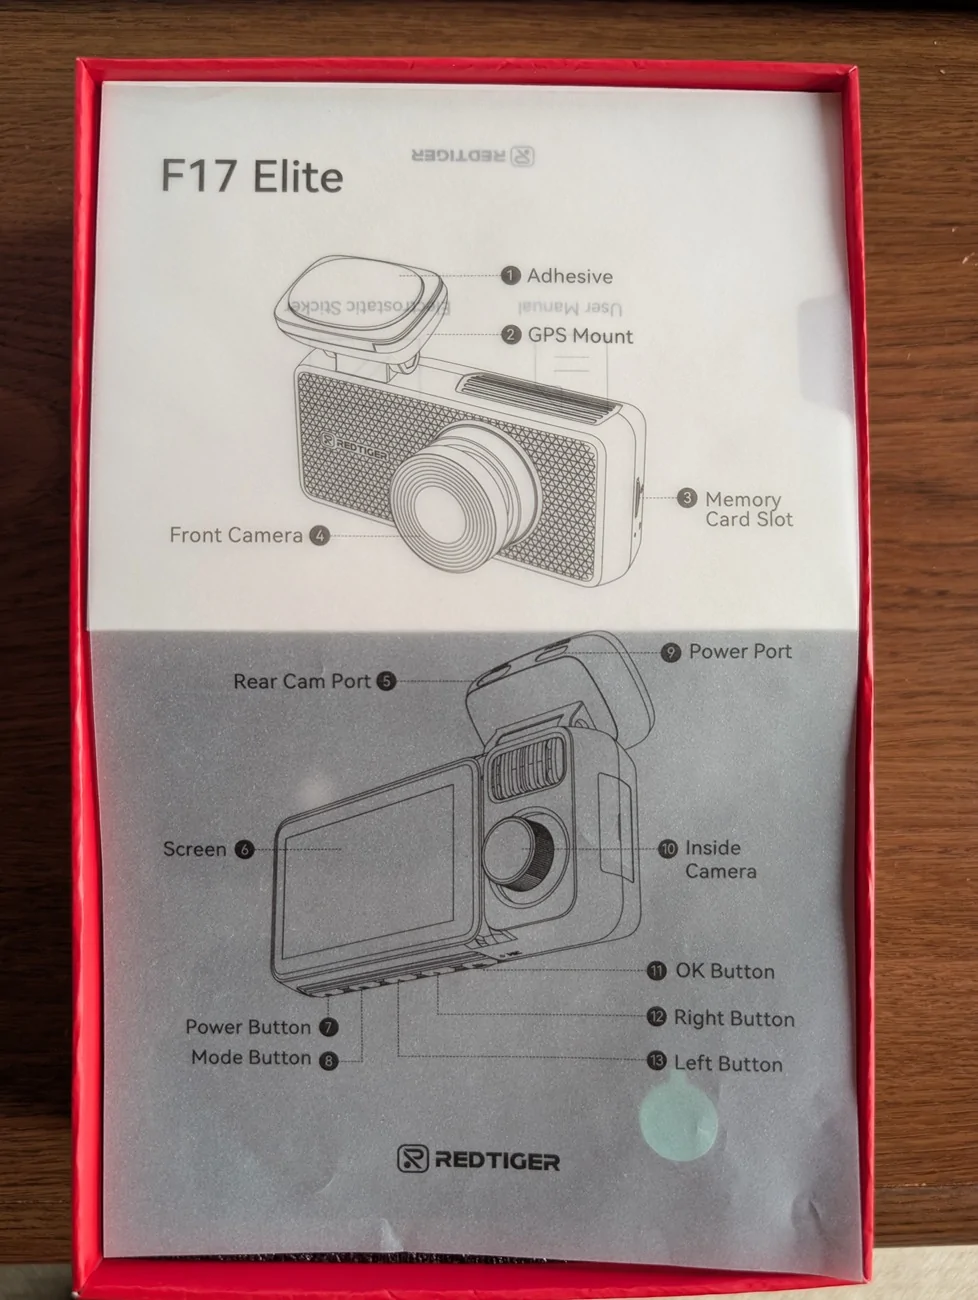
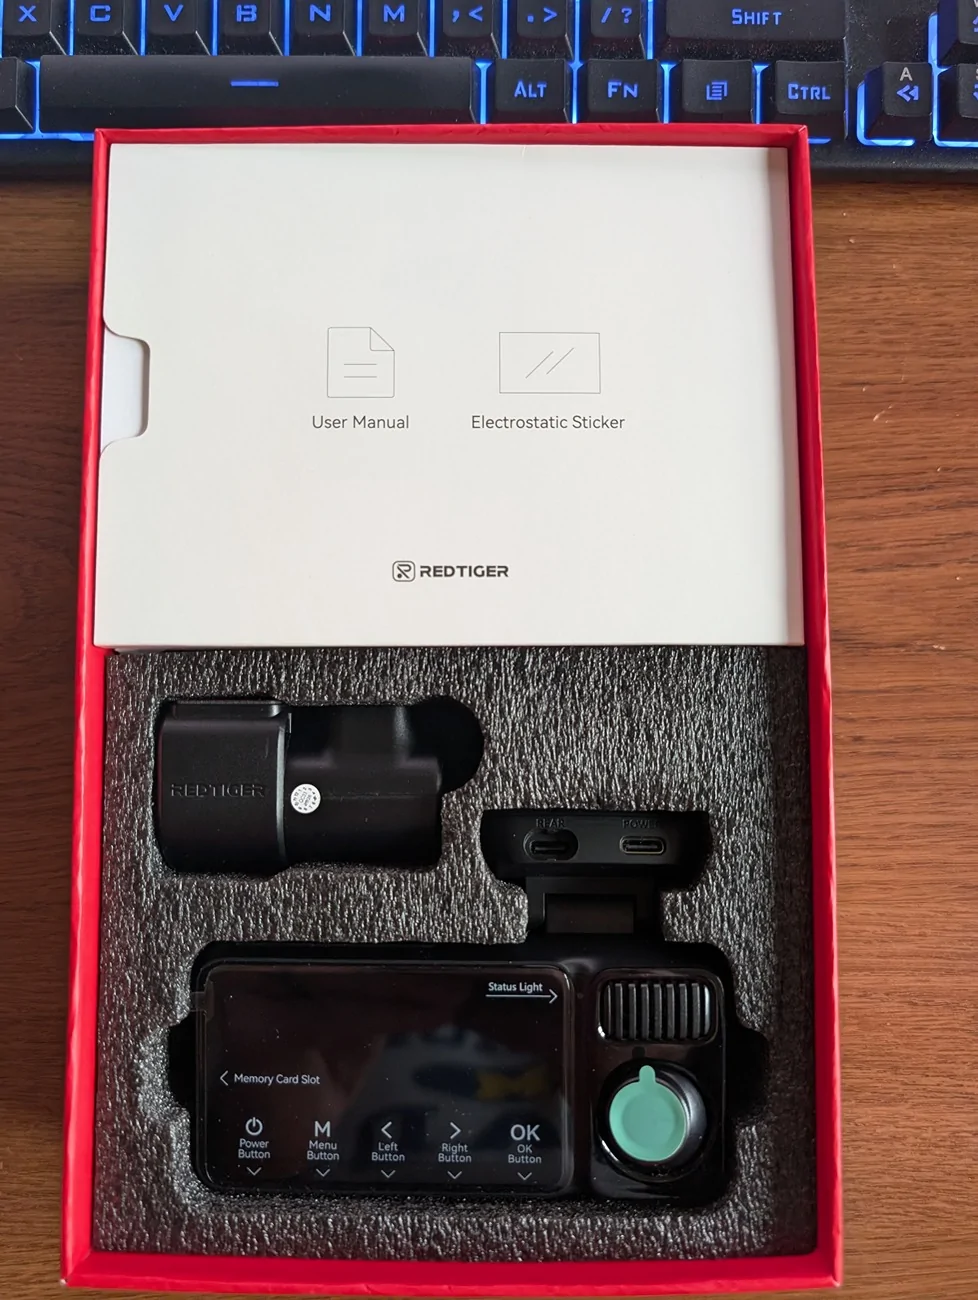
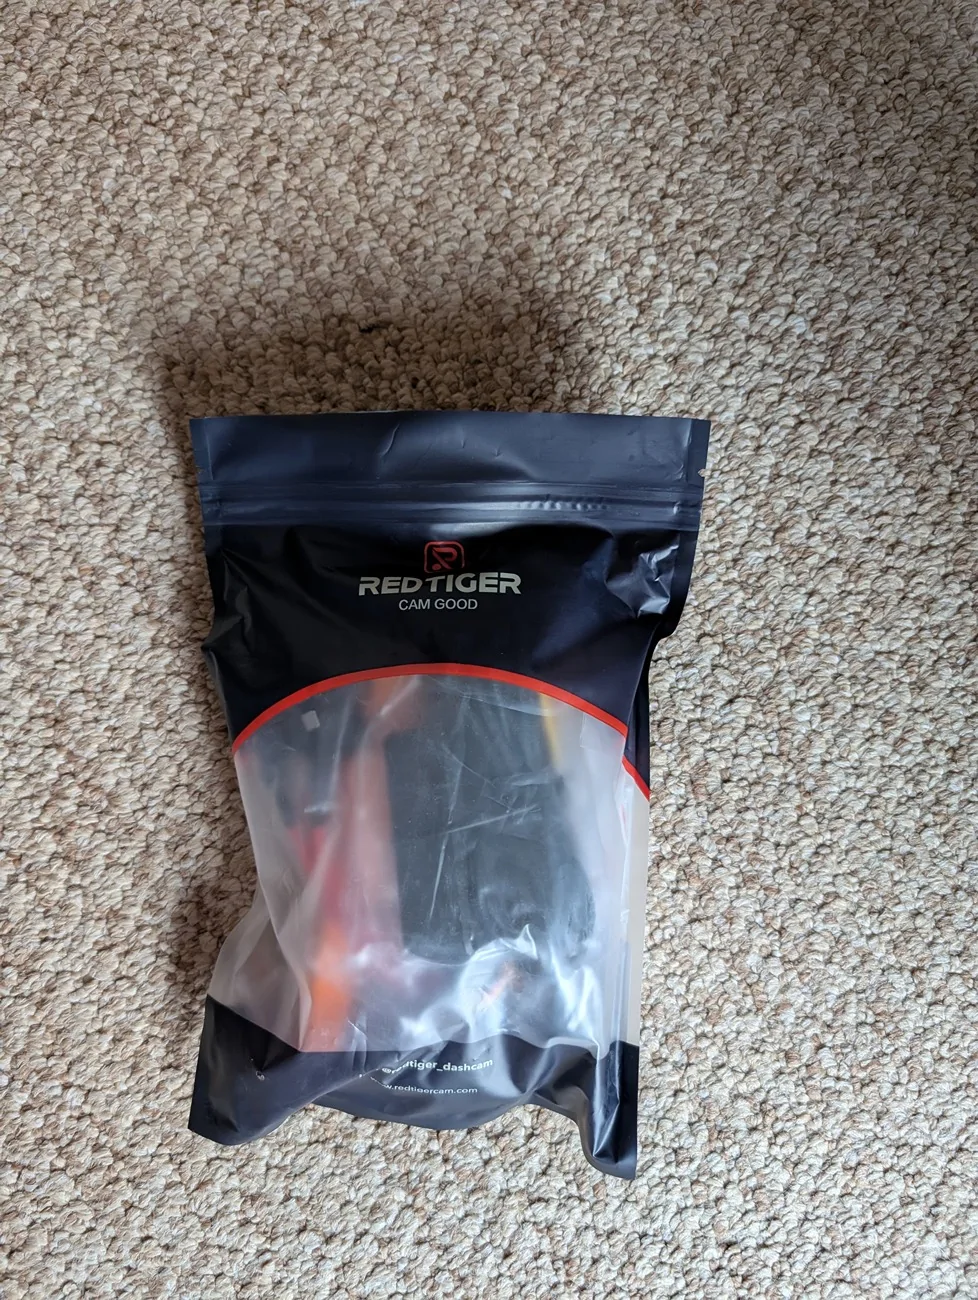
My camera arrived in a plastic pouch from RedTiger, delivered by FedEx. Opening the box you find a diagram sheet, and underneath it the camera along with parts boxes. They also included a separate package for the hardwiring of the camera.
For those that don’t want to hardwire the camera, there is an included adapter to plug into a 12v outlet, and that eliminates finding the right fuses as well as using the add-a-circuit.
I read through the 3 booklets that came with the products. The main User Manual is 24 pages of not much content. Installation instructions are 4 pages that lack much detail. First page told me to insert the memory card that was already inserted. The App Quick Book explains briefly how to use the app. The Multi-Size Type-C Hardwire Kit booklet says as a subtitle “How to install without vehicle fuse box manual”, which is quite confusing. I found a few references like this that seem to need some translation tweaking. Interesting, the version online is V1.0, mines is V2.0, and they added this confusing language, at least confusing to me.
Before proceeding, I then decided to cheat, i.e. see what others have experienced in installing this product or similar products, by searching the forum. Good thing I did because several threads were invaluable to me, particularly explaining the fuses and that the Mach-E and Lightning use different types of fuses than the kit includes (more info later), and the nuances of removing the a-pillar on the Lightning so you don't rip off the speaker wire. I had no tool to remove the cover that went in the small opening, so a big hook with a tiny point on it worked great.
I started out on the Lightning discussing with my wife where on the windshield we wanted to put the camera. The problem with installing the camera there is that you can’t easily reach the buttons, but in daily use that shouldn’t matter. And, it has voice commands, (referenced later).
Here's the front camera mounted. Note that the plastic sheet is not supposed to be in front of the lens.

Now that I knew where the front camera is going, I needed to figure out how to run the wires. Up to the headliner was obvious, then across and down the a-pillar. I quickly decided that the back camera wire was going to run on the floor, not the headliner, because of the airbags installed plus the moonroof, and my desire to not lower the headliner because I doubted it would ever be the same. Note that the videos on the RedTiger site show the cable being installed in the edge of the a-pillar, and then the headliner, ignoring the reality that the airbags are behind there. IMO, this is dangerous.
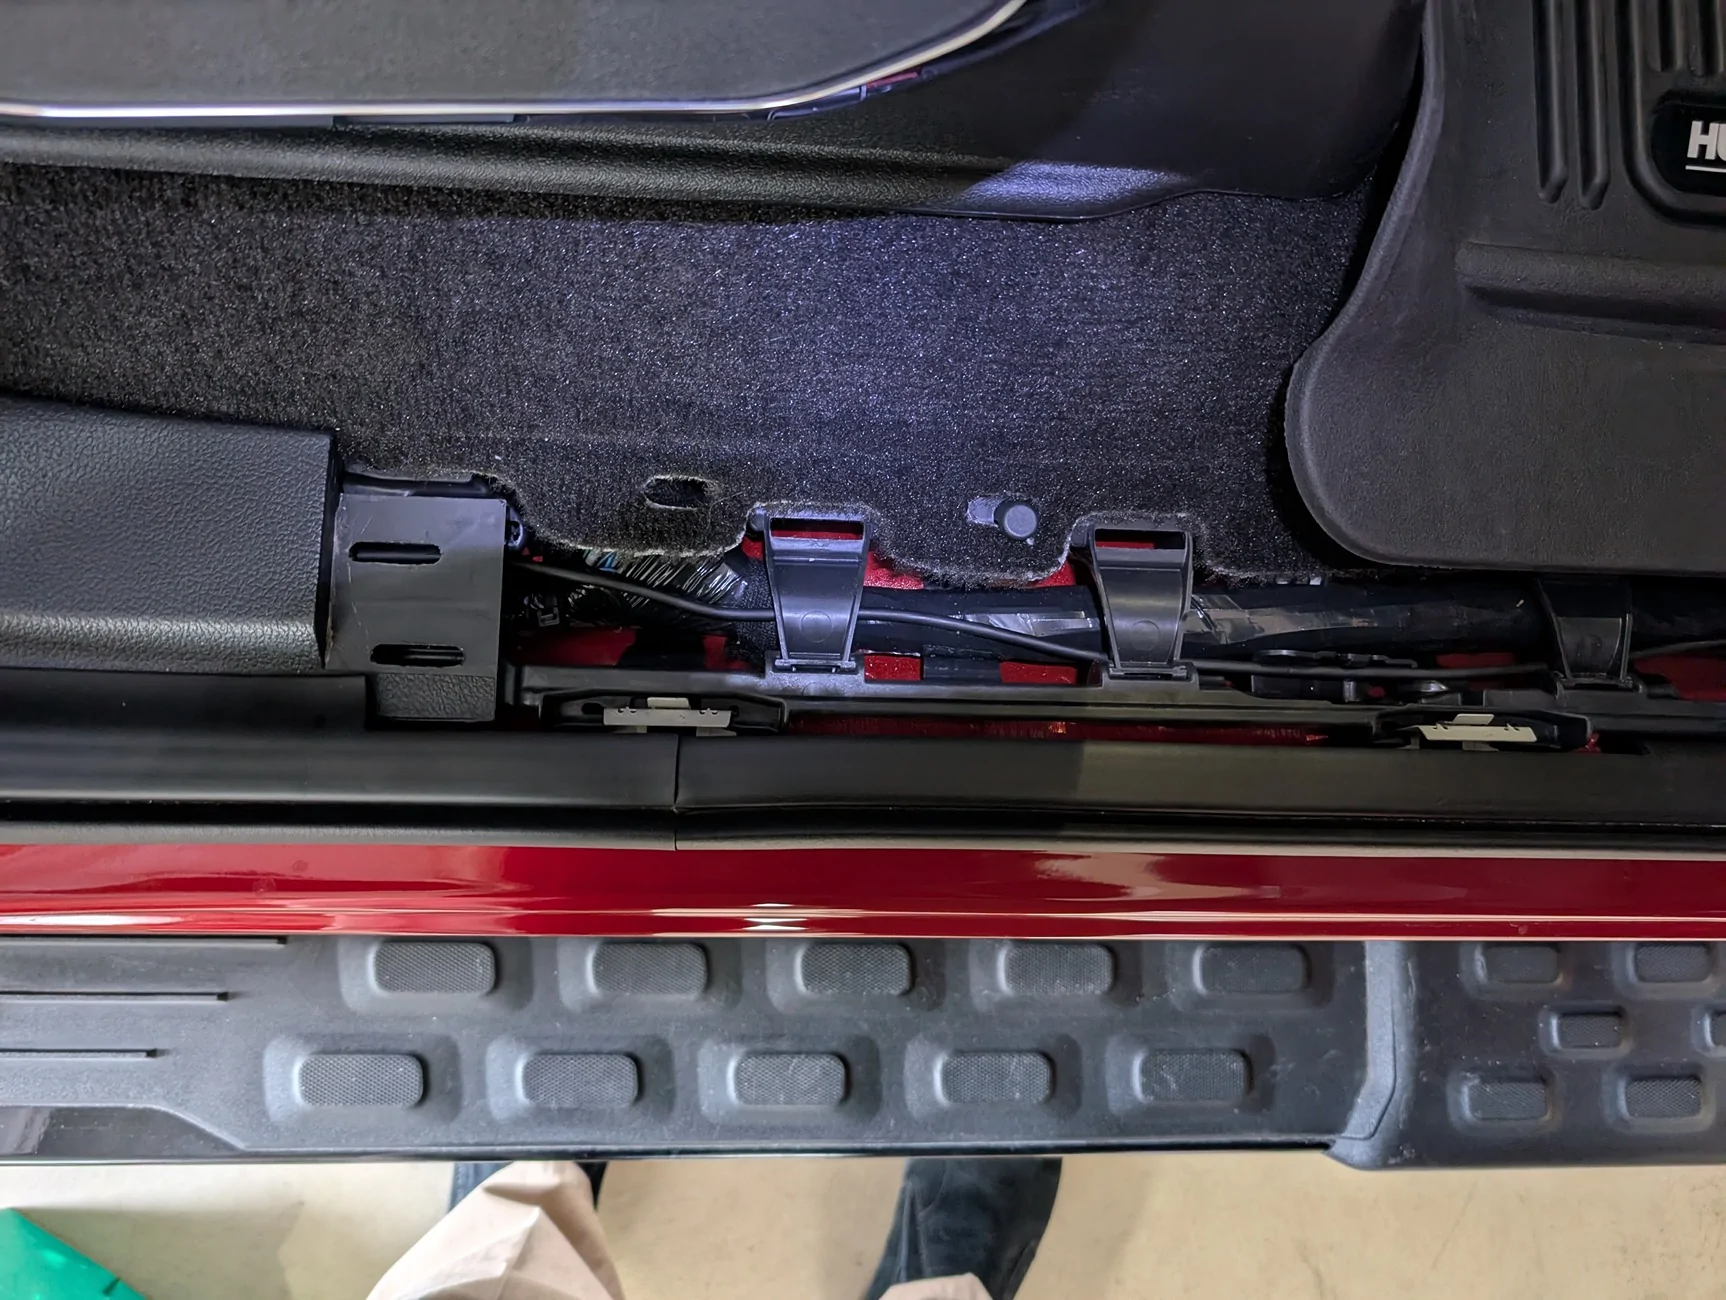
I proceeded to remove the a-pillar cover, the side cover by the door, and the front door edge panel and rear door edge panels. I mounted the camera as we had decided, then plugged in the wires, noting that the wire for the hardwired system is a 90 degree angle, allowing closer placement to the headliner, but the one for the back camera is not. I noted this in feedback to the company. I ran the wires to the headliner, making sure to ziptie them to the wires behind the airbag. Down the a-pillar, then dropped down through the dash. The hardwire kit wire went towards the fusebox, the back camera wire went further down and then across the floor to the rear. I had measured and knew it would be close, and it was, in fact it could be 3 feet longer but I made it work. You need pry tools, the tiny orange tool they provide is good for stuffing but not prying.
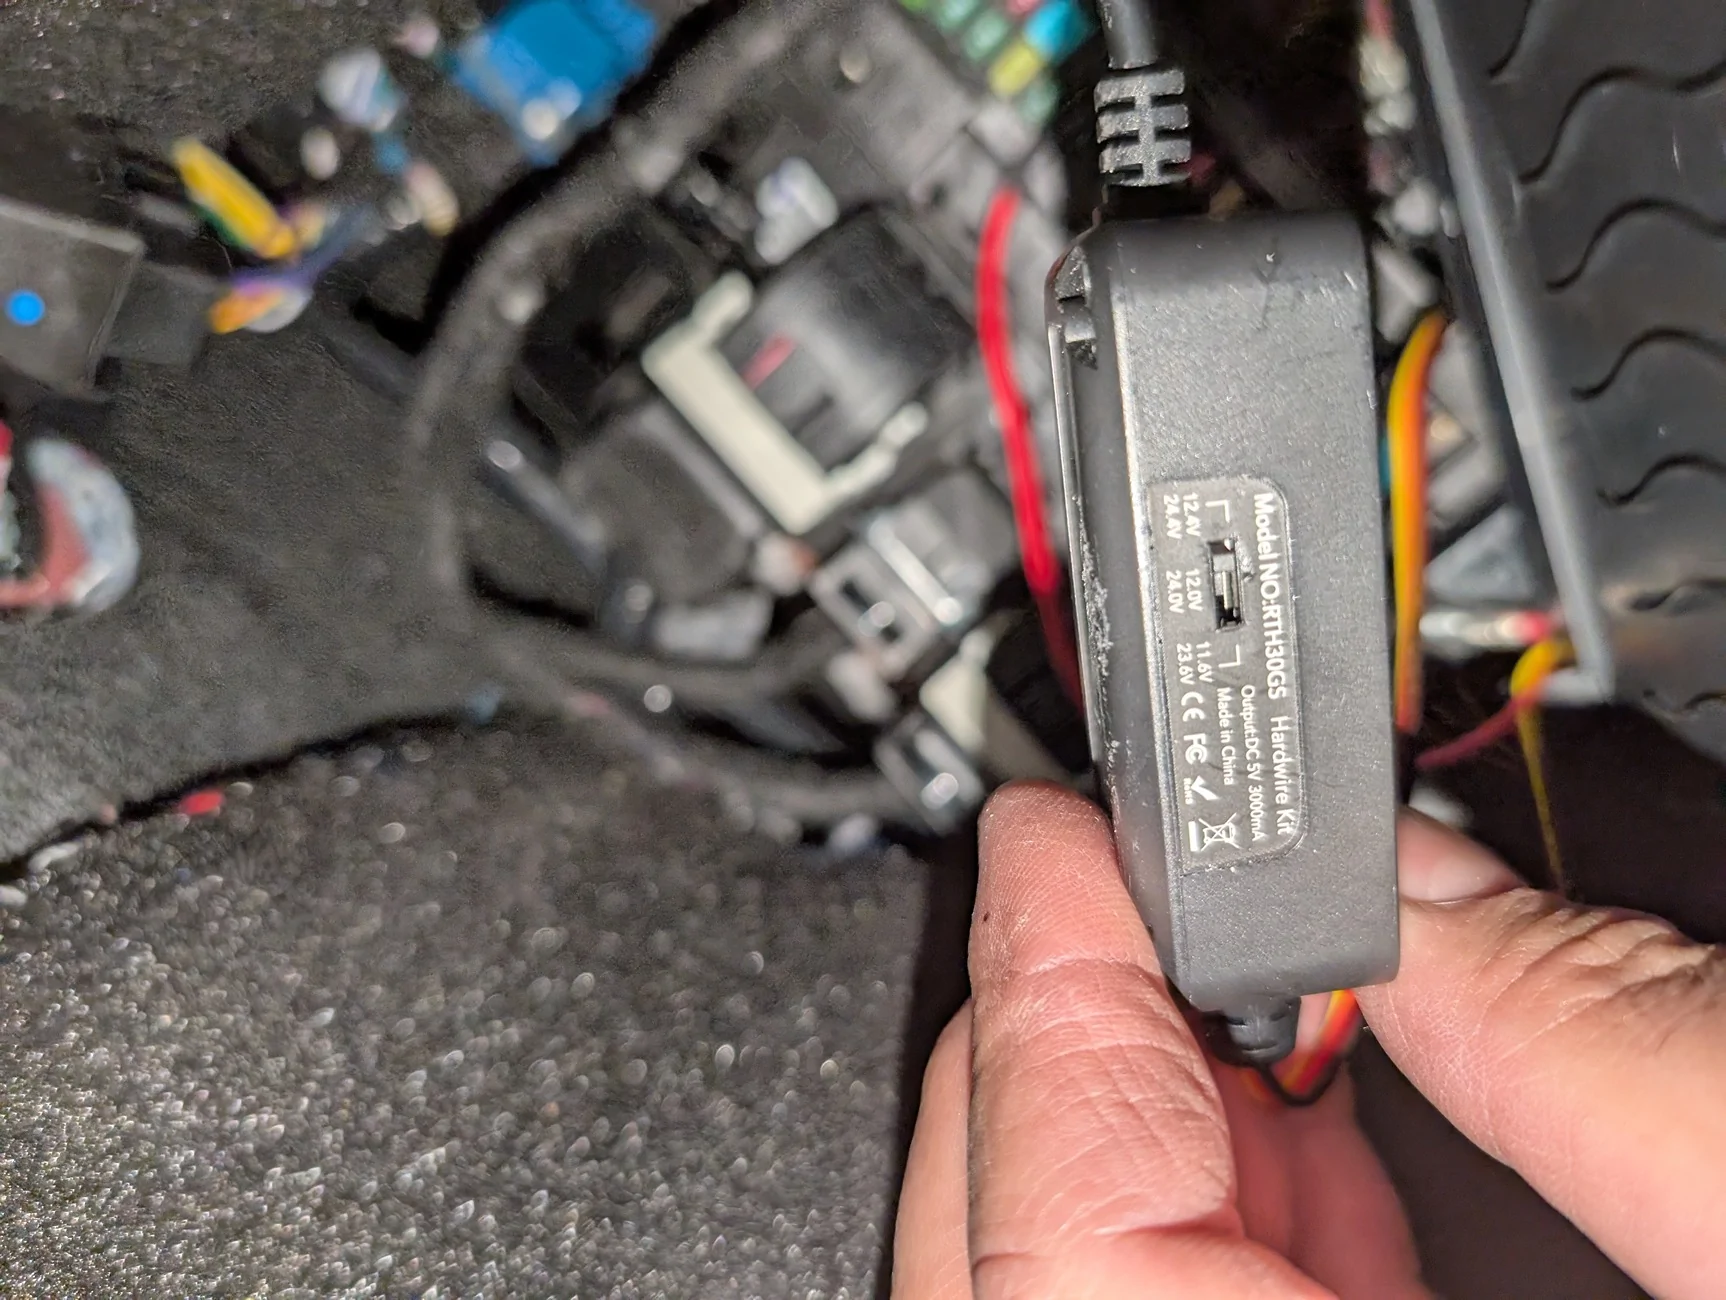
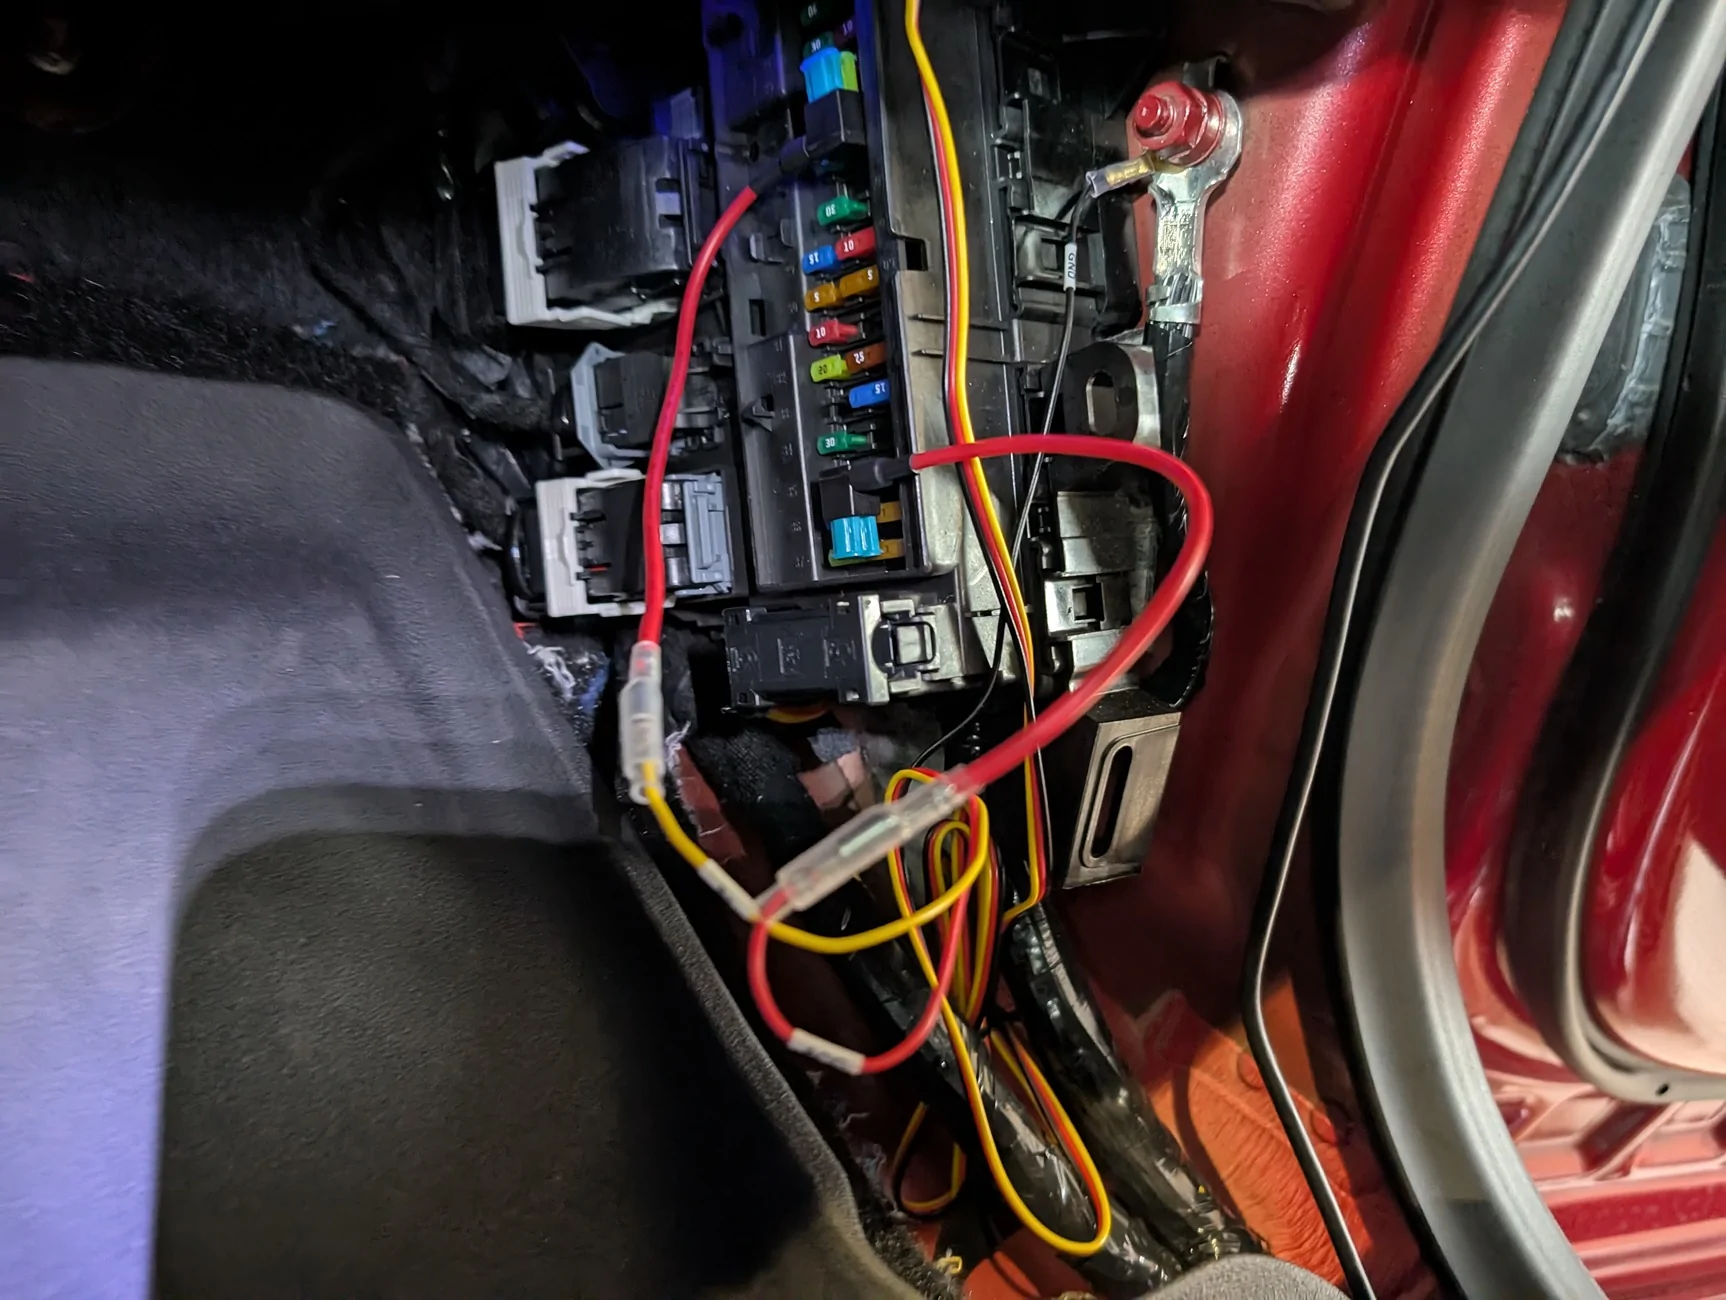
I went to work accessing the front fuse box. It’s a pain in the butt, but I had researched ahead of time what fuses I would likely use. Then I laid down with a poor headlamp on, trying to read the tiny numbers in black on a black background, holding the diagram next to me. Very comfortable. I had decided to use 17-18 for the switched fuse, and discovered it had 3 blades, which is a Micro3 fuse. Did my research and some Googling and discovered that Mach-Es and Lightnings use Micro3 for switched fuses. Well, the add-a-taps included (4 of them) did not include Micro3… More search and learned I could use a Micro2 tap and occupy the left and middle positions, leaving the righthand position open on these unused locations. But now I had to find an extra 15amp type2 fuse to take the second spot on the tap… . I used 4 for the always on fuse, as 5 was too tight a fit. I checked both power leads with a meter to ensure they had power (17-18 when the car was started by my wife, 4 always).
I didn’t bother following the guide that @RedTiger provides, since I had read the other threads and used a test meter. The voltage restricting device (they call it a “digital tube”) that they provide has 3 settings – 11.6V, 12.0V, and 12.4V. I set it on 12.4V. Right now my camera is set to activate, when parked, only when enough G-Forces are noted.
I didn’t spend a lot of time attaching wires to things because it was very uncomfortable down there. They have nowhere to go.

I haven’t played with the camera much beyond getting daytime and nighttime pictures of each view (front, inside, and rear) as RedTiger requested. I also haven’t yet tested whether I can go out to the vehicle, activate the 12v by starting, then turning off the car, then during the 12 minutes that the 12v stays active transfer photos via WiFi. I pulled the cards to do so, and copying them easily. There seem to be a lot of videos created from a relatively short drive.
I mentioned that the camera has voice control. I found it iffy, and found that while I could switch to the front or rear camera, nothing I tried worked for the inside camera. I found that I could tell it to snap a picture, but also that it would take a picture when I say things that didn’t include the word “picture”. I may not leave the voice control on.
They have an app for the phone, as well as for a Windows PC. The PC app lets you watch the video with a GPS map on the right showing the vehicle moving. It also lets you see all views.
I found the camera buttons annoying in that every time I held the camera, I pushed buttons. I also can’t read the screen from the driver’s seat, but again that was a mounting choice. I need to learn more about looping, all the files created on the storage card, etc.
I liked and didn’t like the plastic sheet they give you to mount on the glass, and mount the camera to that. Makes it easy to remove in the future. But it has scalloped edges which are visible on the glass, and it’s way too big for the attachment points. I will probably use the extra ones provided in the spring to remount on a small piece of plastic. I also have nice fingerprints on the corners of the plastic, it would be great if they supplied some tabs to hold the sheet after you peel it off, similar to those included with my watch or a phone cover.
Overall, I’m happy with the result. I will experiment with the after shutdown usage, right now set on G-Force, to make sure I don’t drain the 12v battery.
I liked the product enough that I became an affiliate, and the links to the product in this review will generate a small payment to me if purchased. I’m noting that here to be upfront.
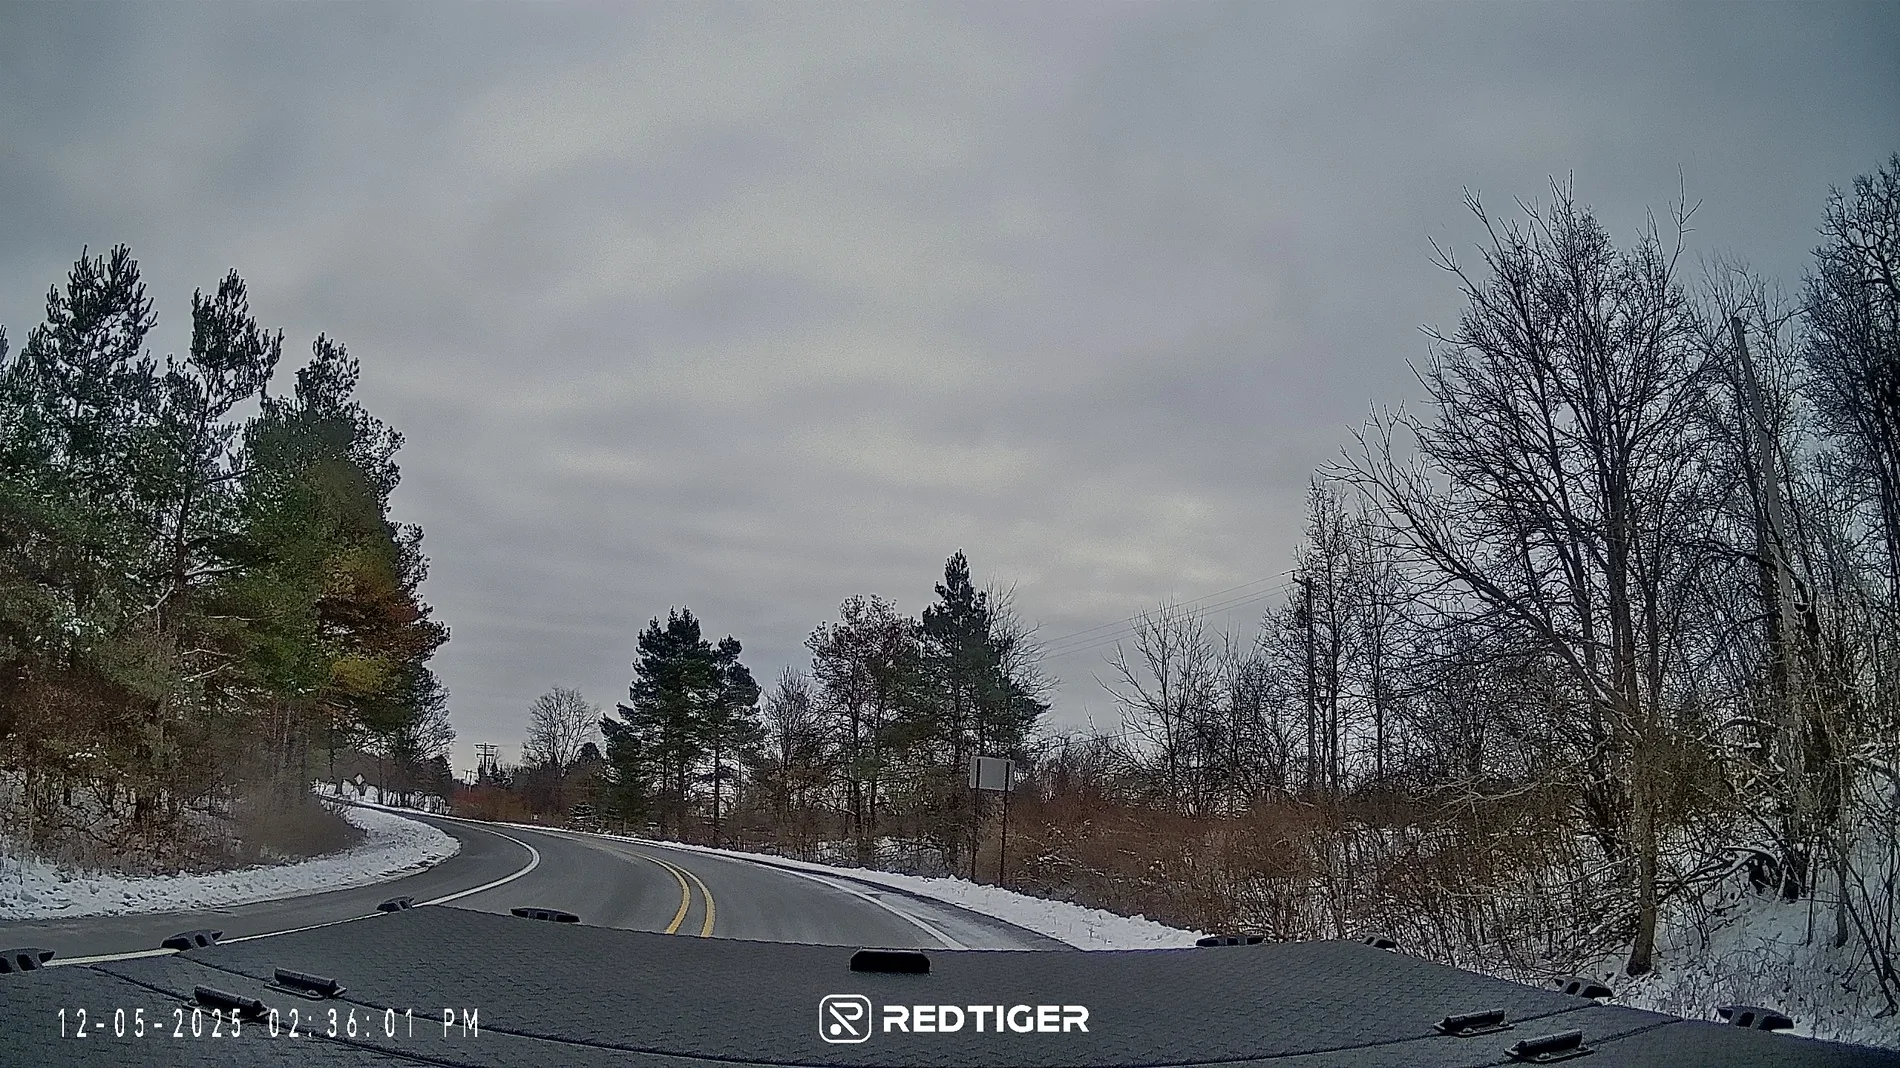
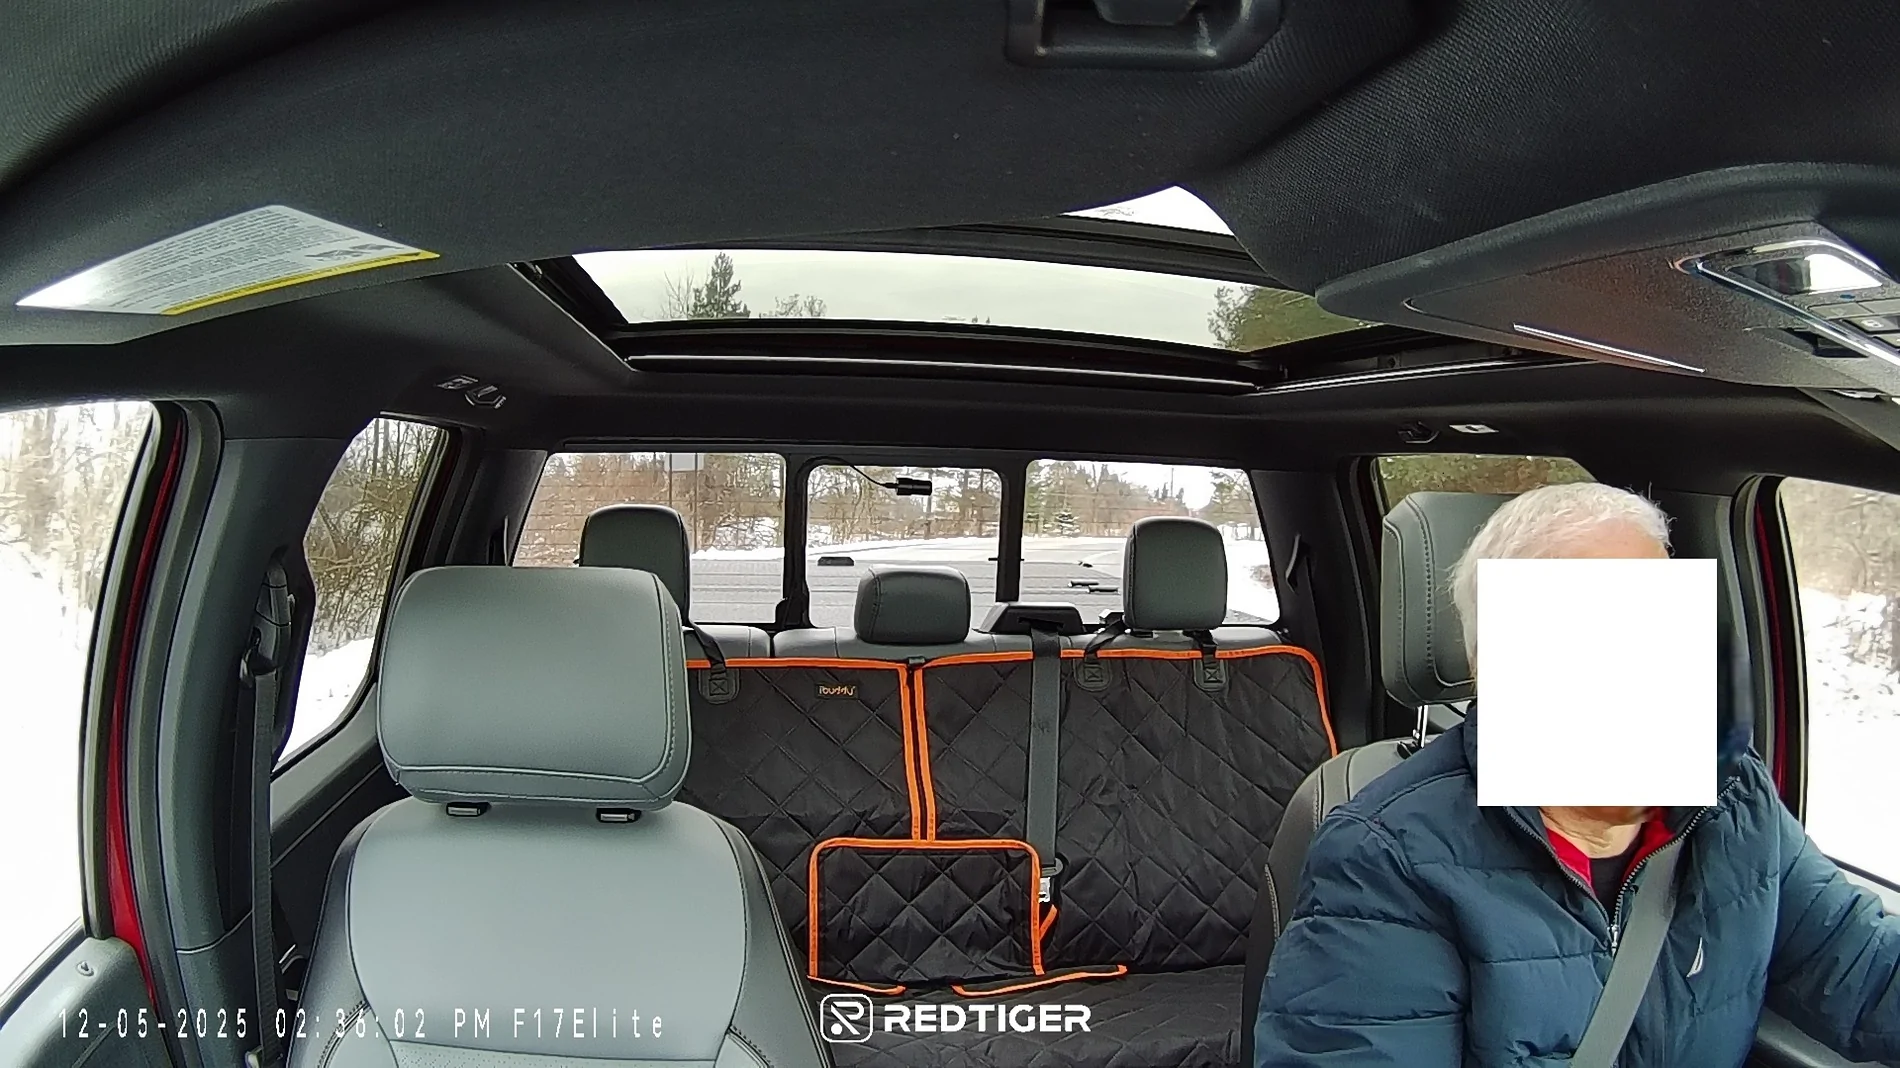
Below are pictures from each view, day and night. See if you can catch the shot that has a little issue with it...

Nice quality camera, installation doesn’t blend in with vehicle like competitor, hardwire kit takes time and effort to install. Currently $219.99 which is very competitive, and the quality is quite good, with 4K.
This is a compensated review – I received the RedTiger F17 Elite camera for no charge after agreeing to write a review and post it here. At no time was I asked to write a positive review, merely to write a review.
I am not a “modifier”, i.e. I don’t tweak my vehicles a lot. I have used FORScan for minor stuff, otherwise the modifications to the Lightning are limited to installing Ford mudflaps, license plate frames, a tonneau cover from Diamondback, mats a bedmat from Husky, a backseat cover, a hitch from MaxxHaul, and using CarScanner on trips. I have never used a dashcam in my life. I am also not a photo editor, not photographer.
I had been thinking about a dashcam for a while, but never moved forward, until now.
Some things to mention upfront. First, working on the Lightning's internal fusebox is not fun. It’s located where the passenger’s right foot would be, so you have to lay on the floor and then look towards the right. Not fun gyrating my over 60 year old body into that space. I received the camera on Friday, November 21st, one of the last nice days here, but didn’t get to working on the installation until temps started to fall and snow (early for us) came down, and Thanksgiving interfered. Much of the installation work was done with temps in the 20s and 30s, not fun. Cold hands combined with cold windshield and back window glass fogging up when installing wasn’t fun, nor was my cold hands pulling off body panels and putting them back.
Back in the day, I would install things in vehicles by running a ground wire, and a 12v wire with an inline fuse. Gone are those days, with all sorts of modules running things. Using Add-A-Circuit fuse taps is new to me, I spent some time learning about them. What I learned that was important are two things. First, the original fuse goes in the bottom slot. Second, the power comes up the outside leg to the new circuit, which matters. I also figured out that if I was using an unused location with a 5 or 7.5amps fuse, and the new circuit is 15amps, then the original fuse can’t be less than 15amps (at least that’s what I reasoned), so I had to find ways to accomplish that.
My camera arrived in a plastic pouch from RedTiger, delivered by FedEx. Opening the box you find a diagram sheet, and underneath it the camera along with parts boxes. They also included a separate package for the hardwiring of the camera.
For those that don’t want to hardwire the camera, there is an included adapter to plug into a 12v outlet, and that eliminates finding the right fuses as well as using the add-a-circuit.
I read through the 3 booklets that came with the products. The main User Manual is 24 pages of not much content. Installation instructions are 4 pages that lack much detail. First page told me to insert the memory card that was already inserted. The App Quick Book explains briefly how to use the app. The Multi-Size Type-C Hardwire Kit booklet says as a subtitle “How to install without vehicle fuse box manual”, which is quite confusing. I found a few references like this that seem to need some translation tweaking. Interesting, the version online is V1.0, mines is V2.0, and they added this confusing language, at least confusing to me.
Before proceeding, I then decided to cheat, i.e. see what others have experienced in installing this product or similar products, by searching the forum. Good thing I did because several threads were invaluable to me, particularly explaining the fuses and that the Mach-E and Lightning use different types of fuses than the kit includes (more info later), and the nuances of removing the a-pillar on the Lightning so you don't rip off the speaker wire. I had no tool to remove the cover that went in the small opening, so a big hook with a tiny point on it worked great.
I started out on the Lightning discussing with my wife where on the windshield we wanted to put the camera. The problem with installing the camera there is that you can’t easily reach the buttons, but in daily use that shouldn’t matter. And, it has voice commands, (referenced later).
Here's the front camera mounted. Note that the plastic sheet is not supposed to be in front of the lens.

Now that I knew where the front camera is going, I needed to figure out how to run the wires. Up to the headliner was obvious, then across and down the a-pillar. I quickly decided that the back camera wire was going to run on the floor, not the headliner, because of the airbags installed plus the moonroof, and my desire to not lower the headliner because I doubted it would ever be the same. Note that the videos on the RedTiger site show the cable being installed in the edge of the a-pillar, and then the headliner, ignoring the reality that the airbags are behind there. IMO, this is dangerous.
I proceeded to remove the a-pillar cover, the side cover by the door, and the front door edge panel and rear door edge panels. I mounted the camera as we had decided, then plugged in the wires, noting that the wire for the hardwired system is a 90 degree angle, allowing closer placement to the headliner, but the one for the back camera is not. I noted this in feedback to the company. I ran the wires to the headliner, making sure to ziptie them to the wires behind the airbag. Down the a-pillar, then dropped down through the dash. The hardwire kit wire went towards the fusebox, the back camera wire went further down and then across the floor to the rear. I had measured and knew it would be close, and it was, in fact it could be 3 feet longer but I made it work. You need pry tools, the tiny orange tool they provide is good for stuffing but not prying.
I went to work accessing the front fuse box. It’s a pain in the butt, but I had researched ahead of time what fuses I would likely use. Then I laid down with a poor headlamp on, trying to read the tiny numbers in black on a black background, holding the diagram next to me. Very comfortable. I had decided to use 17-18 for the switched fuse, and discovered it had 3 blades, which is a Micro3 fuse. Did my research and some Googling and discovered that Mach-Es and Lightnings use Micro3 for switched fuses. Well, the add-a-taps included (4 of them) did not include Micro3… More search and learned I could use a Micro2 tap and occupy the left and middle positions, leaving the righthand position open on these unused locations. But now I had to find an extra 15amp type2 fuse to take the second spot on the tap… . I used 4 for the always on fuse, as 5 was too tight a fit. I checked both power leads with a meter to ensure they had power (17-18 when the car was started by my wife, 4 always).
I didn’t bother following the guide that @RedTiger provides, since I had read the other threads and used a test meter. The voltage restricting device (they call it a “digital tube”) that they provide has 3 settings – 11.6V, 12.0V, and 12.4V. I set it on 12.4V. Right now my camera is set to activate, when parked, only when enough G-Forces are noted.
I didn’t spend a lot of time attaching wires to things because it was very uncomfortable down there. They have nowhere to go.


I haven’t played with the camera much beyond getting daytime and nighttime pictures of each view (front, inside, and rear) as RedTiger requested. I also haven’t yet tested whether I can go out to the vehicle, activate the 12v by starting, then turning off the car, then during the 12 minutes that the 12v stays active transfer photos via WiFi. I pulled the cards to do so, and copying them easily. There seem to be a lot of videos created from a relatively short drive.
I mentioned that the camera has voice control. I found it iffy, and found that while I could switch to the front or rear camera, nothing I tried worked for the inside camera. I found that I could tell it to snap a picture, but also that it would take a picture when I say things that didn’t include the word “picture”. I may not leave the voice control on.
They have an app for the phone, as well as for a Windows PC. The PC app lets you watch the video with a GPS map on the right showing the vehicle moving. It also lets you see all views.
I found the camera buttons annoying in that every time I held the camera, I pushed buttons. I also can’t read the screen from the driver’s seat, but again that was a mounting choice. I need to learn more about looping, all the files created on the storage card, etc.
I liked and didn’t like the plastic sheet they give you to mount on the glass, and mount the camera to that. Makes it easy to remove in the future. But it has scalloped edges which are visible on the glass, and it’s way too big for the attachment points. I will probably use the extra ones provided in the spring to remount on a small piece of plastic. I also have nice fingerprints on the corners of the plastic, it would be great if they supplied some tabs to hold the sheet after you peel it off, similar to those included with my watch or a phone cover.
Overall, I’m happy with the result. I will experiment with the after shutdown usage, right now set on G-Force, to make sure I don’t drain the 12v battery.
I liked the product enough that I became an affiliate, and the links to the product in this review will generate a small payment to me if purchased. I’m noting that here to be upfront.
Below are pictures from each view, day and night. See if you can catch the shot that has a little issue with it...


Sponsored
