Mcfly
Well-known member
- Thread starter
- #1
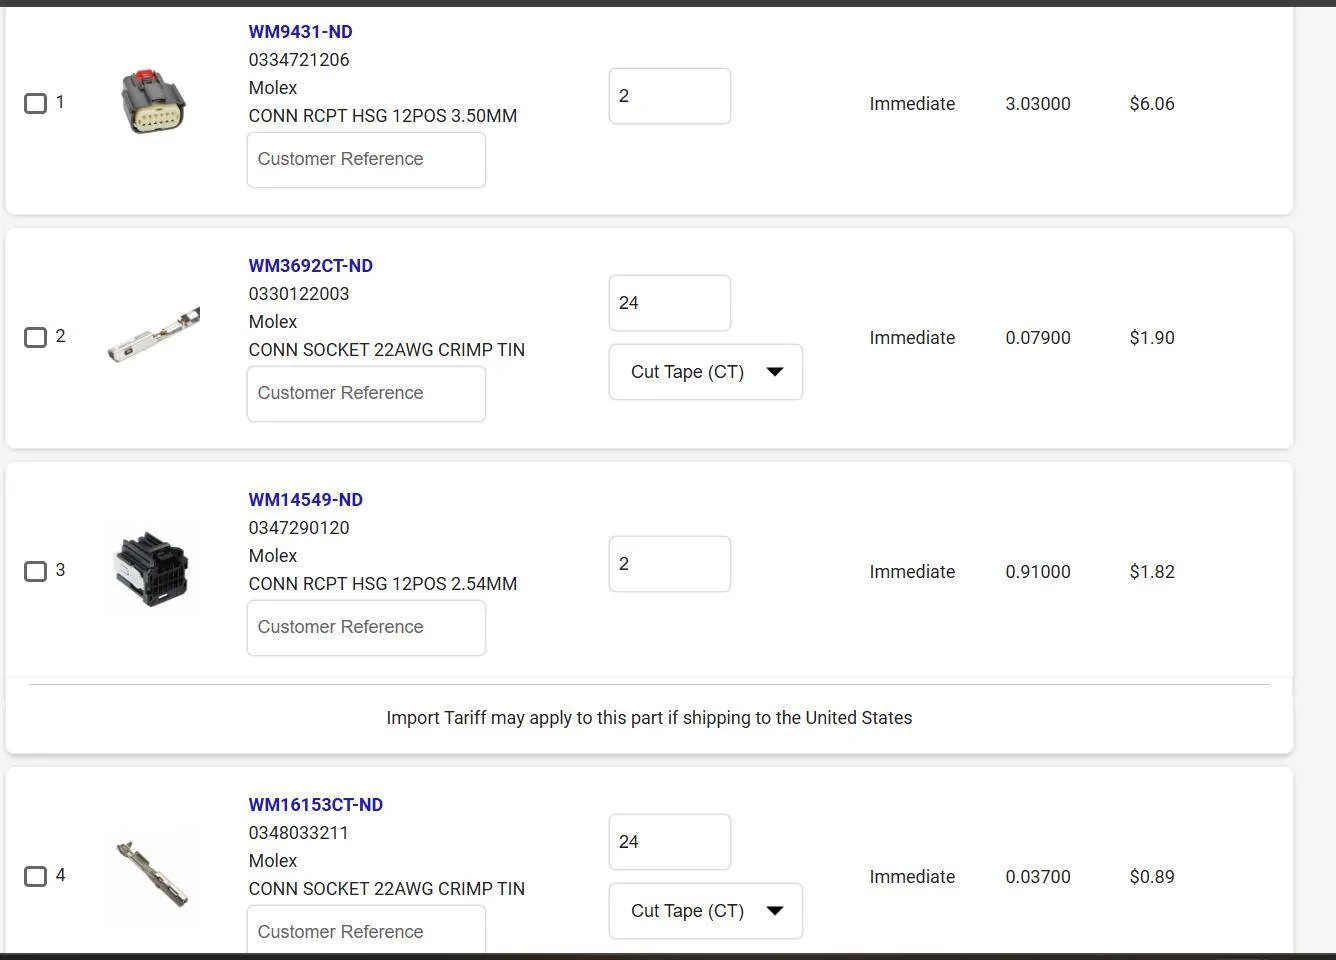
I've seen some aftermarket aux switch installs but hadn't seen anyone post a factory upfitter install on a lightning. I referenced the thread on the Ice forum for the parts and how to make the harness. Shout out to @bordner42 for figuring out the illumination lightning. I purchased the items to make the harness from digikey. You only need 1 of each connector and 12 pins, I ordered extra just incase.
Link to Ice forum thread
https://www.f150gen14.com/forum/threads/upfitter-switch-installation.12438/
Oem Parts
Upfitter switch panel part number M2DZ13D730HA
Overhead console (this can vary depending on your truck, pano roof, rear sliding window or not) mine was no slider or pano roof. If you switch over your internals no need for Forscan. ML3Z18519A70ECT
Relay fuse box (from superduty trucks) NC3Z14A303A
Harness

I ordered the wire off amazon, BNTECHGO 22 Gauge Silicone Wire Kit 10 Color Each 30 ft Flexible 22 AWG Stranded Tinned Copper Wire
Tool to crimp the pins amazon iCrimp SN-28B Dupont Crimping Tool for 3.96mm, 2.54mm, 2.5mm Pitch Dupont, JST XH VH Connectors, AWG 18 to 28
Wire t taps amazon Nilight-50004R 120 Pcs/60 Pairs quick splice wire T Tap
Add a fuse wire
Electrical tape and wire loom
How to make the harness
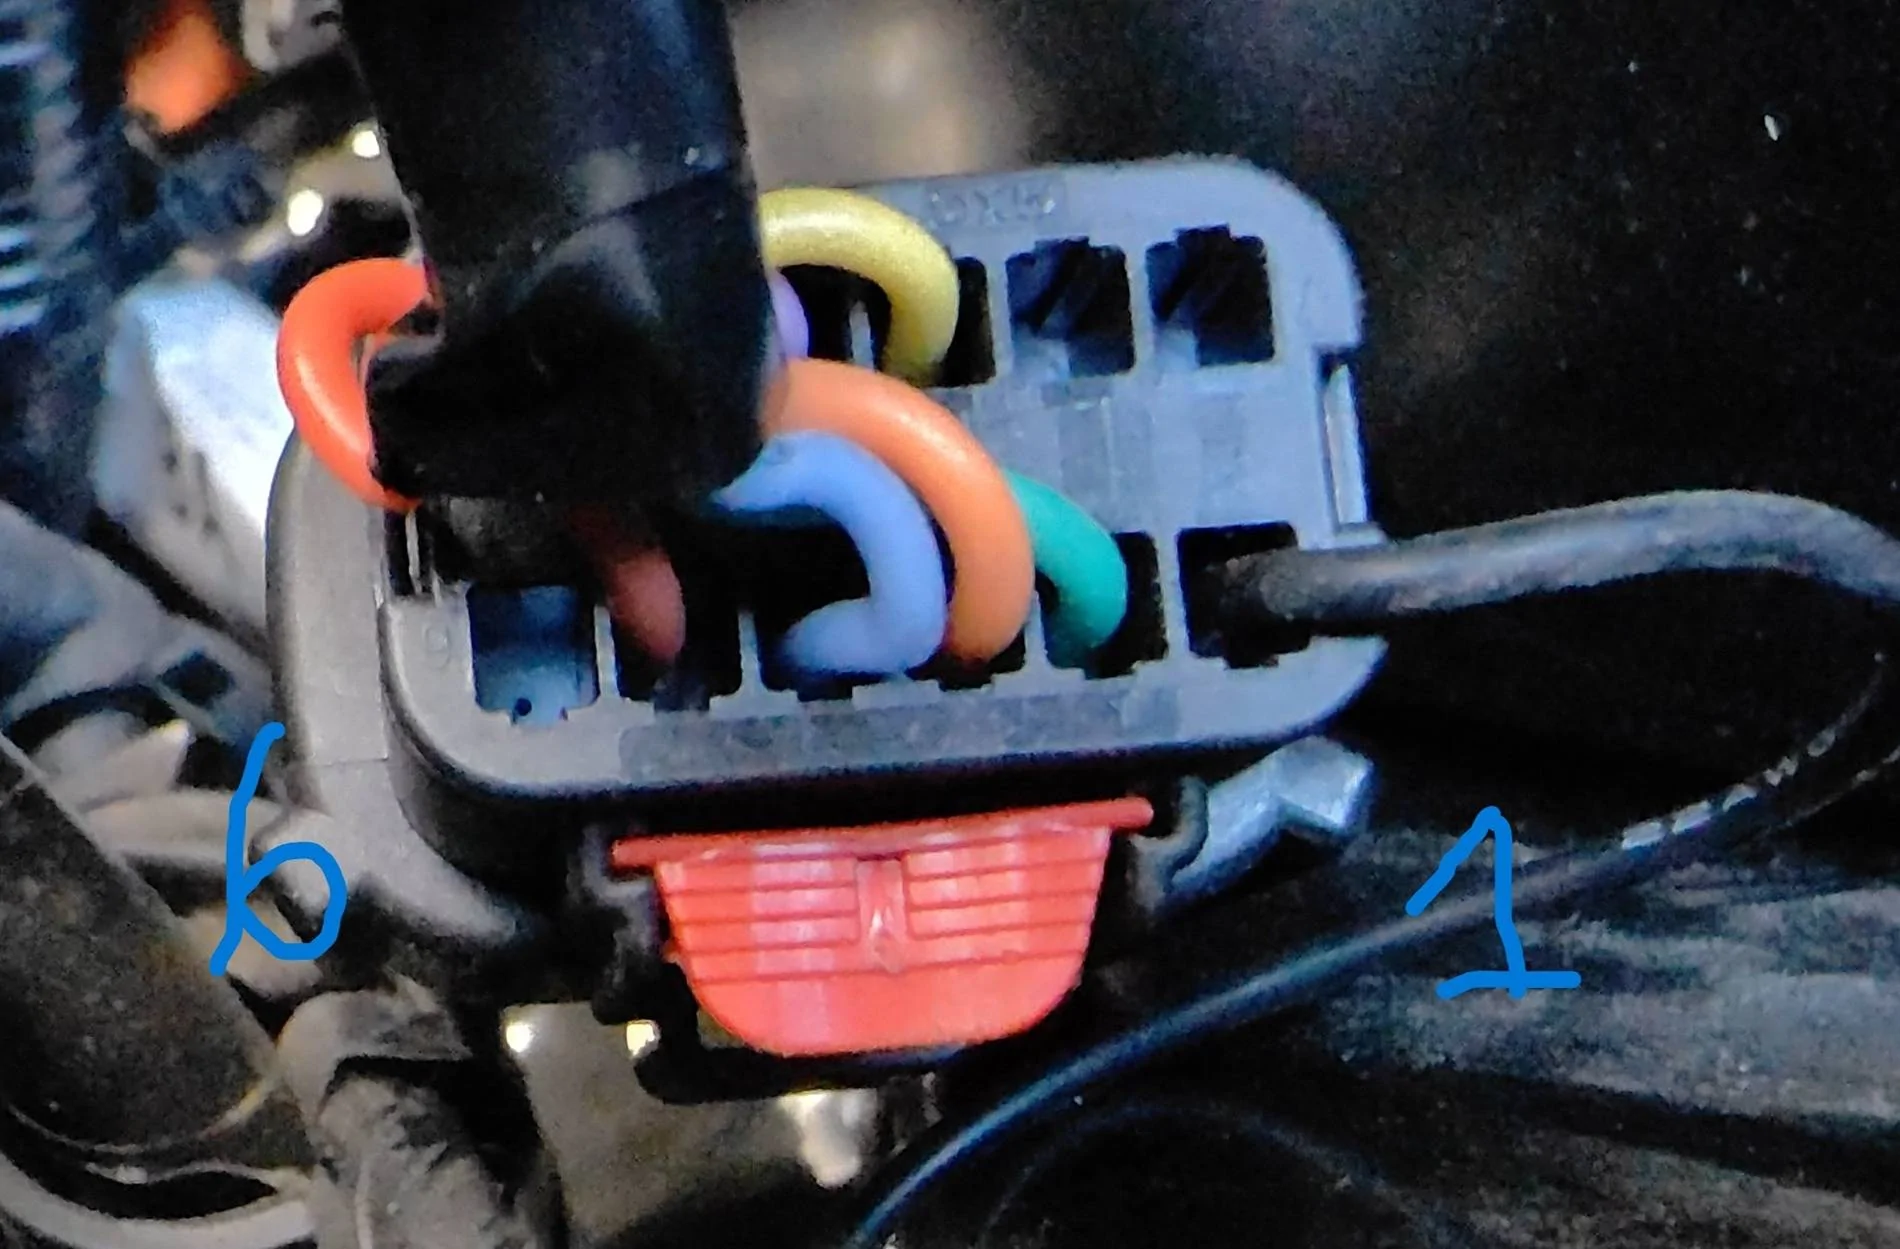
I used the following post on the ice forum to pin the wires to the connectors. You will need to add a t wire tap on the Hot in wire(my red wire) and splice that to an add a fuse. You plug that into the fuse panel inside the truck or behind the frunk tub. The number 11 pin wire on the upfitter switch connector side is the illumination wire. I tapped into the overhead console harness purple/gray wire using a t tap. I also tapped the ground for the upfitter side of the harness(pin 6) into the yellow/black wire on the overhead console harness. A ground must go to the overhead and also a ground to the relay box. I think I made the harness 16 feet long. I wrapped the harness in tape, ran a wire loom on the portion outside the cab. I pinned the upfitter side of the harness but left the relay fuse box side of the harness unpinned so it would be easier to snake it thru the firewall.
Upfitter Switch pin .... relay fuse box pin
9 (hot in run) to 12 (t tap add a fuse to fuse box) my Red Wire
11 (illumination) t tap over head console harness purple/gray wire my pink wire
2 (switch 1) to 2 my green wire
3 (switch 2 )to 9 my yellow wire
6 (ground) to 1 t tapped into the yellow/black wire on the upfitter side, I ran to a gound point on the fuse box relay side my black wires
4 (switch 3) to 3 my orange wire
1 (hot all times) to 5 my brown wire
10 (switch 4) to 4 my blue wire
8 (switch 5) to 11 my white wire
7 (switch 6) to 10 my violet wire
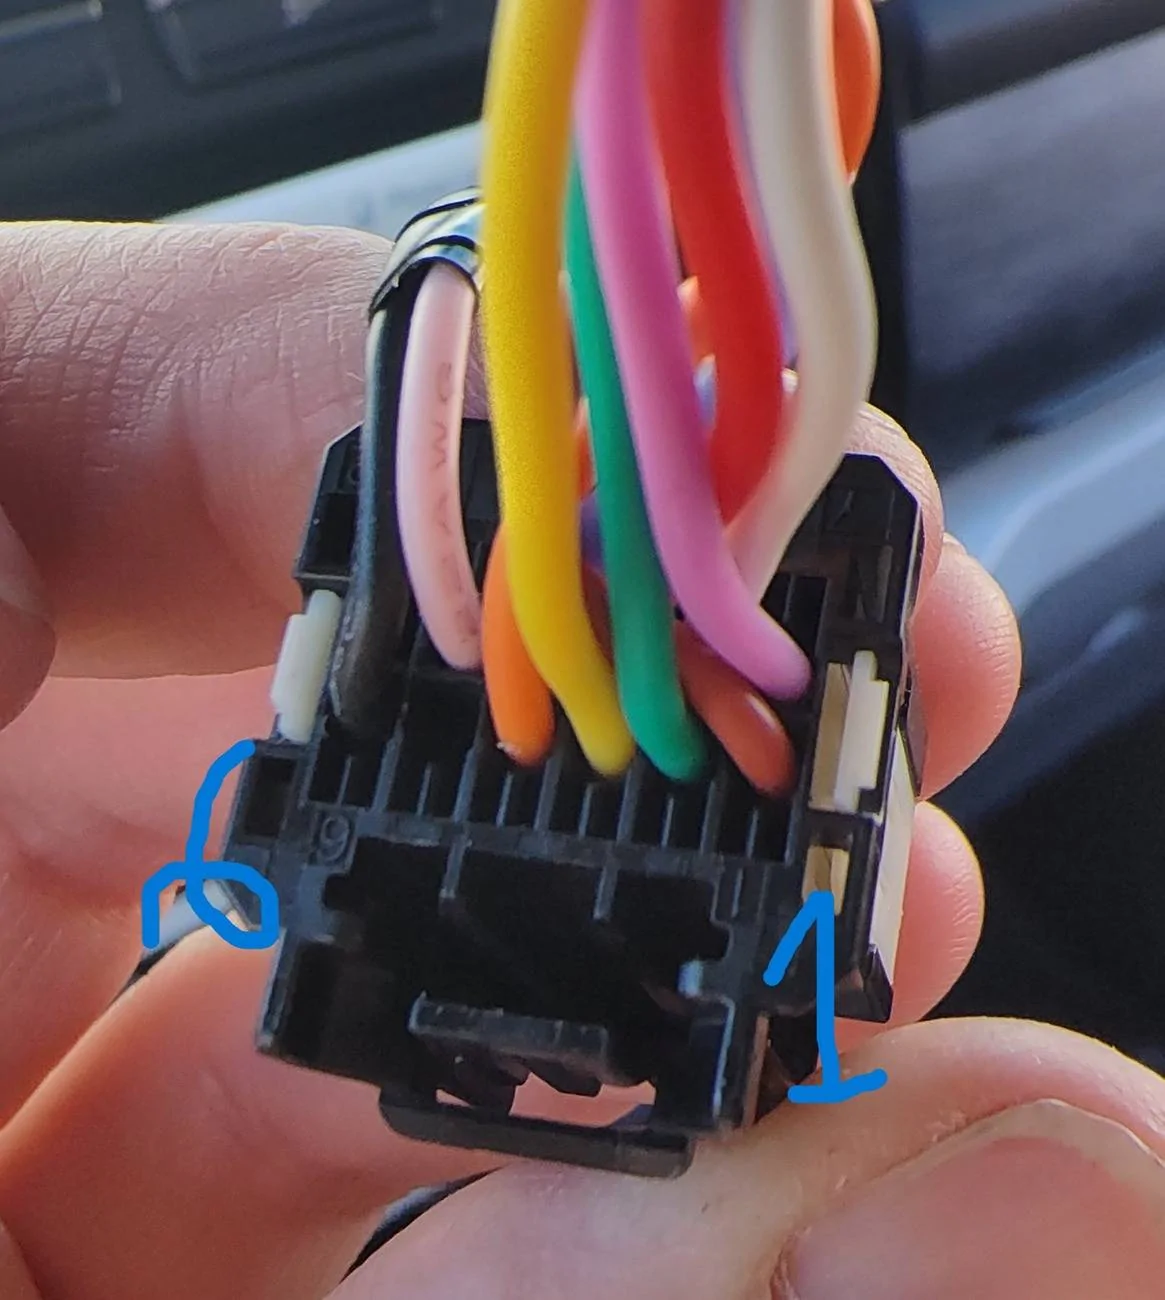
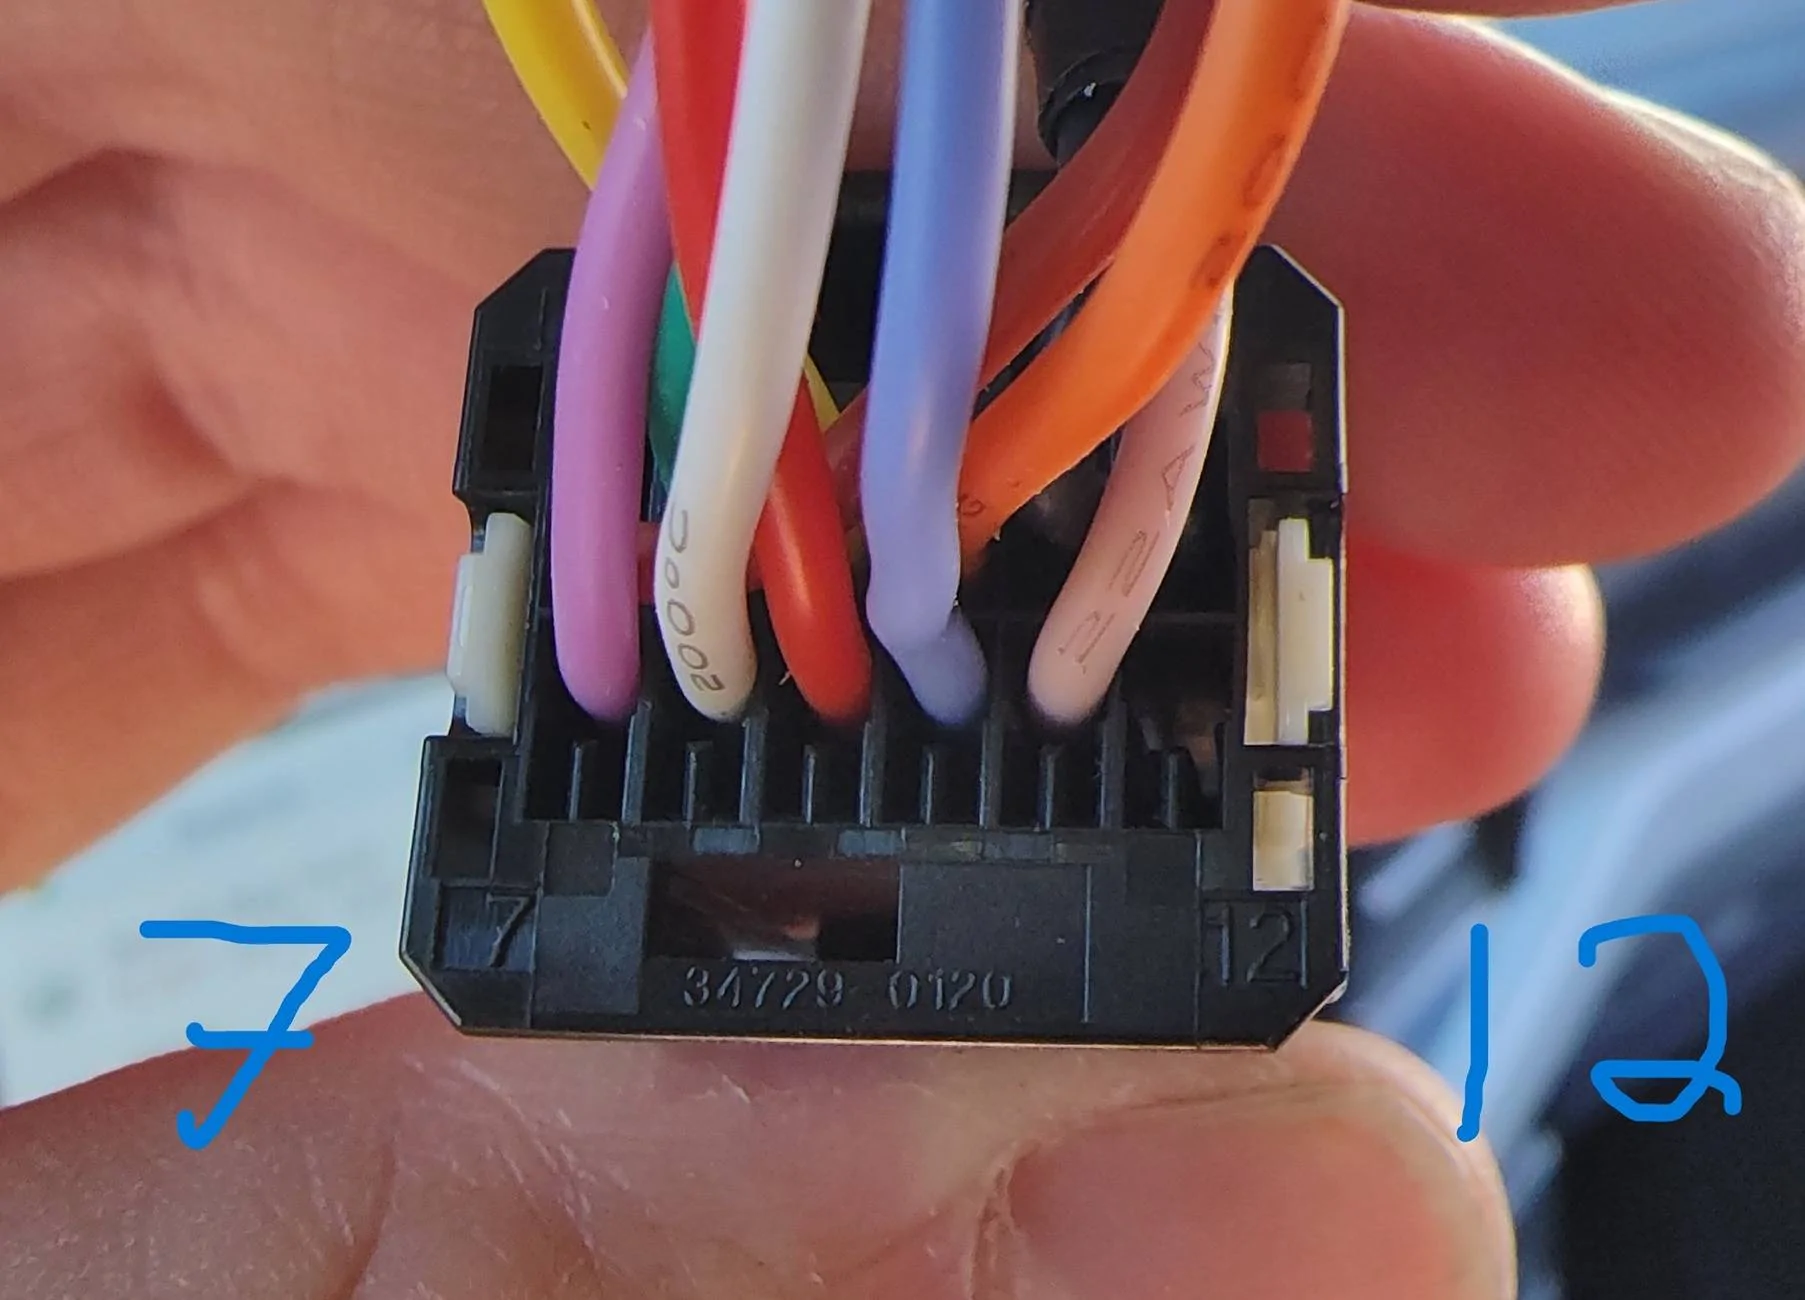
ps look real close on the connector plugs and you will see the pin number.
Pics of the connectors
Upfitter switch side


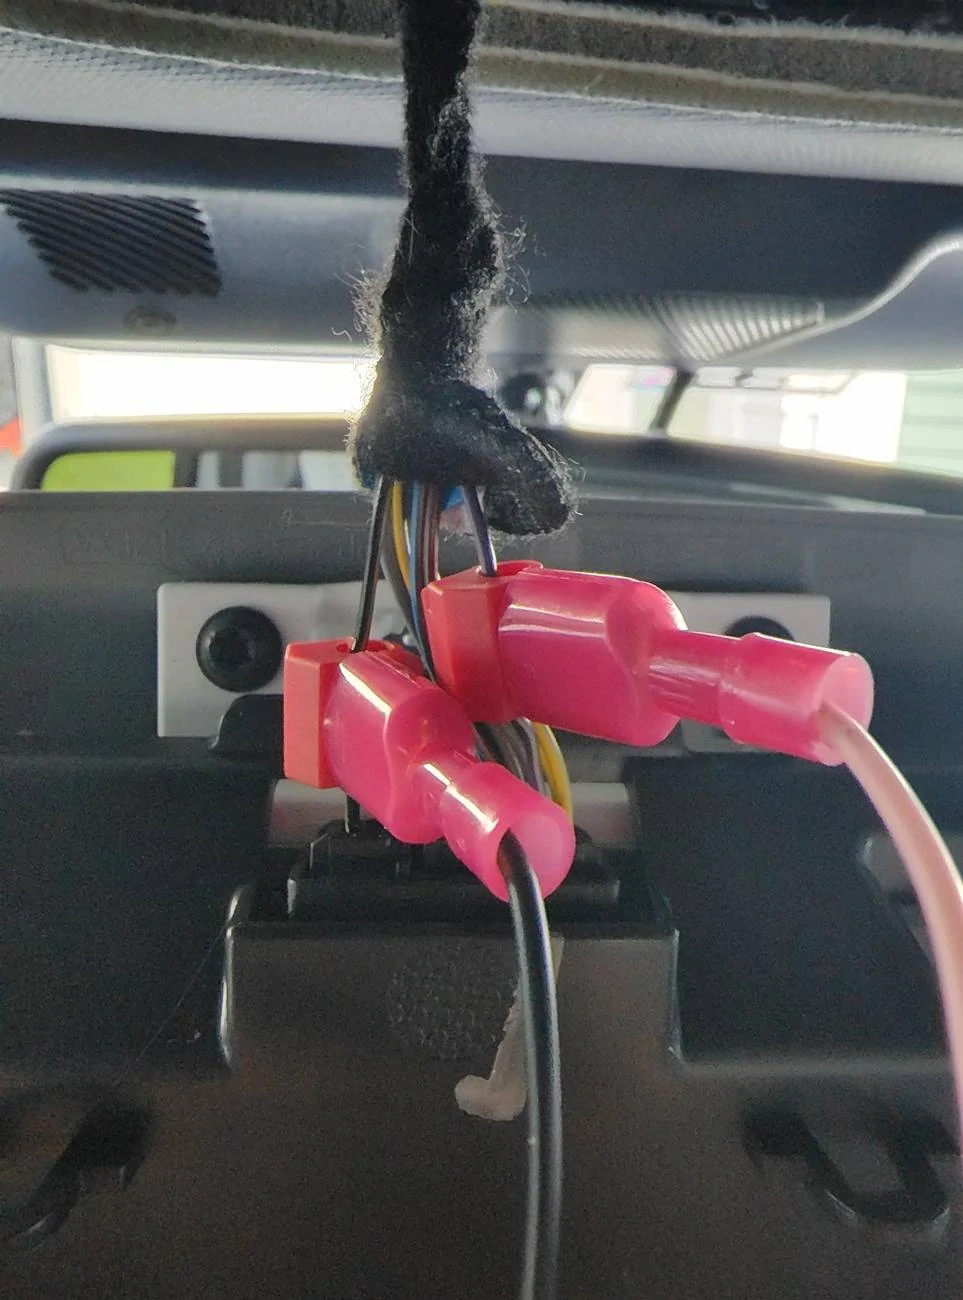
Overhead console t taps

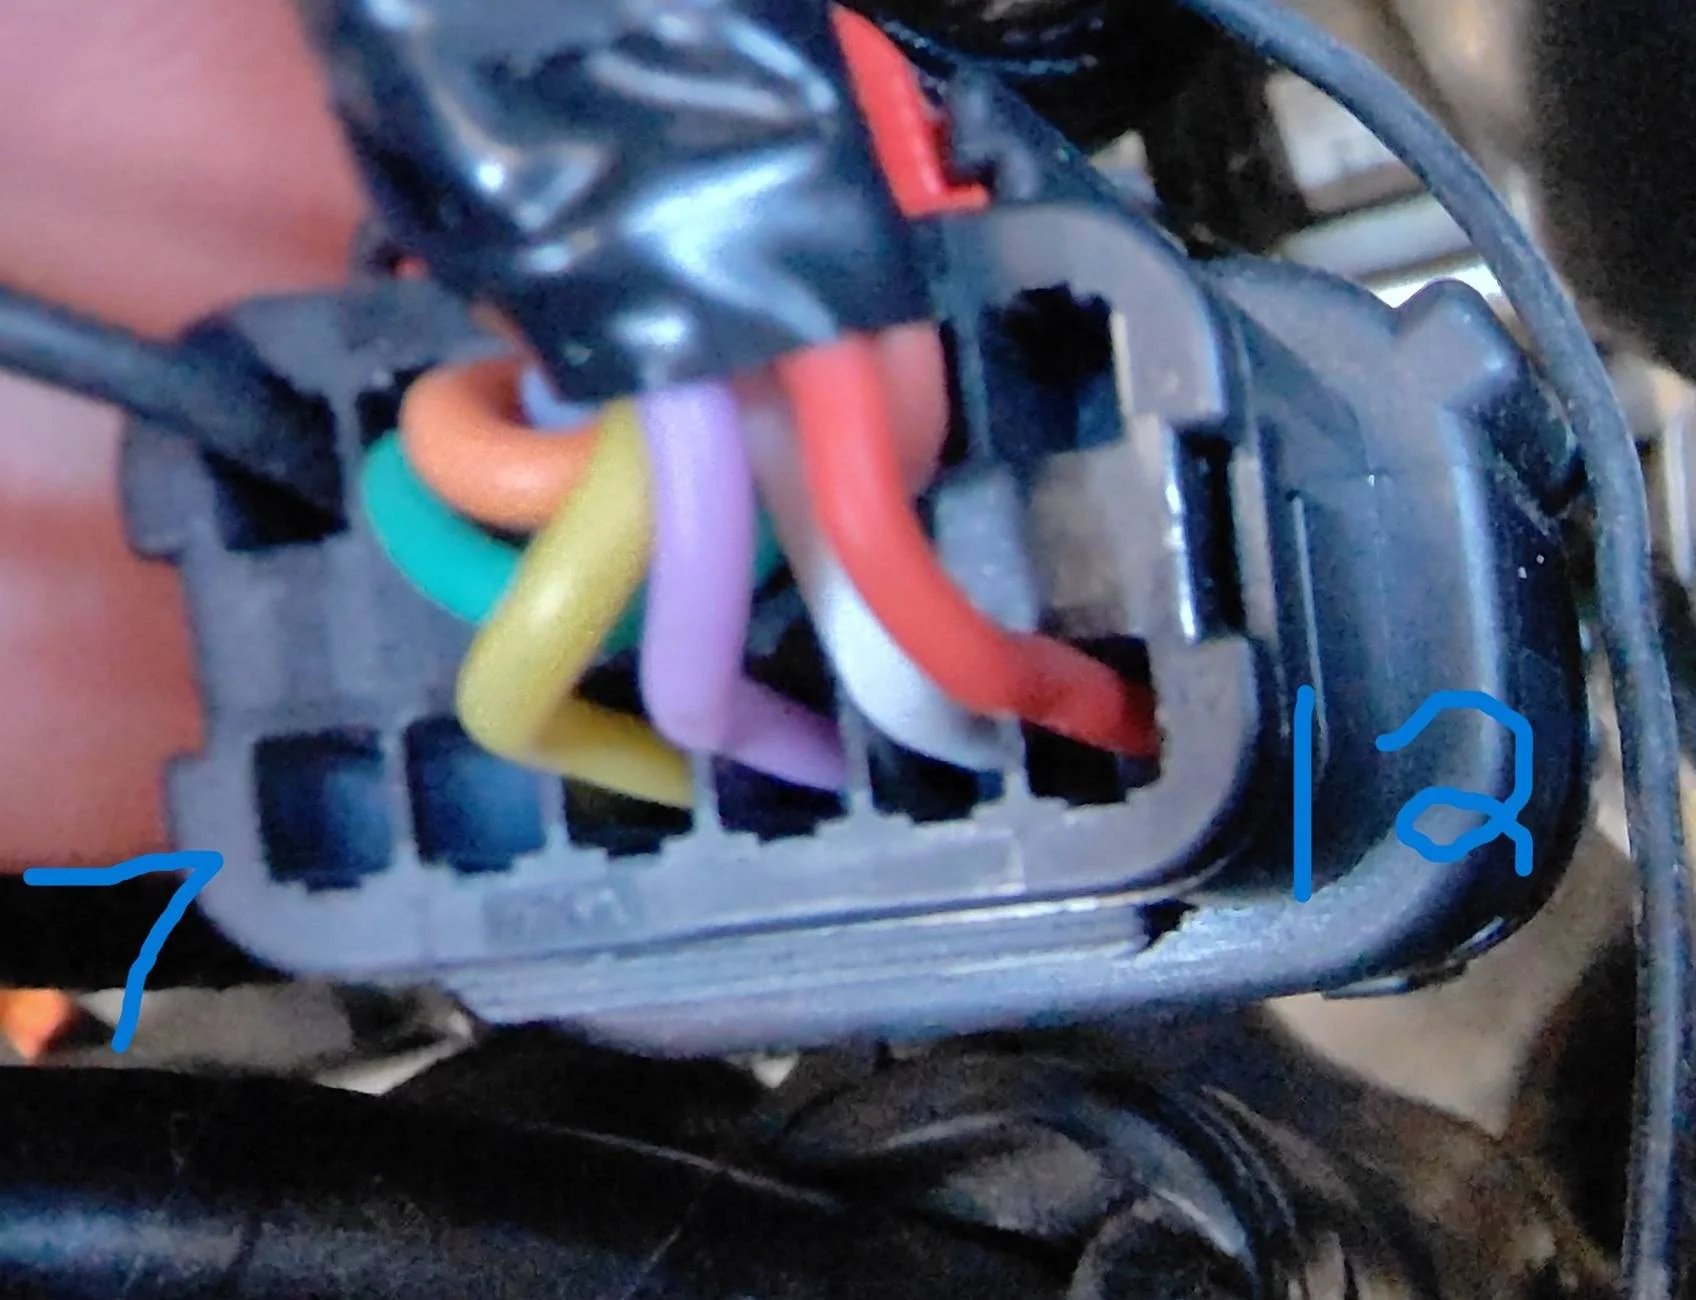
Relay fuse box side


Install instructions
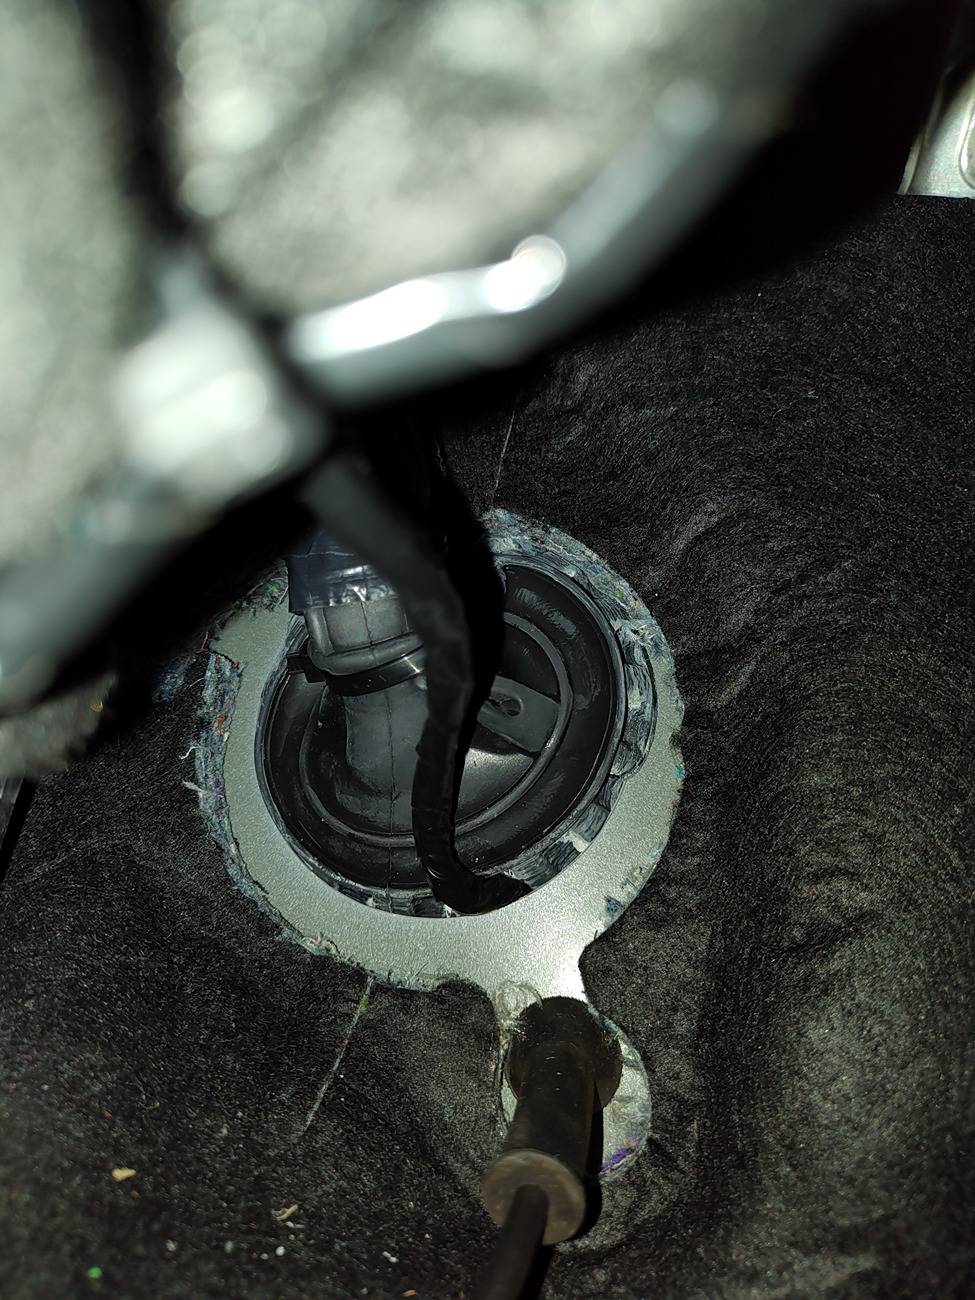
First remove the frunk tub and unplug the battery. Move to the inside of the cab. Remove the overhead console and overhead console harness. T tap the ground wire (yellow/black) and illumination wire (gray/purple) on the overhead harness. Connect those to your ground(pin 6) and illumination(pin 11) wires on the upfitter switch side of the harness. I decided to run my harness thru the main harness grommet on the drivers side foot well. Remove the drivers side a pillar trim then snake the harness thru the head liner, down the a pillar, and into the drivers side foot well. Next reconnect the overhead console wiring harness, connect the upfitter switch side of the harness to the upfitter switches and re install the overhead console. Now you can focus on getting the relay fuse box side of the harness into the frunk. Locate the large harness grommet in the drivers side foot well. I used a flat head screw driver to push a gap on the side of the grommet and pushed the harness thru. I did not pin this side of the harness to the connector so it would be easier to get it thru. Once your thru move to the frunk. Find the harness and gently pull it the rest of the way thru. Pin the wires to the relay fuse box connector as described above. Wrap wire loom around the harness. Next you will install the relay fuse box. I installed it directly to the main fuse panel in the frunk. You might be able to install it directly to the positive battery terminal as well. If your going direct to the fuse panel, remove the small cover on the side of the fuse panel. This exposes the high voltage connections. Look for the connection labeled 300 amps, connect the large red wire from the relay fuse box. I then zip tied the relay fuse box to the other harness connectors close by. Connect the harness to the relay fuse box. Run the ground wire (pin 1 ) to a ground location in the frunk. T tap the hot in wire (pin 12) splice in the add a fuse and run that to the main fuse box. I put the add a fuse into fuse spot 22. Re connect the battery and test the upfitter switches. They should light up blue when off and amber when on.


Link to Ice forum thread
https://www.f150gen14.com/forum/threads/upfitter-switch-installation.12438/
Oem Parts
Upfitter switch panel part number M2DZ13D730HA
Overhead console (this can vary depending on your truck, pano roof, rear sliding window or not) mine was no slider or pano roof. If you switch over your internals no need for Forscan. ML3Z18519A70ECT
Relay fuse box (from superduty trucks) NC3Z14A303A
Harness
I ordered the wire off amazon, BNTECHGO 22 Gauge Silicone Wire Kit 10 Color Each 30 ft Flexible 22 AWG Stranded Tinned Copper Wire
Tool to crimp the pins amazon iCrimp SN-28B Dupont Crimping Tool for 3.96mm, 2.54mm, 2.5mm Pitch Dupont, JST XH VH Connectors, AWG 18 to 28
Wire t taps amazon Nilight-50004R 120 Pcs/60 Pairs quick splice wire T Tap
Add a fuse wire
Electrical tape and wire loom
How to make the harness
I used the following post on the ice forum to pin the wires to the connectors. You will need to add a t wire tap on the Hot in wire(my red wire) and splice that to an add a fuse. You plug that into the fuse panel inside the truck or behind the frunk tub. The number 11 pin wire on the upfitter switch connector side is the illumination wire. I tapped into the overhead console harness purple/gray wire using a t tap. I also tapped the ground for the upfitter side of the harness(pin 6) into the yellow/black wire on the overhead console harness. A ground must go to the overhead and also a ground to the relay box. I think I made the harness 16 feet long. I wrapped the harness in tape, ran a wire loom on the portion outside the cab. I pinned the upfitter side of the harness but left the relay fuse box side of the harness unpinned so it would be easier to snake it thru the firewall.
Upfitter Switch pin .... relay fuse box pin
9 (hot in run) to 12 (t tap add a fuse to fuse box) my Red Wire
11 (illumination) t tap over head console harness purple/gray wire my pink wire
2 (switch 1) to 2 my green wire
3 (switch 2 )to 9 my yellow wire
6 (ground) to 1 t tapped into the yellow/black wire on the upfitter side, I ran to a gound point on the fuse box relay side my black wires
4 (switch 3) to 3 my orange wire
1 (hot all times) to 5 my brown wire
10 (switch 4) to 4 my blue wire
8 (switch 5) to 11 my white wire
7 (switch 6) to 10 my violet wire
ps look real close on the connector plugs and you will see the pin number.
Pics of the connectors
Upfitter switch side
Overhead console t taps
Relay fuse box side
Install instructions
First remove the frunk tub and unplug the battery. Move to the inside of the cab. Remove the overhead console and overhead console harness. T tap the ground wire (yellow/black) and illumination wire (gray/purple) on the overhead harness. Connect those to your ground(pin 6) and illumination(pin 11) wires on the upfitter switch side of the harness. I decided to run my harness thru the main harness grommet on the drivers side foot well. Remove the drivers side a pillar trim then snake the harness thru the head liner, down the a pillar, and into the drivers side foot well. Next reconnect the overhead console wiring harness, connect the upfitter switch side of the harness to the upfitter switches and re install the overhead console. Now you can focus on getting the relay fuse box side of the harness into the frunk. Locate the large harness grommet in the drivers side foot well. I used a flat head screw driver to push a gap on the side of the grommet and pushed the harness thru. I did not pin this side of the harness to the connector so it would be easier to get it thru. Once your thru move to the frunk. Find the harness and gently pull it the rest of the way thru. Pin the wires to the relay fuse box connector as described above. Wrap wire loom around the harness. Next you will install the relay fuse box. I installed it directly to the main fuse panel in the frunk. You might be able to install it directly to the positive battery terminal as well. If your going direct to the fuse panel, remove the small cover on the side of the fuse panel. This exposes the high voltage connections. Look for the connection labeled 300 amps, connect the large red wire from the relay fuse box. I then zip tied the relay fuse box to the other harness connectors close by. Connect the harness to the relay fuse box. Run the ground wire (pin 1 ) to a ground location in the frunk. T tap the hot in wire (pin 12) splice in the add a fuse and run that to the main fuse box. I put the add a fuse into fuse spot 22. Re connect the battery and test the upfitter switches. They should light up blue when off and amber when on.


Sponsored
Last edited: