cptj777
Member
- Thread starter
- #1
(Plowing without the lights attached yet)
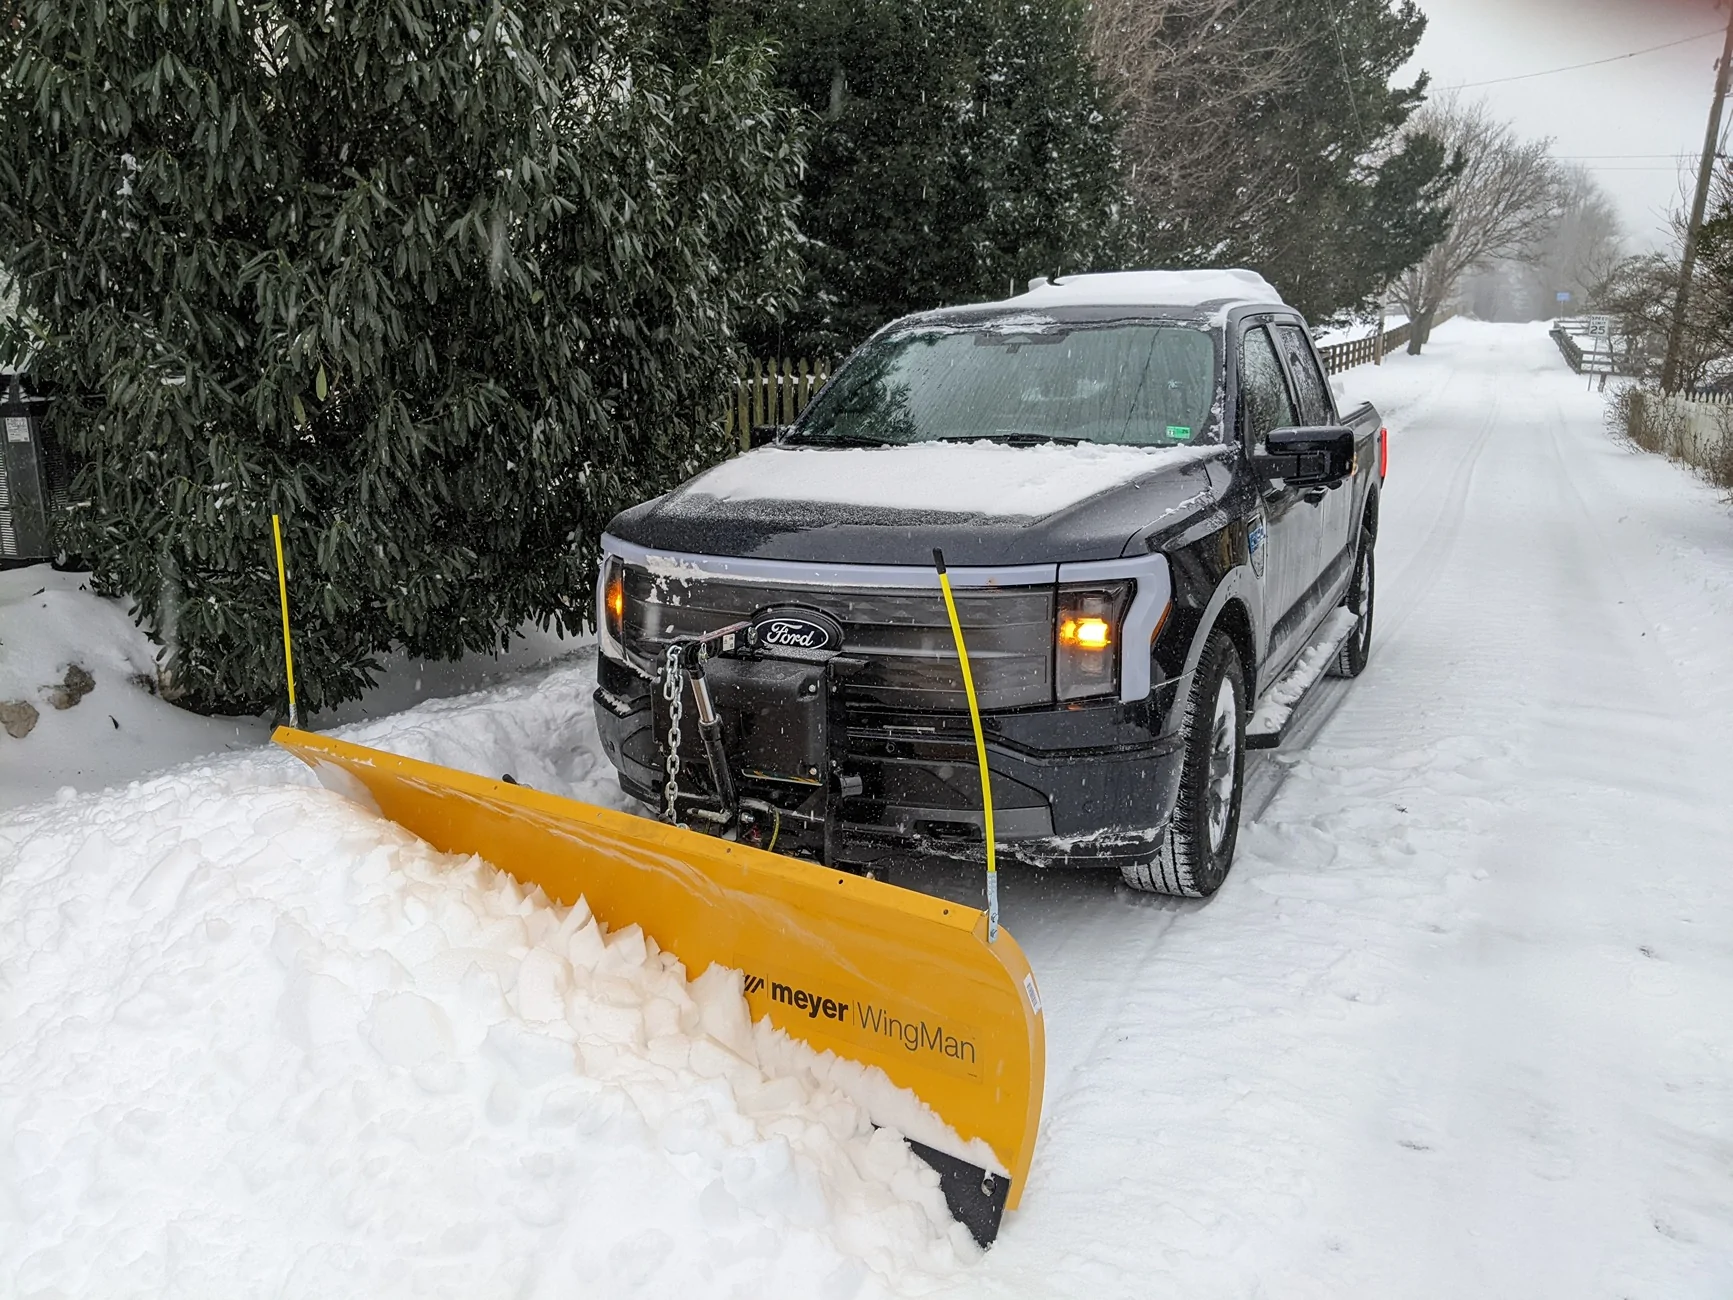
I have now plowed with the Meyer Wingman snow plow a few times on several miles of country road and a few driveways and it is a solid and reliable performer. Additionally, the F-150 Lightning is probably the best truck platform to use a medium-duty snowplow. It does not require the alternator and coolant modifications with the “snow plow package” of the ICE F-150. The Lightning, as you know, requires way less maintenance and service as well. Given the limitations of the F-150 general body, any snow plow greater than 500 lbs weight (such as a V-Plow) would not work regardless of the compatibility with a F-150 Lightning model. The Wingman with the F-150 Lightning should be a solid solution for a majority of commercial work. If you need a V-plow or larger, the Ford Lightning is not for you. Additionally, using a light-duty snow plow (like the Meyer HomePlow) is not recommended. The F-150 Lightning has too much torque and there is a significant risk that a light-duty plow will be damaged or destroyed very quickly. Also the Wingman can be attached and removed by one person very easily for normal use. (Initial delivery of the plow requires at least two people and ideally a forklift. There are other ways to avoid the forklift if you have the equipment.) I also have no issues with frunk access. As a note, these are all modifications I did myself.
Performance of the Plow:
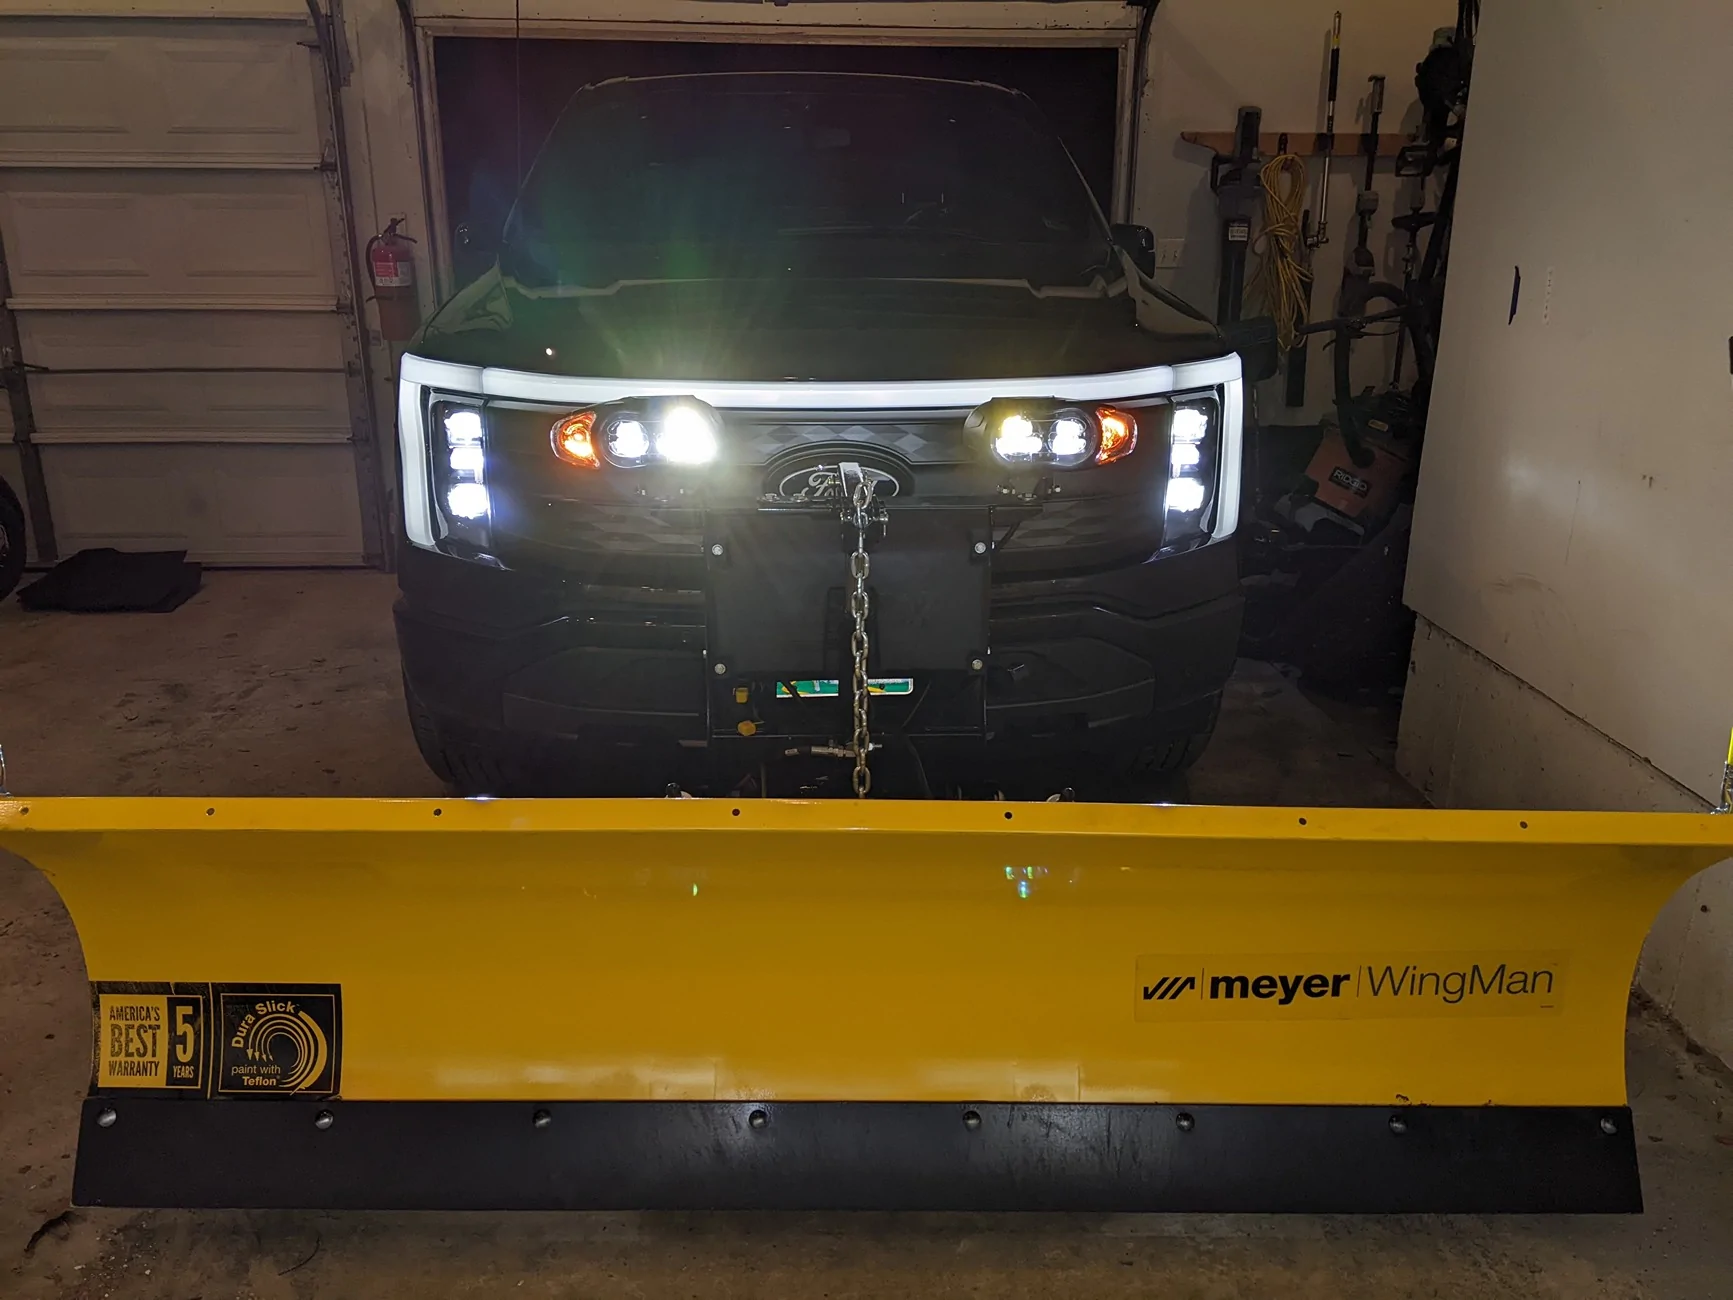
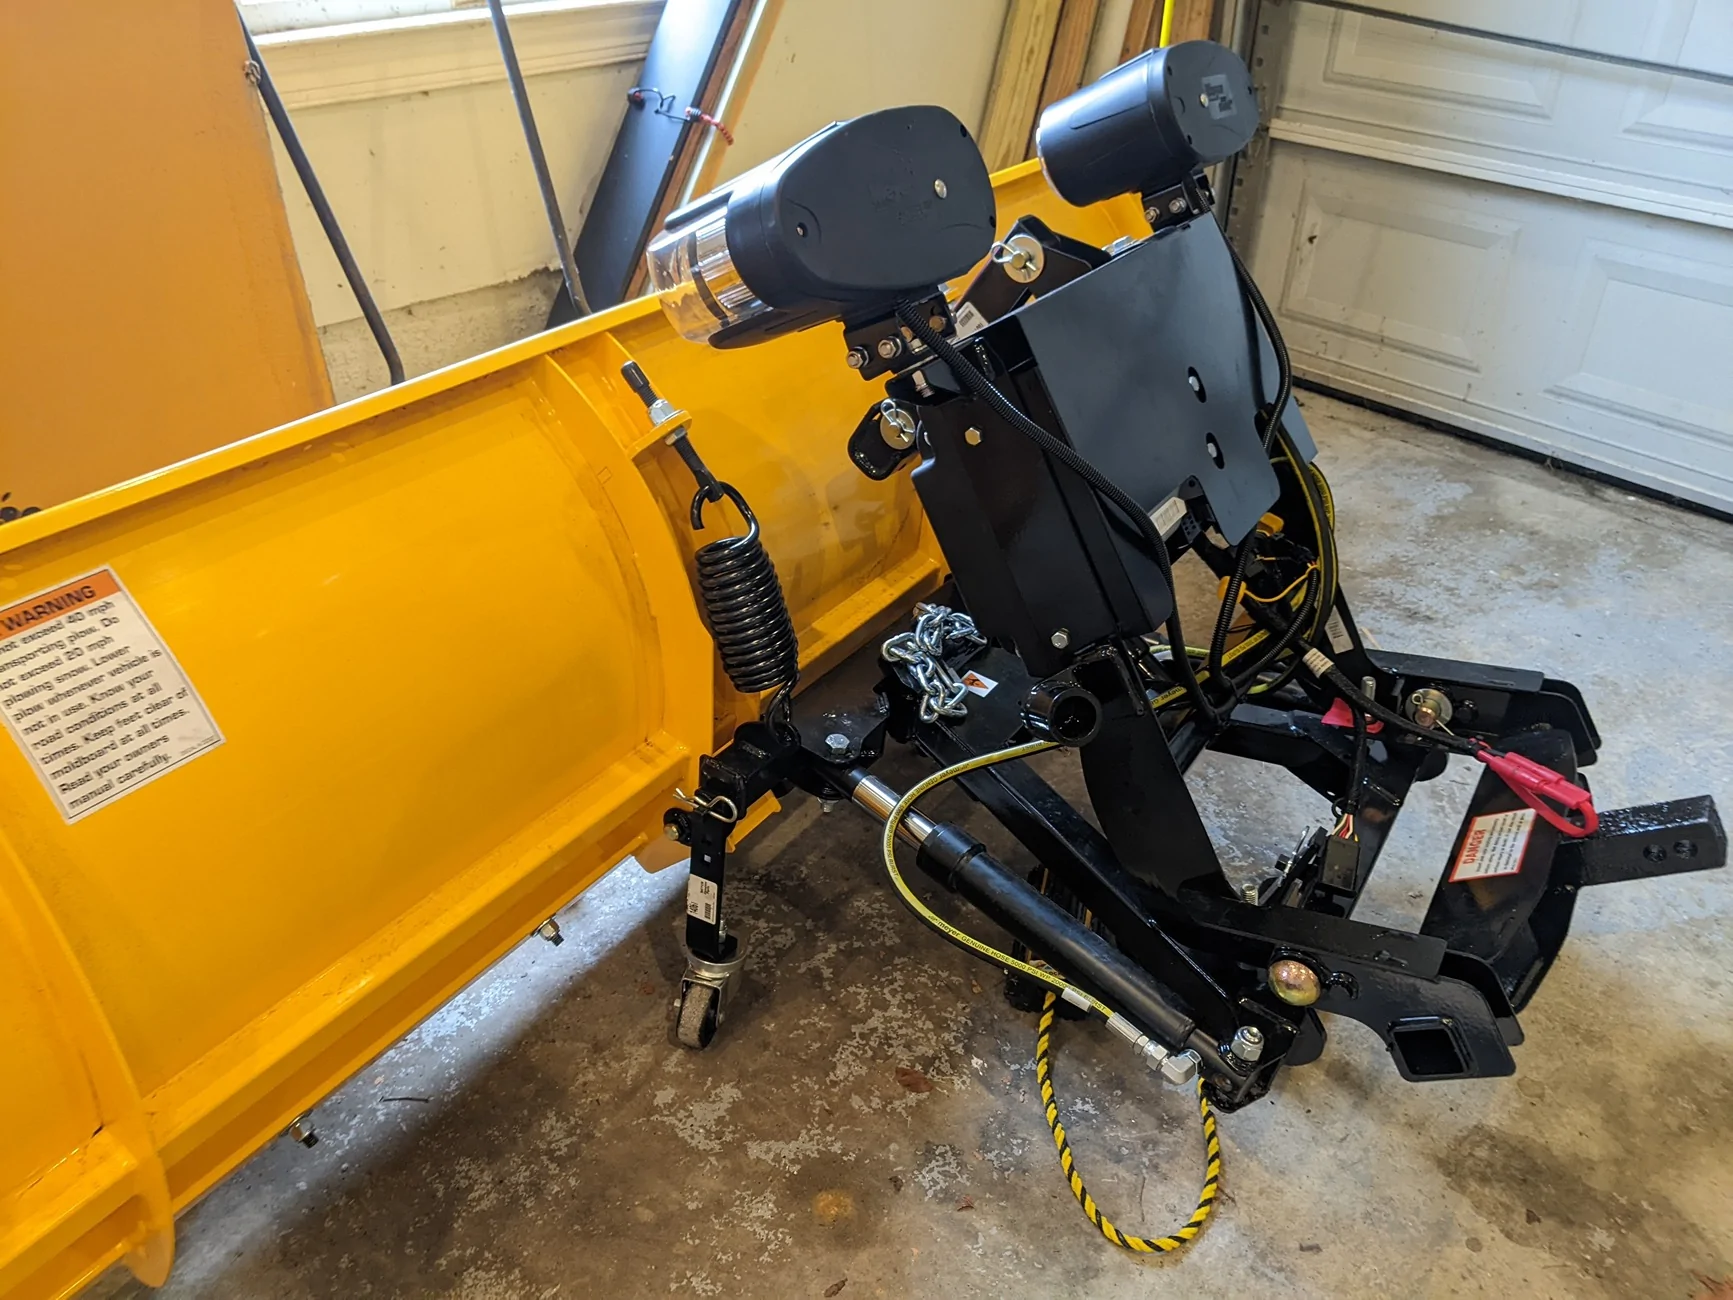
I chose the Meyer Wingman Snow Plow 28330 which is a commercial-grade 7’6” plow for 1/2 ton trucks. Many ICE engine trucks had bails of hay in the bed while operating their plows while my truck bed was empty. The weight distribution and torque of the F-150 Lightning makes this probably the most capable general duty snow plowing platform available. I have plowed several miles of hilly rural gravel road and a few driveways with no issues. When transporting the plow in the “up” position, the average efficiency of the truck was around 1.2 to 1.8 miles per kWh. (About 40 mph is the max speed when driving with the plow all the way up.) When plowing snow the efficiency started at around 0.8 miles/kWh but that increased as the truck drove more. This varied based on the amount of windshield heat needed in a snow storm. The outside temperature was around 12 degrees F. The starting charge was 100% and the battery was conditioned. One item that I did not have, that I will install for next season, is a snow deflector along the top edge of the blade. Frequently, the snow would blow up onto the windshield and freeze (requiring more heat/battery energy) given the conditions. The snow deflector will increase efficiency as a result. Additionally, I kept the Lightning plugged into a level 2 home charger at all times when anticipating any plowing. I charged to 100% and plowed most of the daylight hours on one charge. I stayed within about 20 miles of my home and never had any anxiety about range. It is operated with a controller. Additionally, the controller operates the LED lights that are attached to the plow.
As a word of caution to those who purchase a plow with a hydraulic pump, most of the hose couplings were unknowingly loose when it was delivered. I am not sure if this was a factory issue or a shipping issue. It ships with the hydraulic reservoir containing fluid. Check your fittings when you remove it from the crate to make sure you don’t encounter large leaks like I did.
How the Plow it is Attached:
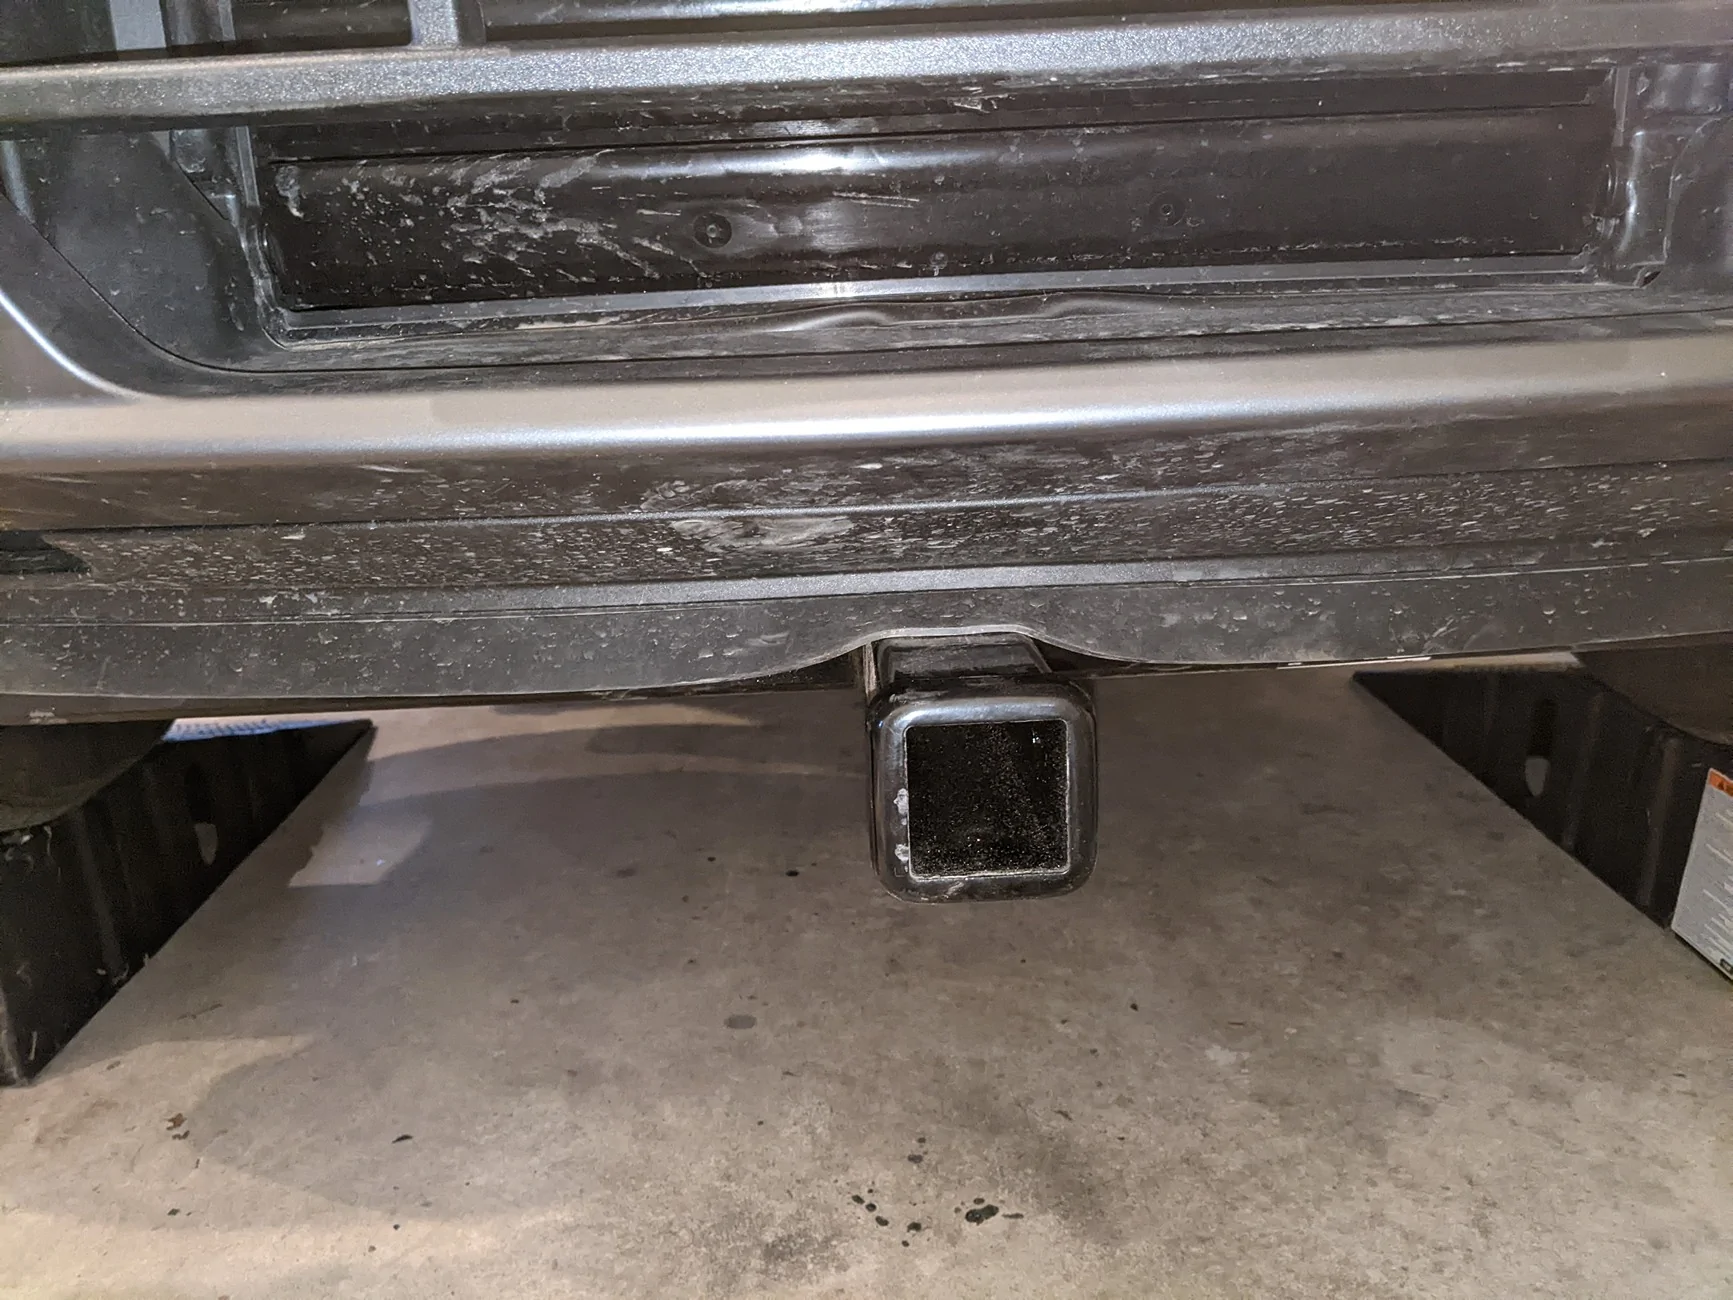
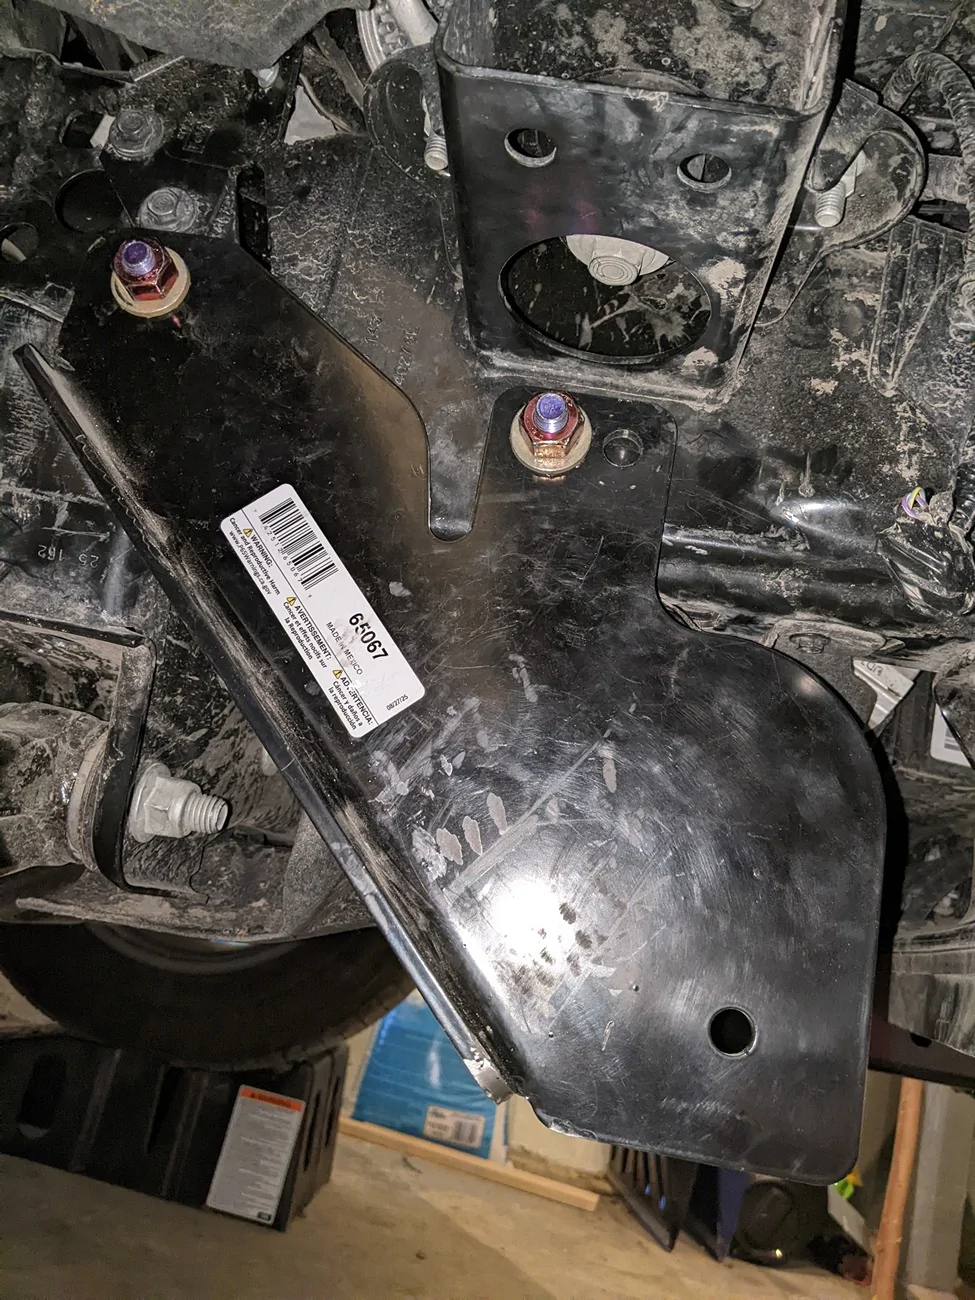
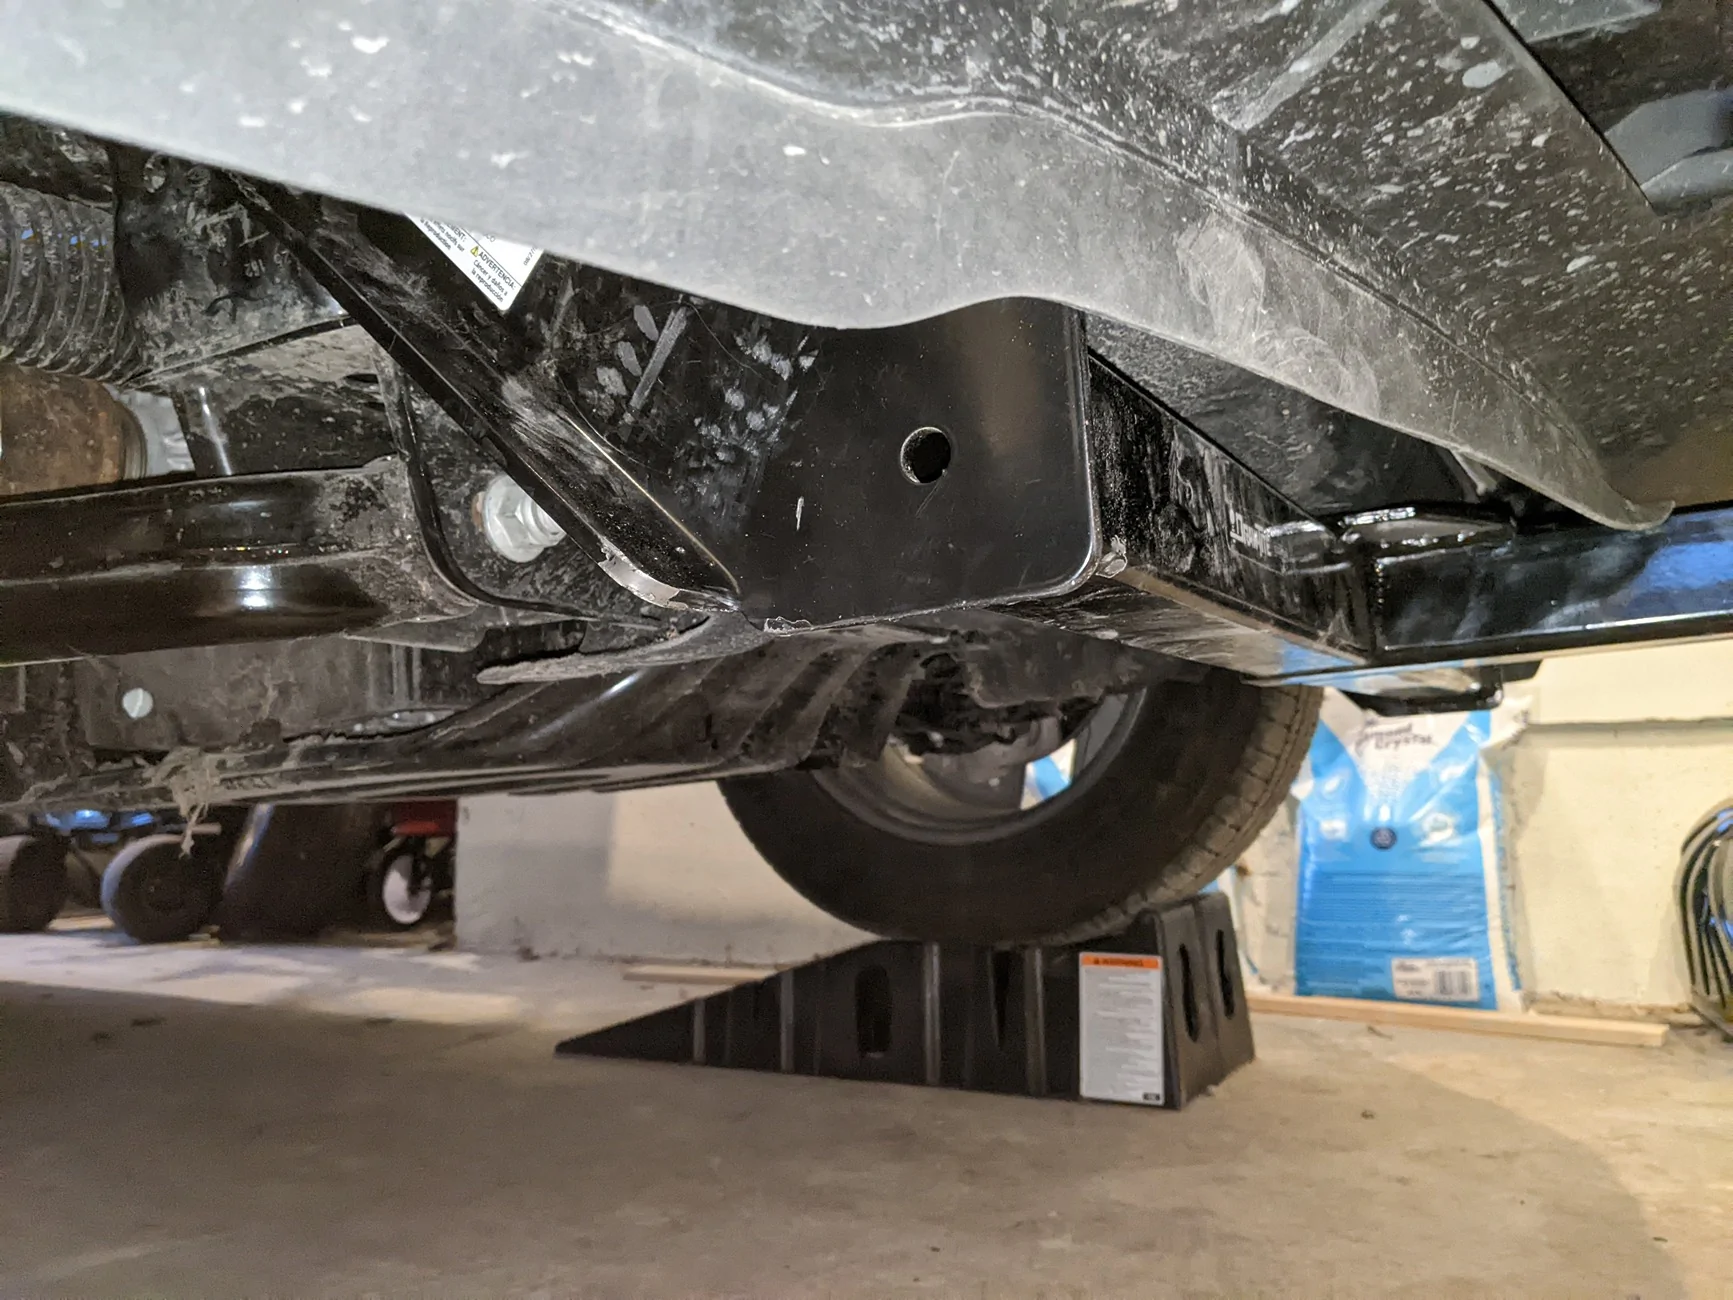
I mounted a Draw-Tite Front Mount Trailer Hitch 2 Inch Receiver – Part Number 65067. There are other front hitches that say they are compatible with a F-150 Lightning (such as Torklift) but the Draw-Tite 65067 is the only one I have found that actually fits. (I had to send the Torklift front hitch back.) I put the truck up on ramps and installed the front hitch in about half of a morning. It did require removing the active air dam. As most folks know the F-150 has an upper air deflector and lower air dam. The upper is stationary and the lower is motorized to change height with highway speed. I removed the two motors and the attached adjustable air dam in less than a hour. There are other posts and videos of how to do this. In the pictures, the bottom of the upper air deflector has a rubber strip. Some folks prefer to cut a 2 inch notch in the rubber so it fits flush around the receiver. I did not do this and have had no issues. (I think the notching is just extra work.) In driving with the front hitch (no attachments) I have not noticed any efficiency issues especially since I removed the active air dam. The active air dam is supposed to add about 4% efficiency I believe but in looking at the real-time miles per kWh before and after the air dam removal (and with installation of the hitch) I have not noticed any difference. Personally, I will opt for slight efficiency loss to have the functionality of a front hitch. Additionally, I have read reviews of active air dam failure when it hits an object in the road. I live in the country and use the truck for actual truck stuff so the active air dam is just a point of failure to me. I think it’s a good idea in theory but will cause issues in the real world. I recommend removing the active air dam regardless. Additionally, the hitch acts as a guard for the "felt diaper" under the front part of the truck. I am confident it will not rip off if I go over a snow mound or hit an object.
How the Plow is Wired:
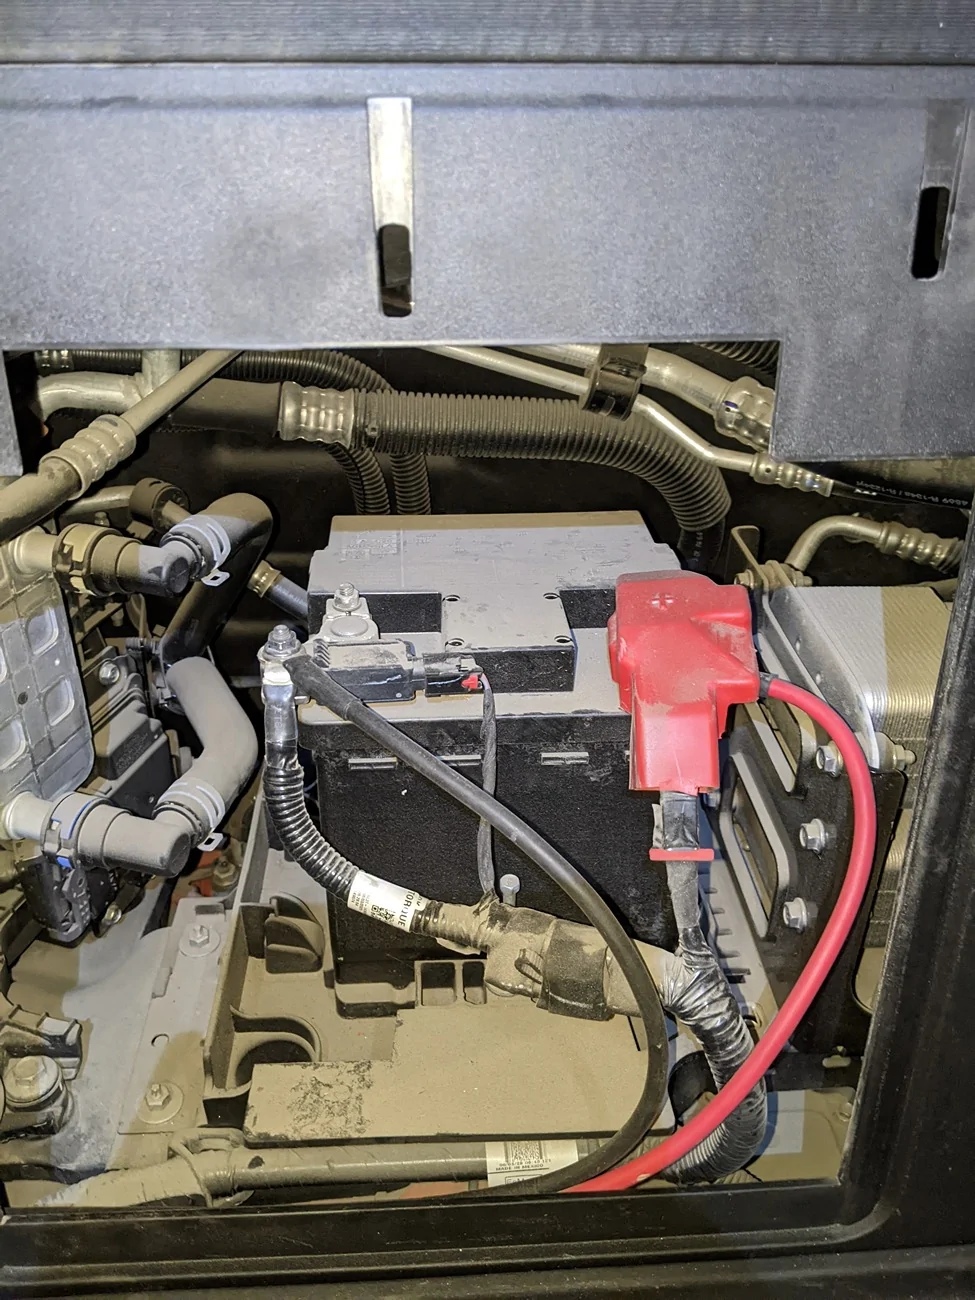
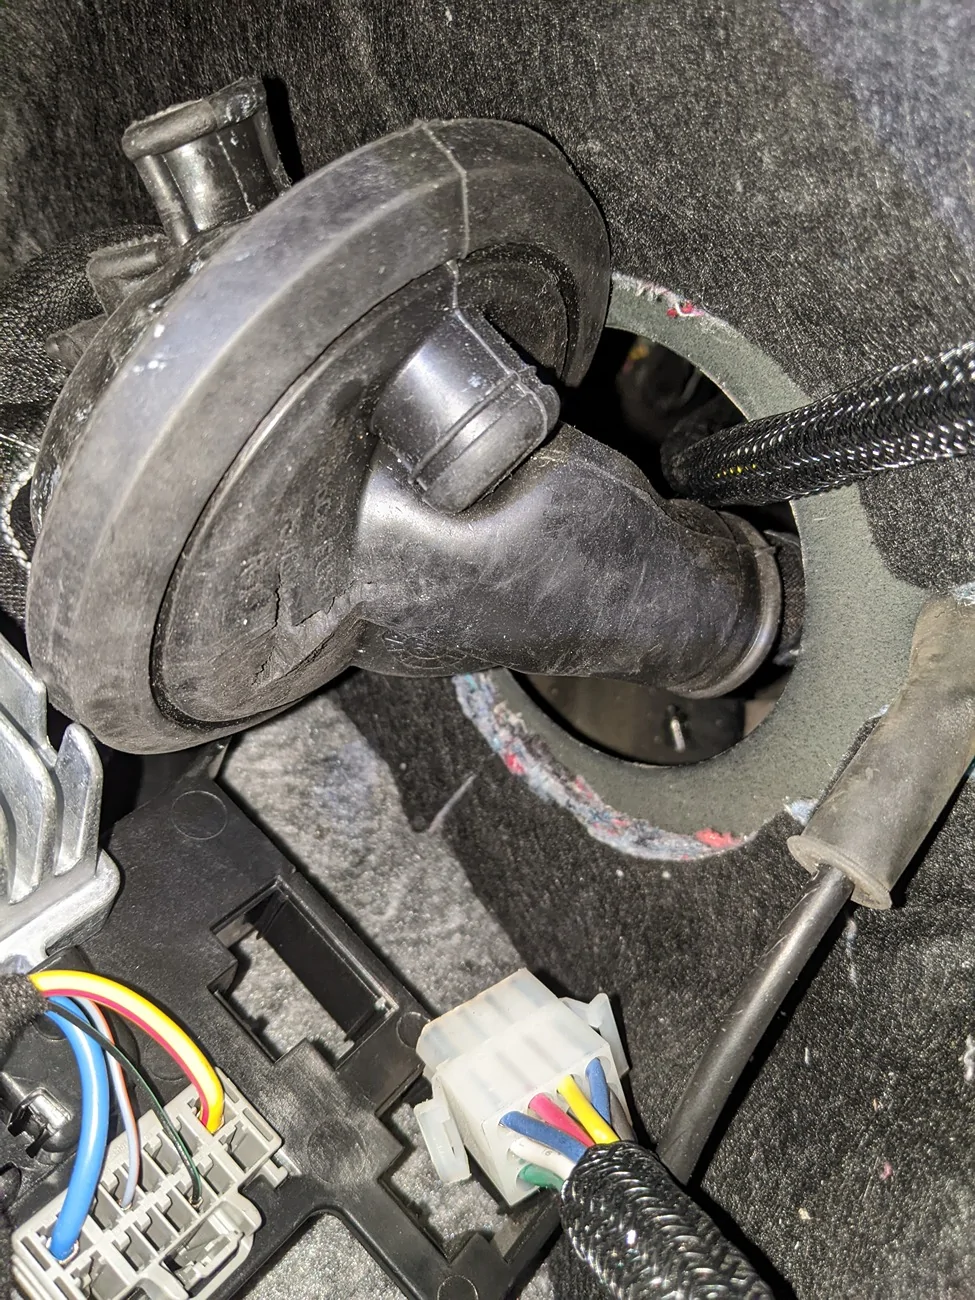
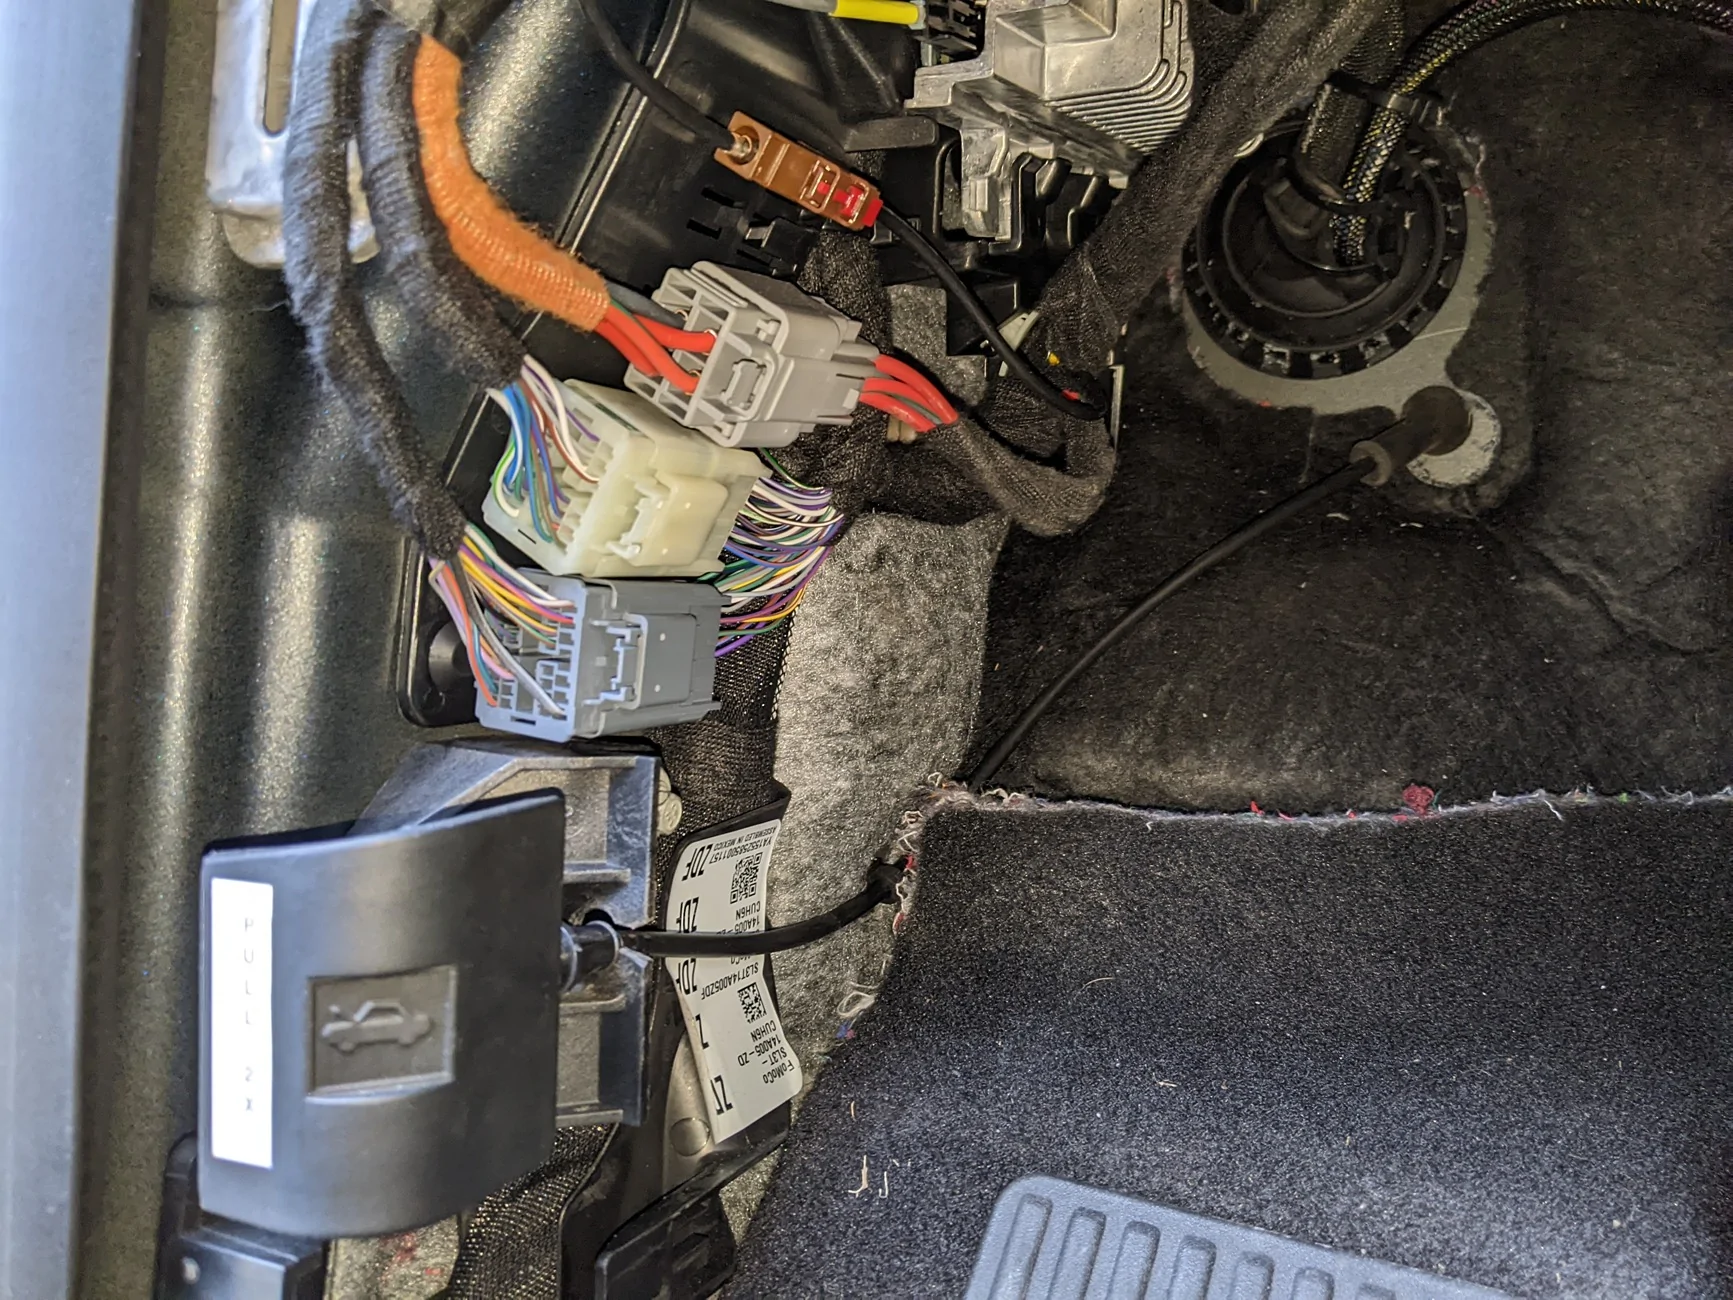
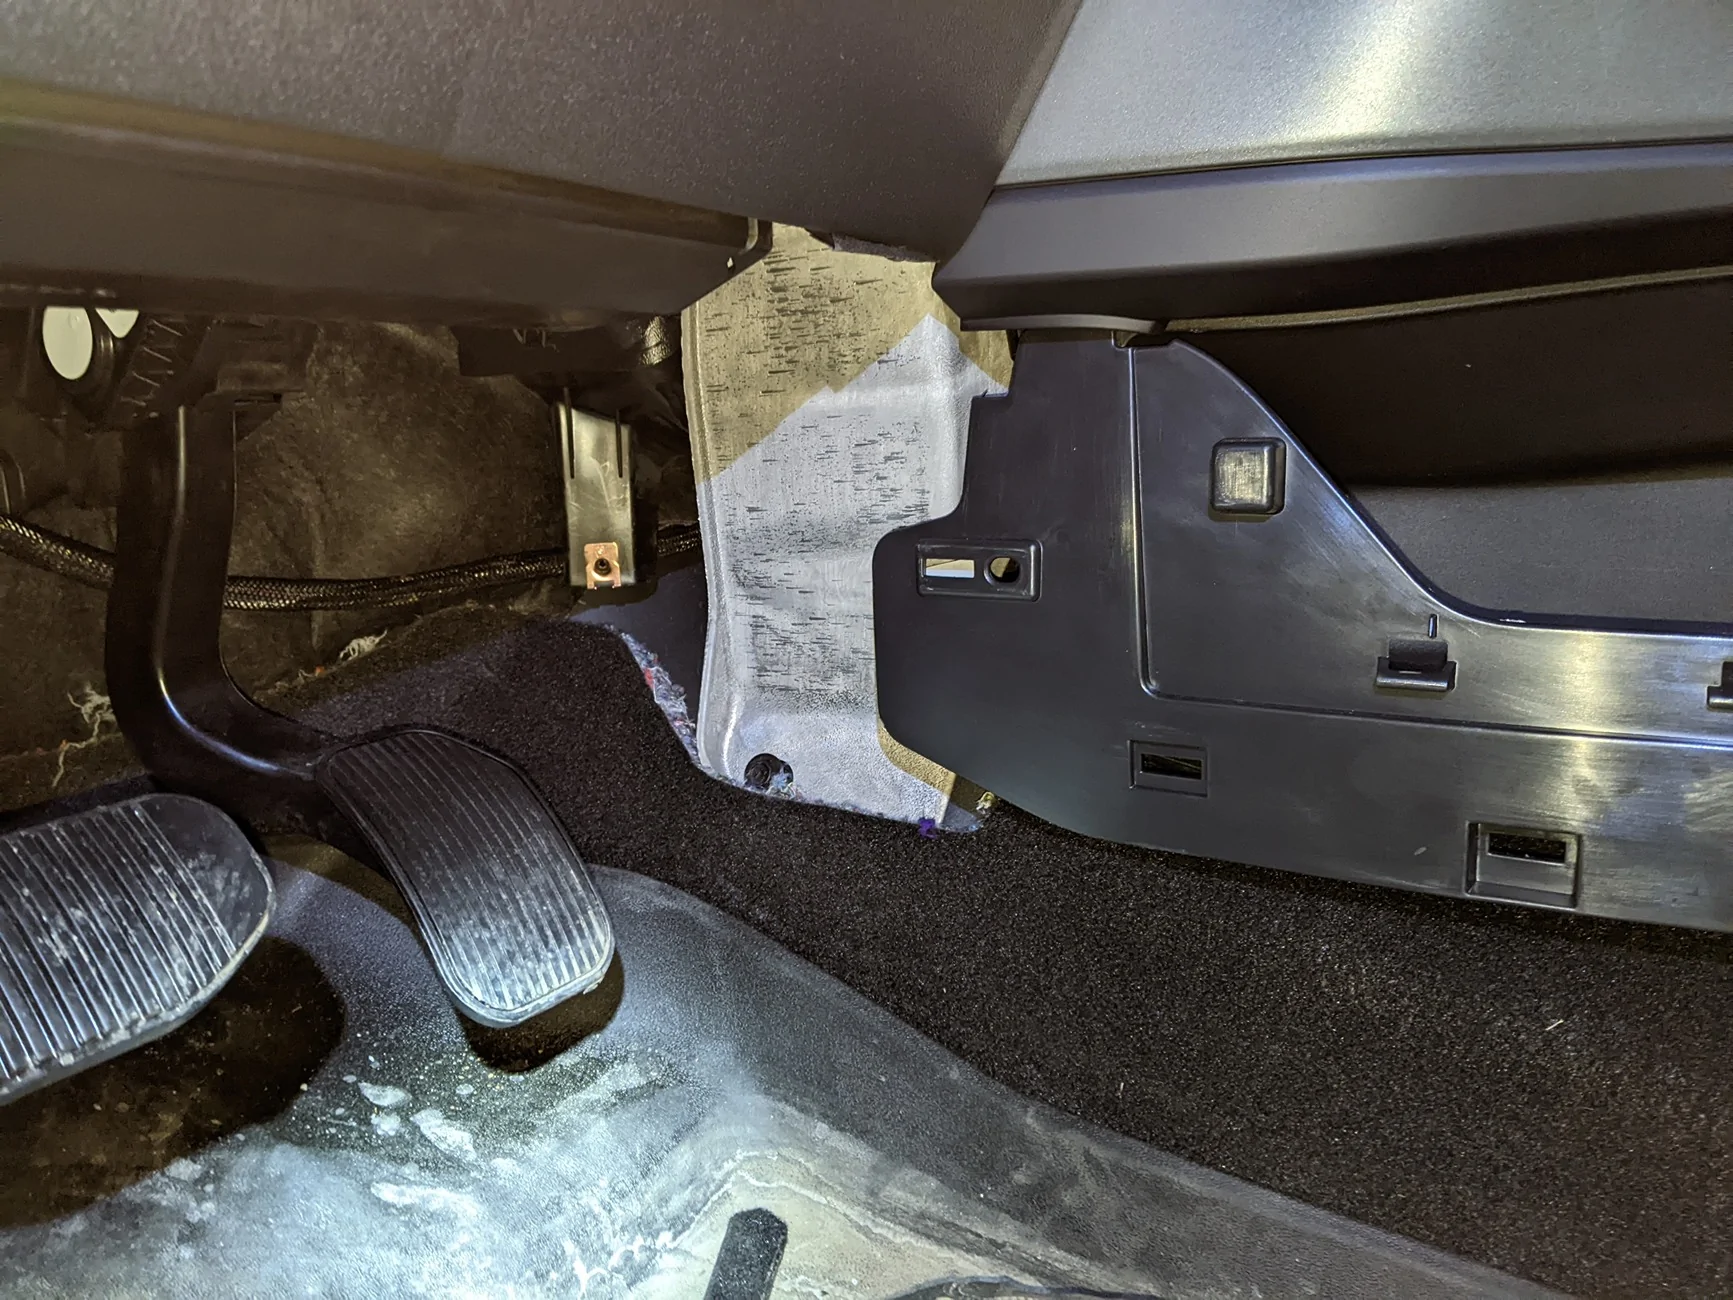
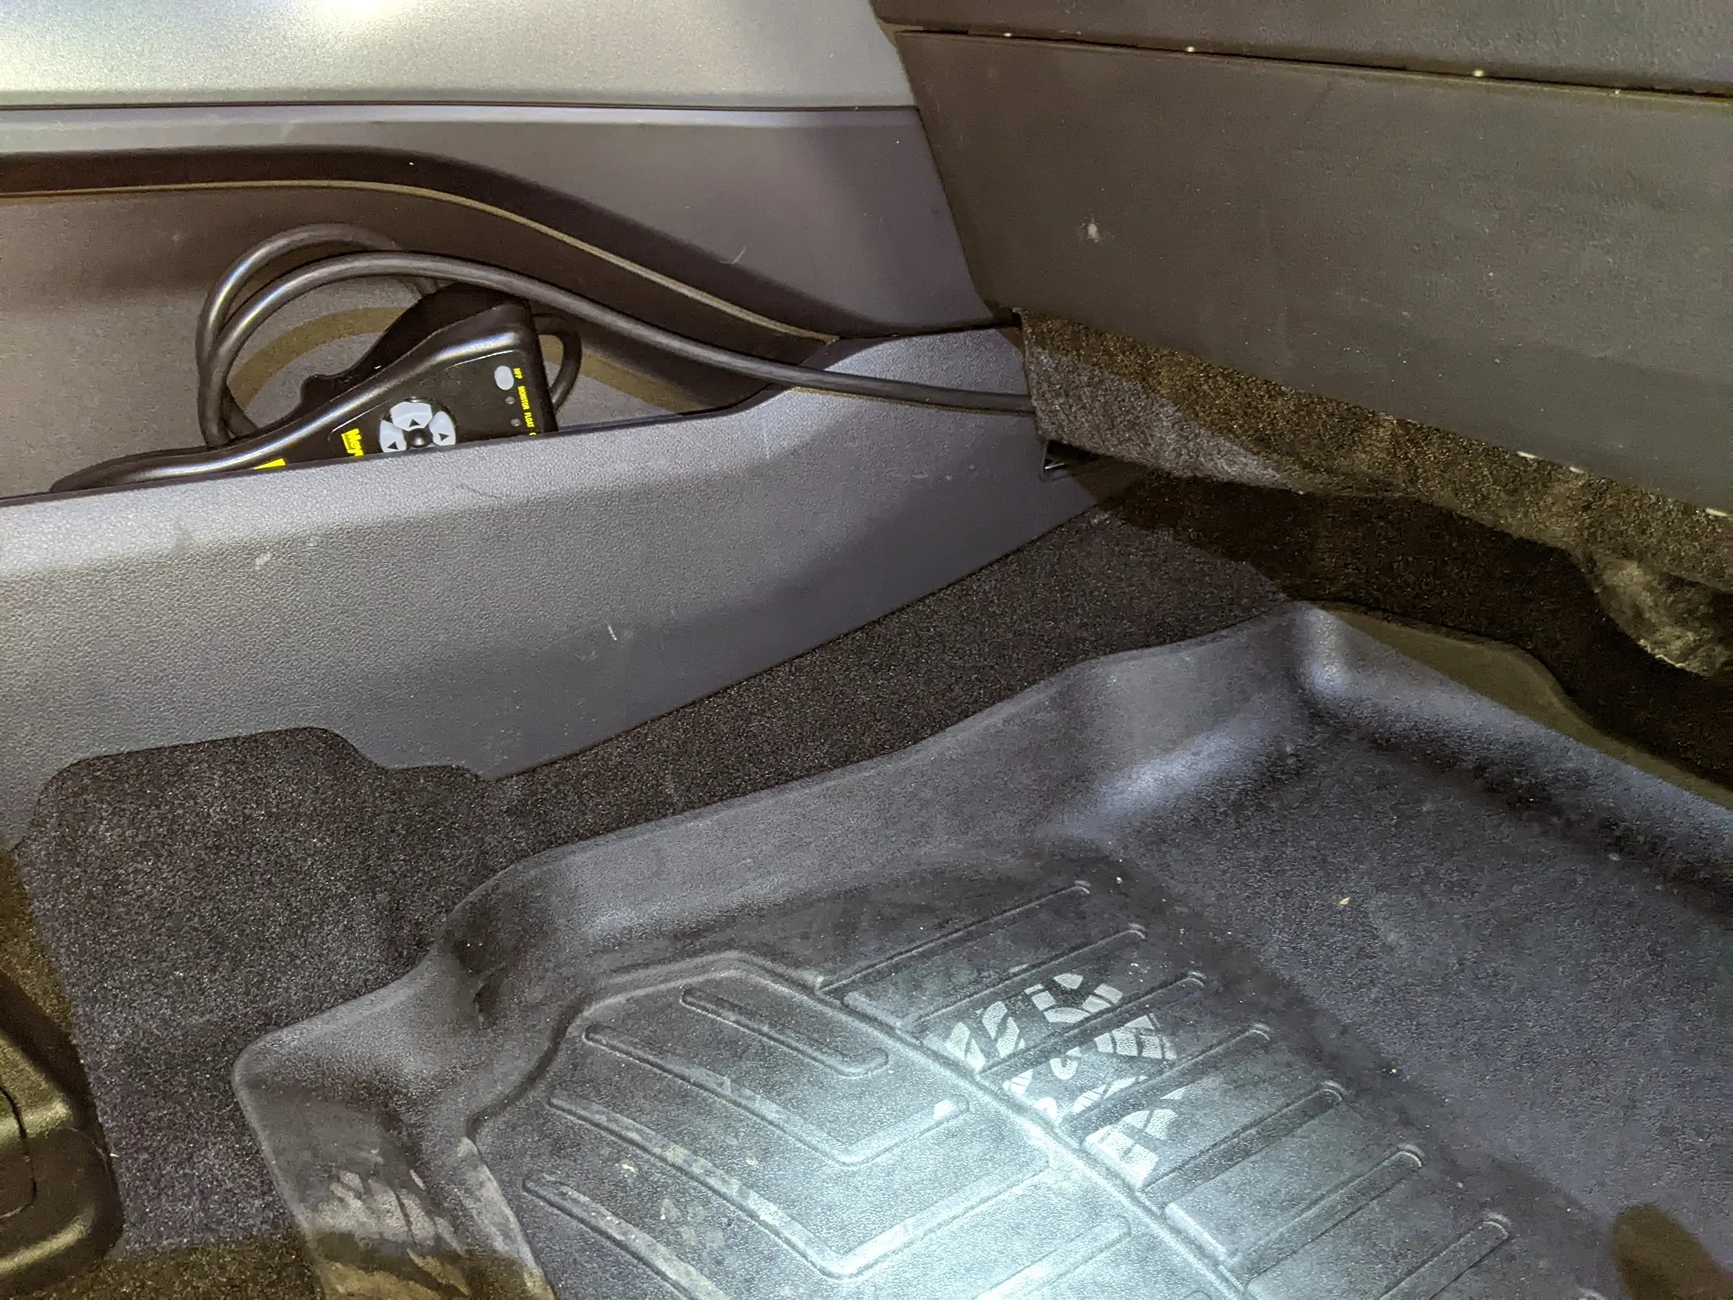
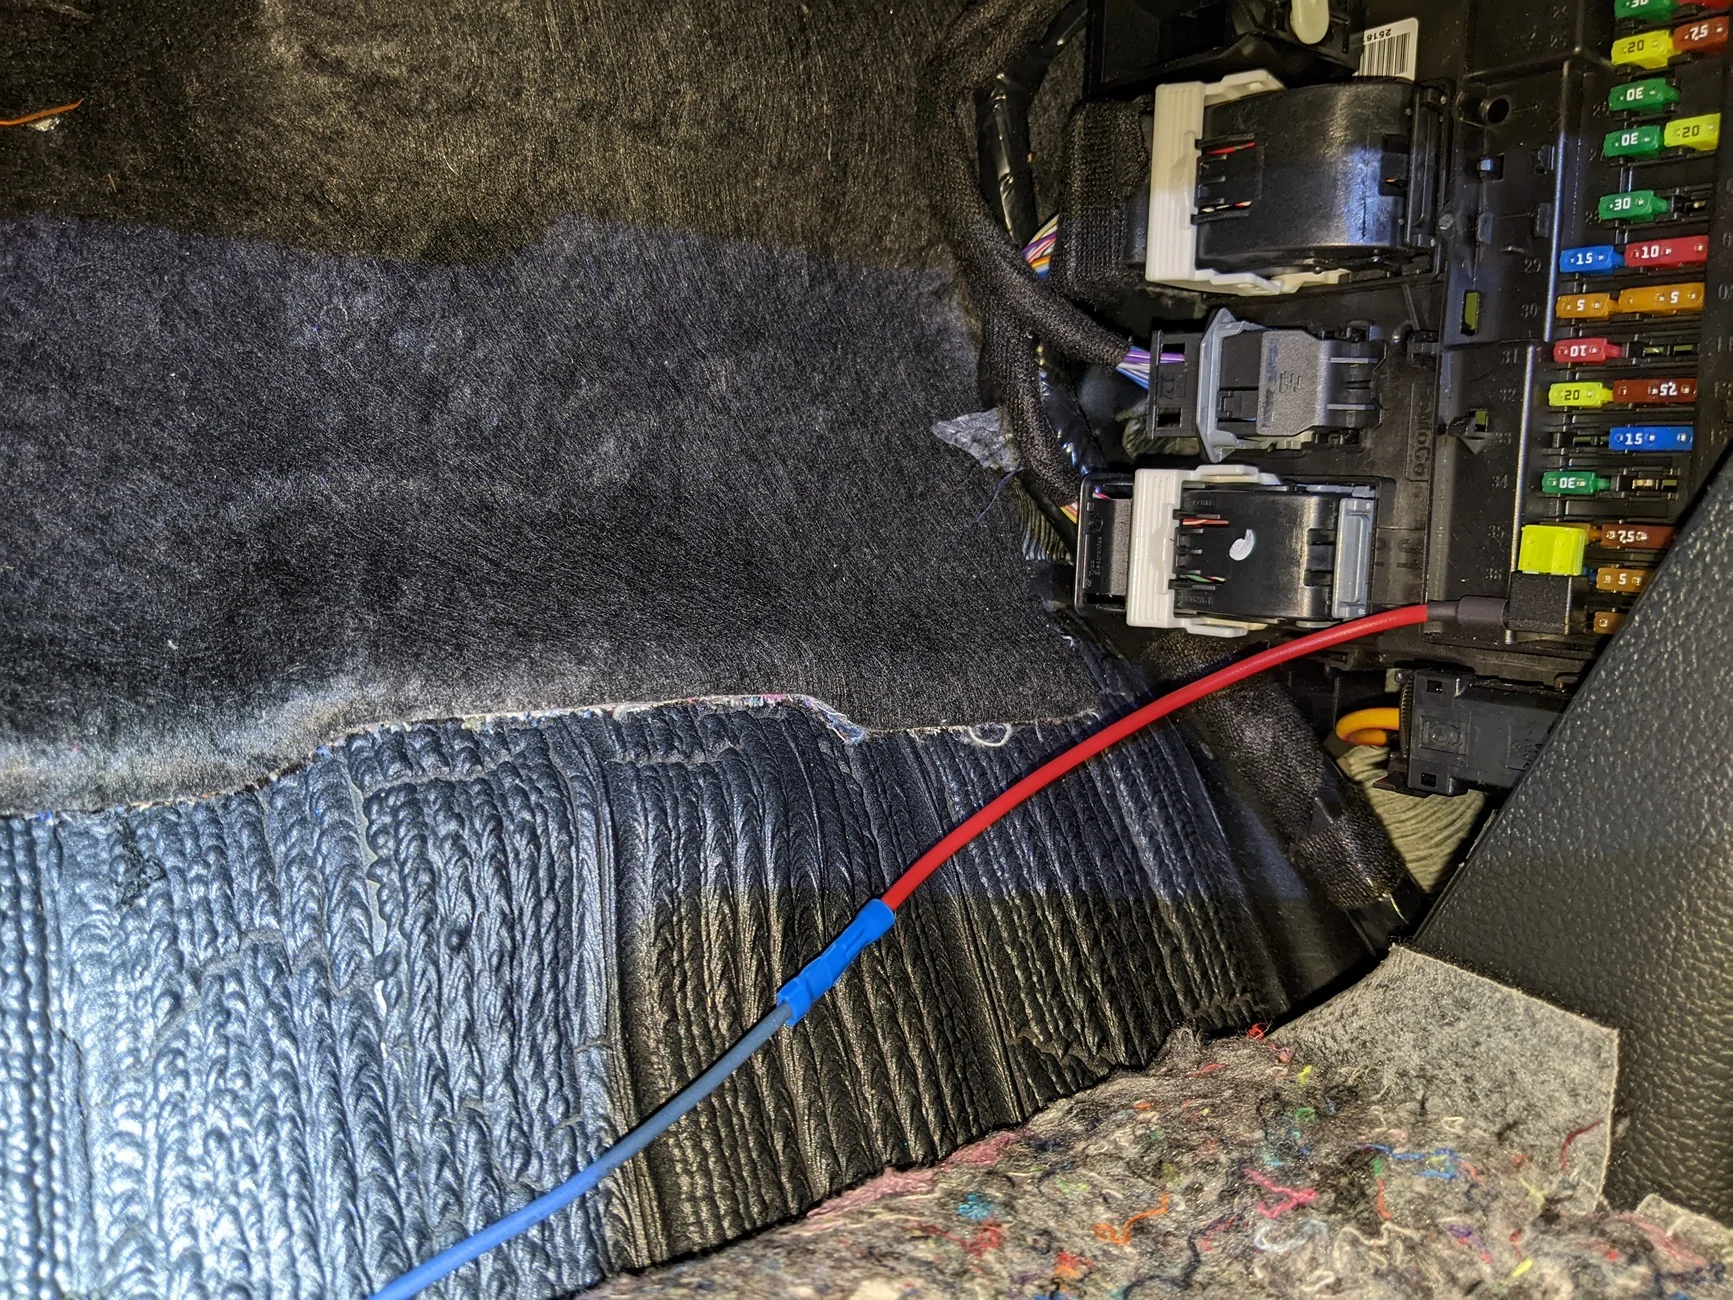
There is a wiring harness for the plow. You will need to open up the frunk and remove the access panels around the edge of the frunk. There is also a power cable that runs directly between the battery and the plow to power the hydraulic motor. I ran the power cable along the left side and the wiring harness along the right side when facing the front of the vehicle. The wiring harness has a large molex connector that I passed through the driver’s side firewall. (It was a pain.) You will need to cut a hole in the back of the firewall seal to pass it through. Once it’s through the seal, you can run it through the front part of the seal normally without needing to cut another hole in the front. There are posts and videos on how to remove and work with this seal. With the wiring harness, there is a blue AWG wire with an in-line 20 amp fuse that gets passed through the seal also. Once through the seal, I then passed these through the bottom of the center console. There are other posts and videos of how to remove the trim panels. I then ran the molex connector to the passenger floor and the blue wire to the #37 fuse with a wire tap. Per the manual, #37 is not used and rated for 20 amps. The blue wire ended up having a fuse at the wire tap in addition to the in-line position. It’s redundant but the fuse tap method was the best way I found to connect the blue wire. #37 is on the accessory and not “hot” battery bus. Make sure you are aligning the fuse tap the right way putting the + tap terminal in the correct position. The controller gets attached to the molex connector and I stored it on the passenger side. When I am plowing, for me, it seems to be the most natural placement to control the plow with one hand while I drive. The wiring harness has four wires I did not use. There are two wires (white and purple for RAM and GM which are not needed) and two for high beam low beam functions (white and red). I taped these off unattached to anything. The controller turns on lights for the plow but some states require either truck lights or plow lights--not both. The high/low beam wires control that function. I don’t have that issue and don’t need those wires. Finally, the other end of the harness is run to the trailer light attachment in the back. I used stainless steel cable ties to attach it to the bottom of the frame. I also intentionally don’t use the 4-pin connector in the back because it is too tight of a connection. I plug it into a Hopkins 7 blade adapter and that makes the disconnection much easier when finished with the plow. Make sure to use dielectric grease for your connections. When I have the plow disconnected, I have the snow plow end of the wiring harness and the power cable Velcro strapped around the front hitch behind the upper air deflector. It is similar with the trailer connection in the back to the rear hitch.
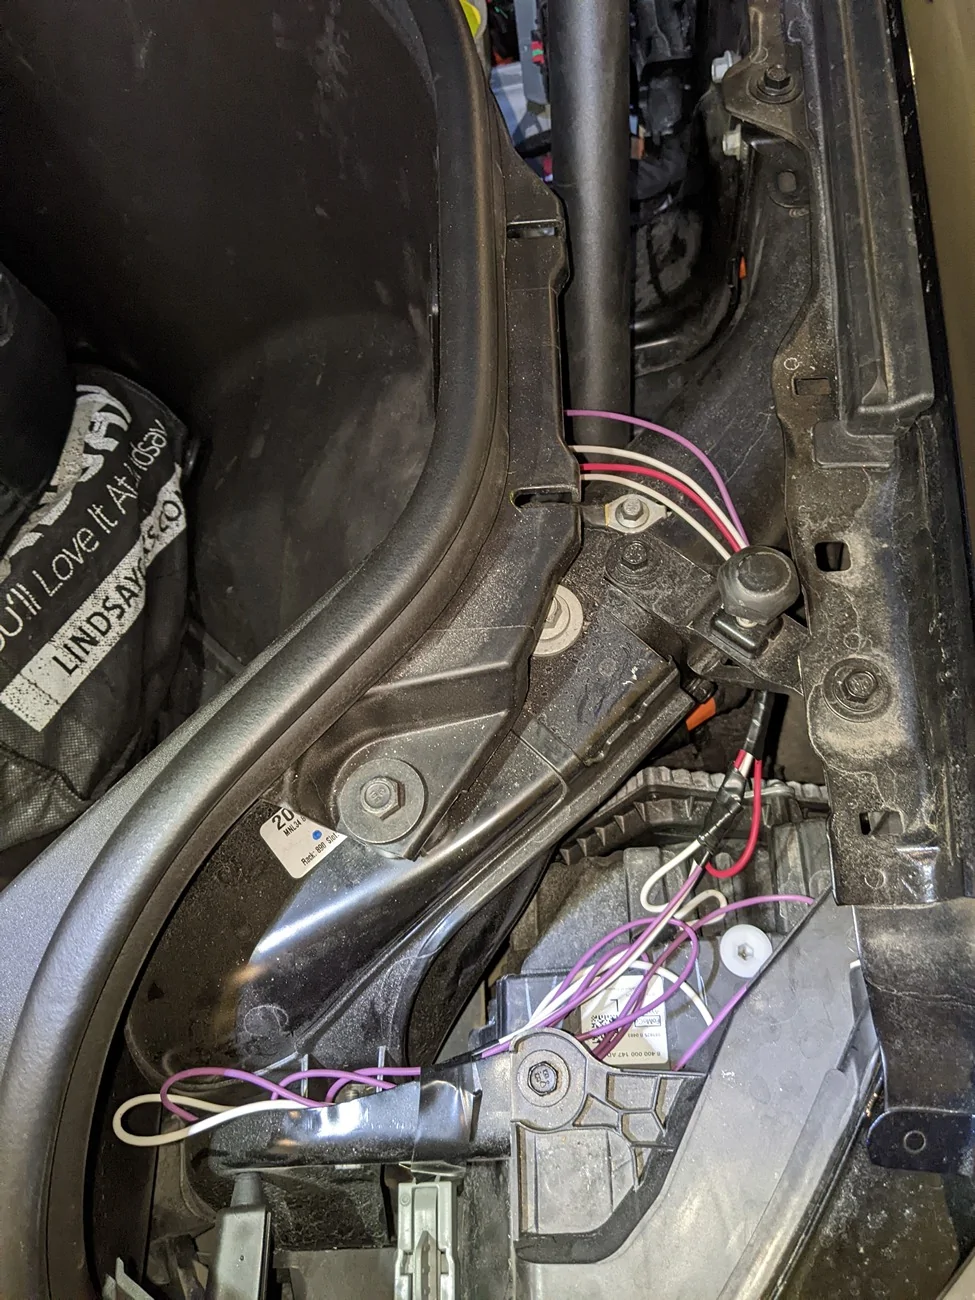
(these four wires I did not use)
(I also replaced the standard red pull strap for emergency frunk access with the standard F-150 hood release handle. For many reasons, it makes more sense and works much better.)
Plow Maintenance:
For attaching and removing the plow, there are 3 caster wheels that are removable. The plow comes with a crankstand but I found this to be completely unnecessary to use. If the front caster wheels are attached on the left and right front positions in the uppermost slot and the rear caster wheel is attached in the second slot, the plow will be at the correct high to slide very easily in/out of the front hitch when on a solid level surface (like a concrete garage floor). When the plow is detached, I just roll it to the side of the garage. Meyer recommends “cool lube” for hitch attachment, but I have found that Fluid Film works much better (and it’s non-toxic). I used fluid film for any metal parts except the hydraulics. WD-40 brand makes a white lithium spray that works for hydraulic pistons.
One Additional Option:
In the rare case you need snow traction, I can confirm the SCC SZ462 Super Z8 8mm Commercial and Light Truck Tire Traction Chains work on the rear tires of the 20" Lightning wheels. I have personally tested them. (I don't have a picture of it. However, someone else posted a picture of their use out West.) These fit on the rear tires and provide required clearance. I didn't need them plowing but I drive in enough mountain areas to carry them "just-in-case." I know what the Ford manual says about snow chains for the Lightning and I believe the information to be incorrect based not only on my usage of the SZ462 but other Lightning owners as well. It's an option if you need it.
Final Thoughts:
My opinion is that the F-150 Lightning is probably the one of the best engineered trucks ever built. It is a solid performer for using a commercial-grade snow plow if you have access to a level 2 home charger and keep the battery appropriately conditioned for the cold. The Wingman is a good fit for the Lightning because it is easily operable by one person and can withstand the torque of the truck. One could easily use this configuration commercially if appropriately set up for electric vehicle use.
Sponsored
Last edited: