Zprime29
Well-known member
- First Name
- Brandon
- Joined
- Jul 26, 2022
- Threads
- 42
- Messages
- 2,649
- Reaction score
- 2,834
- Location
- Tucson, AZ
- Vehicles
- 2022 Lightning ER, 2025 XC90 Recharge
- Thread starter
- #1
The fine folk at @Redtiger sent me the ViewClear 70 dash cam (front and rear camera) and asked me to provide a review here. So here it is!
I first want to say that communication with them has been top notch. For a Chinese based company, they have been very responsive and use very good English. This was a pleasant surprise after dealing with the not-as-fine folk at Creality some years back. Second, this is the first dash cam I've ever used/installed. So yeah, there are a few speed bumps I encountered.
Part 1: The Install
I spoke with my brother about installing it using the provided hardwire kit. I won't spend a great deal on describing it, it's the same hardwire kit that other videos/reviews cover. I watched many to make sure I don't screw it up. I briefly considered a rear view mirror adapter to power it, as they looked a lot easier than running the wires. However, I liked that the kit from RedTiger has a low voltage cutoff. Given the Lightning's tiny 12v battery, I thought this was very useful and opted to use the kit. The cut off has a selector to chose the voltage, 12.4/12.0/11.6, I chose 12.4.
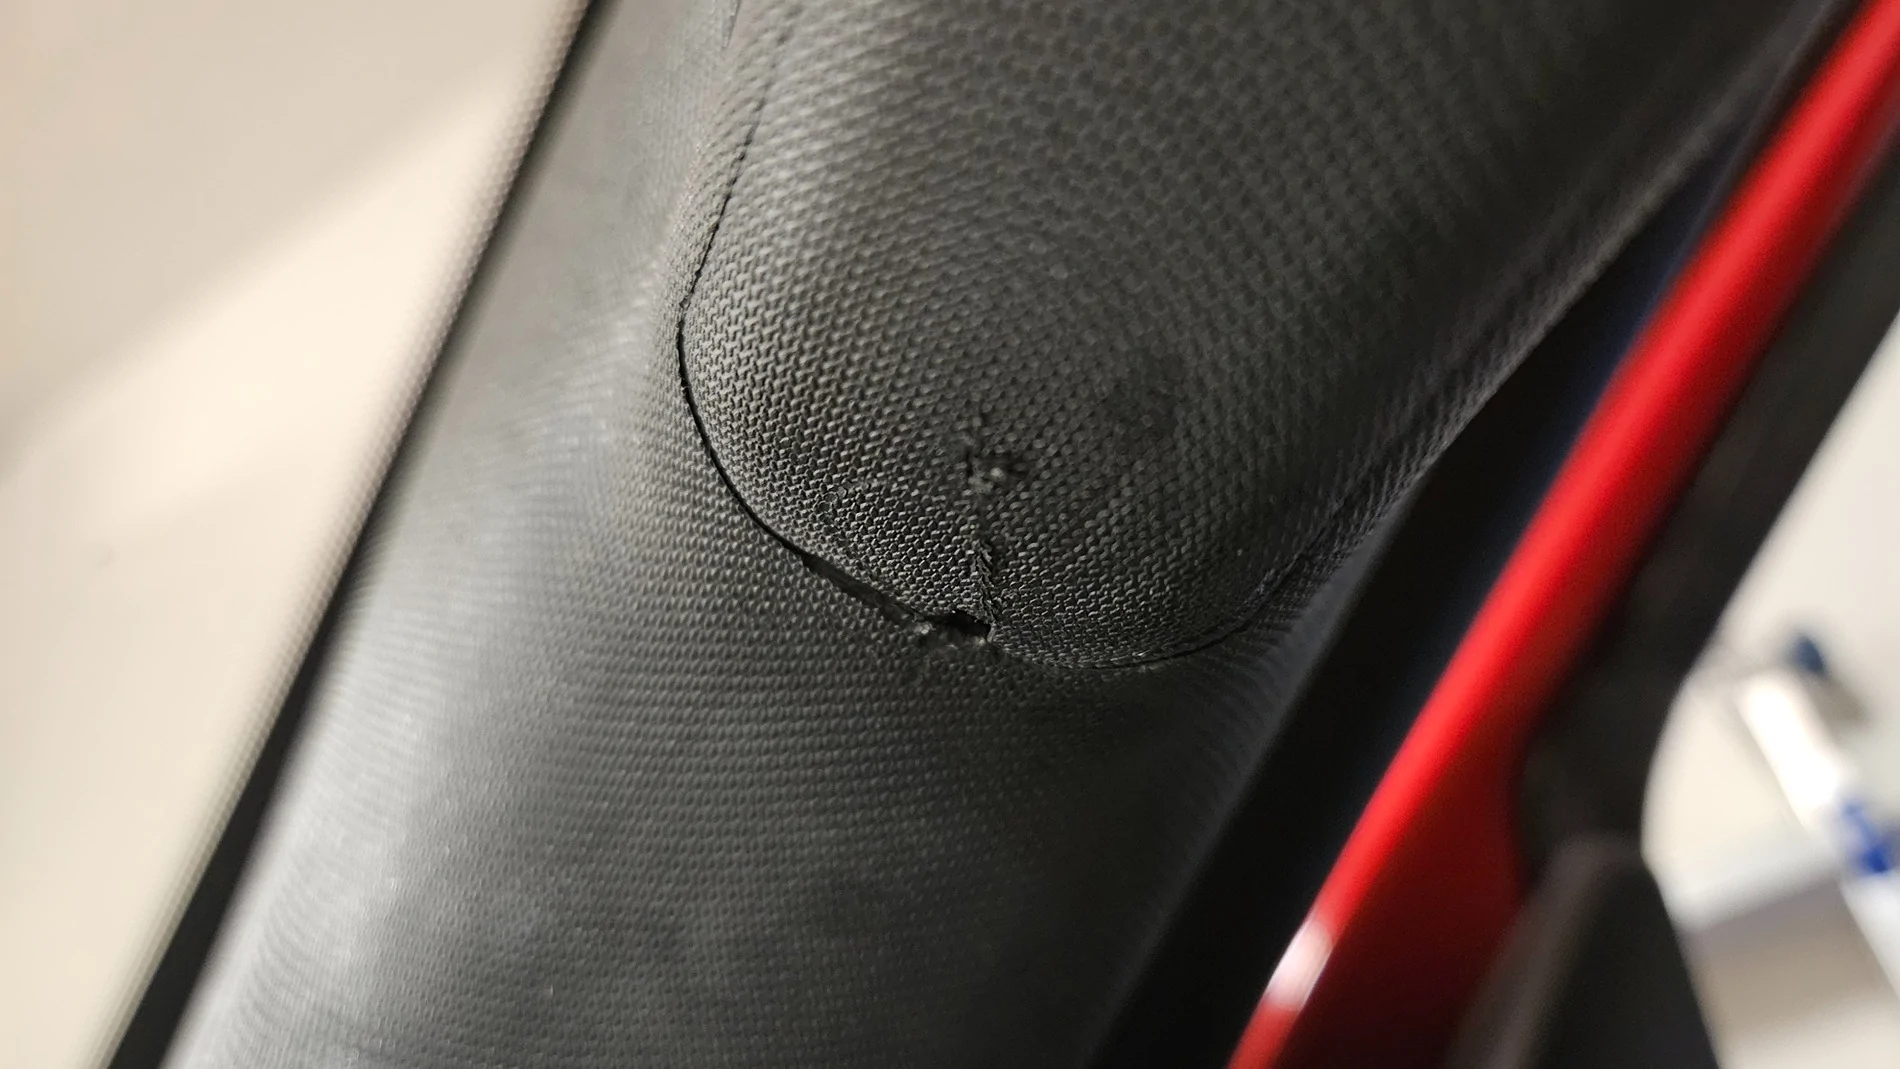
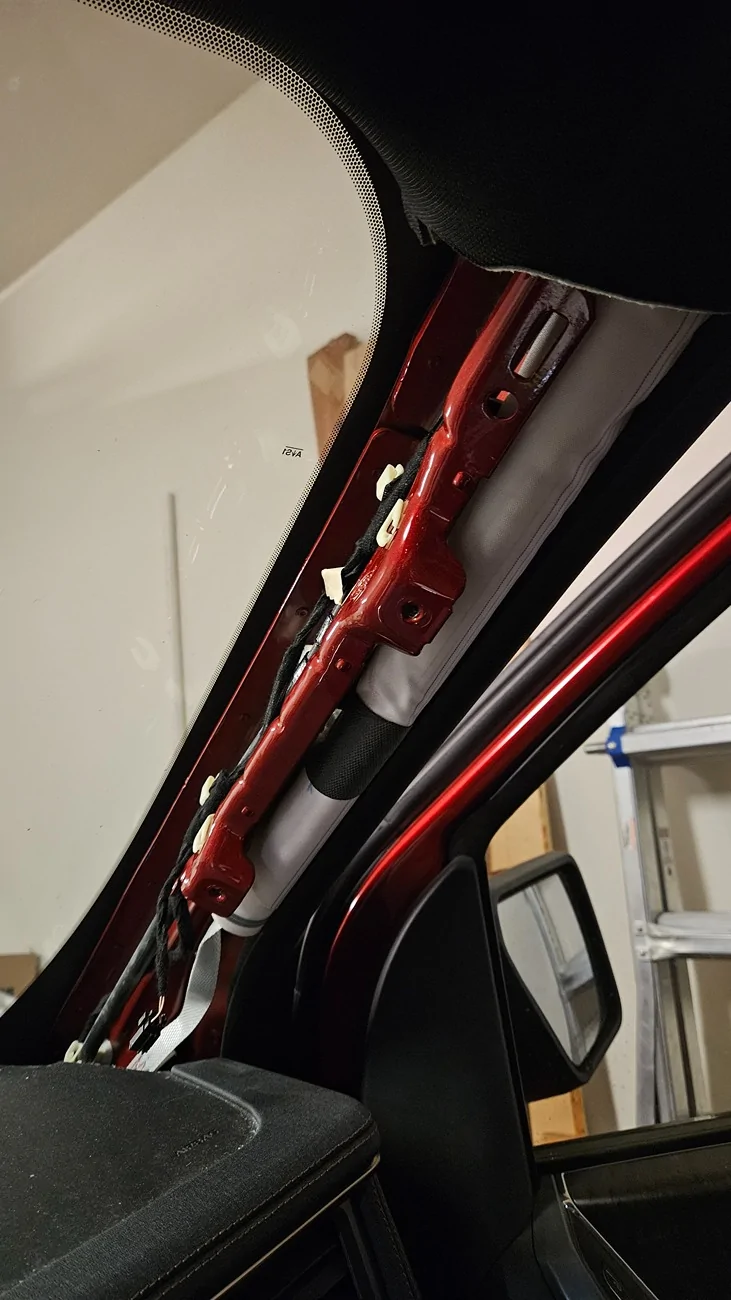
I hooked the USB side into the wire for the mirror and easily fed the cable into the trim along the top of the window. Then things took a turn for the worse. For not fault other than my own ignorance and disorganization, mind you. I struggled to get the A pillar trim off. There is a tiny little hole at the bottom of the grab handle that you are supposed to insert a pick of some sort and pop the cover off to get to two 10mm bolts. Sounds easy enough. Except I had no pick small enough. No problem, I grabbed a nail and bent the end of it. A hook! Pro tip, don't do this.

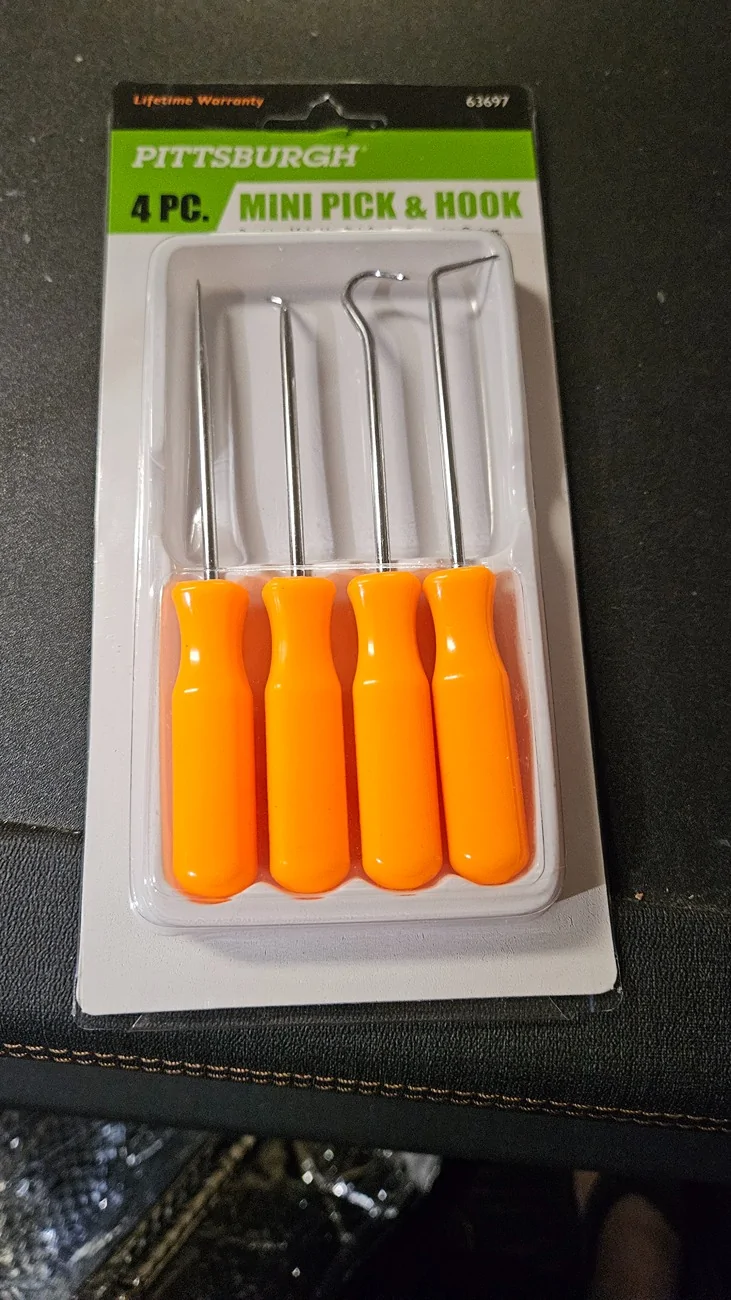
Like the soft plastic giving way to hardened steel, I too had to give way to the install that night. My solution was a $1.99 pack from Harbor Freight.

I managed to scratch the underside a second time even with the picks. Pro tip, you really have to poke that sunnuvagun far into the hole before prying outward. Once that was off, unbolting and popping the trim off was easy. Just don't yank too hard, you'll want to disconnect it from the tweater before moving it out of the way.
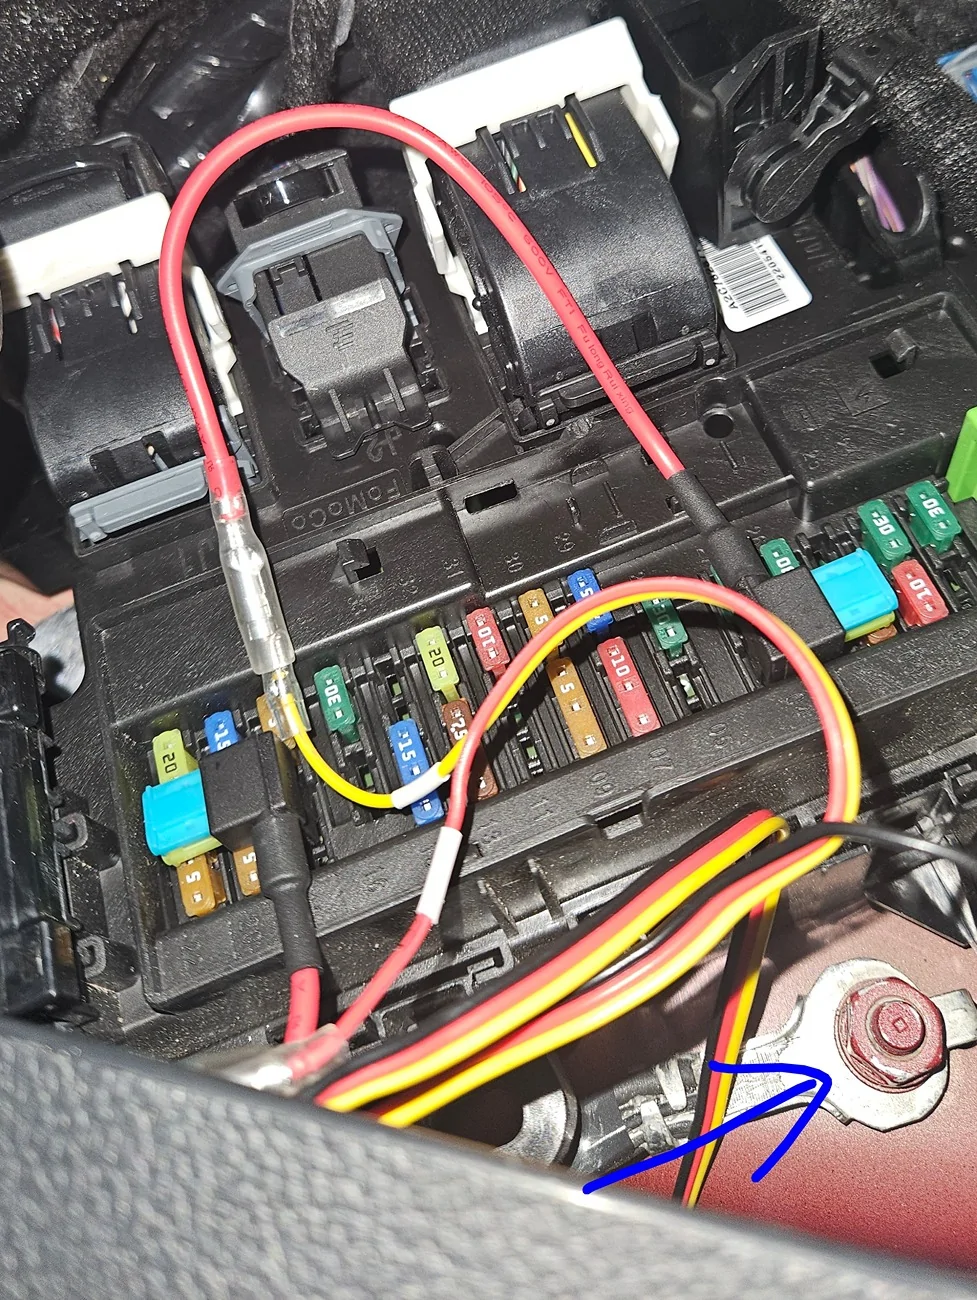
There's lots of room to run the cable behind the airbag. I ended up using a ziptie instead of the adhesive to secure the voltage selector at the bottom of the pillar. I then ran the rest of the wire to the weather stripping and down that to the fuse box in the passenger footwell.
Checking the fuses was a real pain in neck, as I wanted to use a spare/open slot so as to have less chance of interfering with anything. Thankfully, the manual showed several unused and spare slots. What was annoying is that the unused slots where missing the metal connectors so I couldn't use them. And the spares at the bottom where these weird 3 prong fuses that I guess spanned 2 slots.
Long story short, I used the provided piggyback adapter thing and placed the ACC wire in slot 17 facing down and the battery wire in slot 4 facing up. (I think, it's getting late and will double check that tomorrow with a pic) I loosened a bolt nearby that gave good ground and put tightened it back with the ground wire sandwiched between the nut and the washer. I saw one a bit closer that was painted red but assumed that was a DO NOT TOUCH ground.
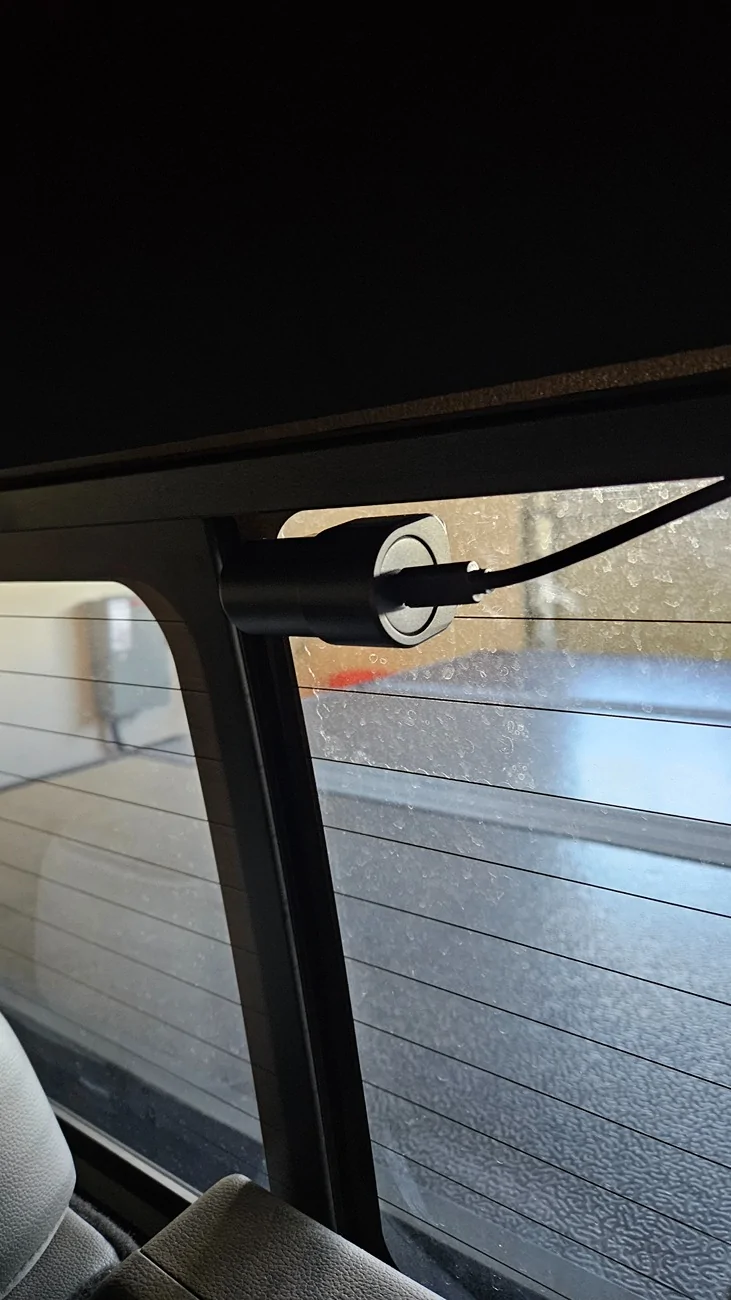
I then ran the rear camera wire up to to the drivers side, then along the weatherstrip/trim to the back. That part was hassle free. The cable has tons of length left over, which I bundled and tucked down next to the rear seat for now. My daughter's car seat is installed there I've got time to figure out a better way to stow it.
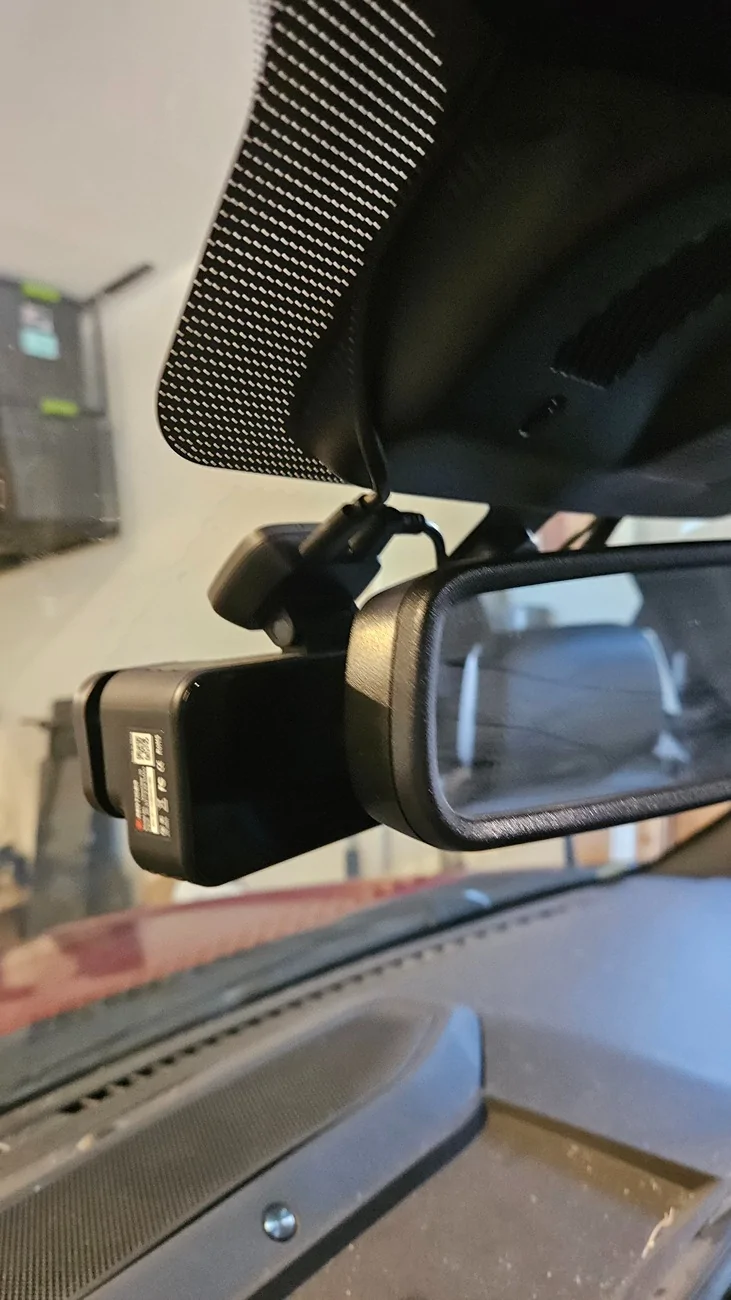
I attached the cameras using the provided bit of clear plastic first, then the camera w/adhesive onto that. Getting all the air bubbles out was tedious and the end result was not perfect. But I can't see any imperfections in the resulting videos so I'm happy.
Yeah, the placement hides a good portion of the touch screen...but I wanted it out of the way. Plus, it has voice commands that work well.
Part 2: The Features
As just mentioned, you can do just about anything you want with voice commands. I tested most of them out and they all worked on the first try. The GPS tracking was accurate for both location and speed. Sound recording was sensitive enough to pick up the kids in the back seat on the front camera. The rear camera also has its own mic, as the rear video audio will play back slightly out of sync with the front when played together on RedTiger's video player app.
I don't know if it was an intended feature, but I like that the from camera mount is a bracket that the camera slides into. It's super easy to unplug and slide it out.
I have not tried the parking mode just yet. It is worth noting that the camera turns on with I remote start and when the truck turns on to prepare the cabin for a set departure time.
The provided SD card provided, a 128GB card, seems to record around 3 hours worth of video before looping and starting to overwrite old video. I'll likely upgrade that at a later time. I just lowered the resolution and will see how much extra time that captures vs the picture quality.
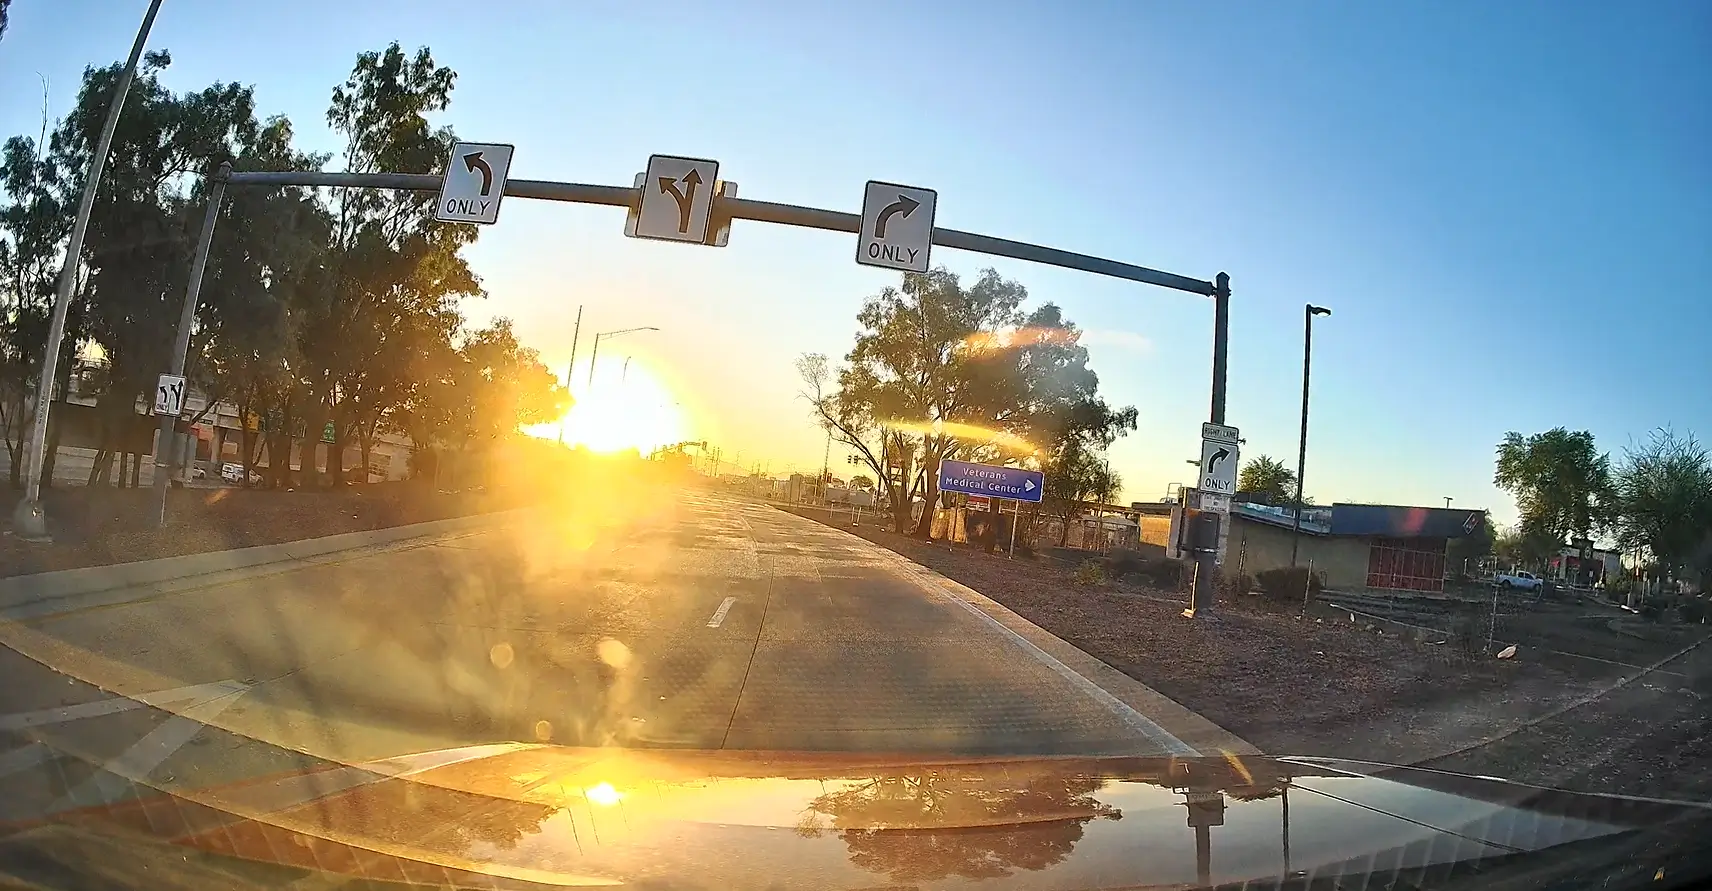
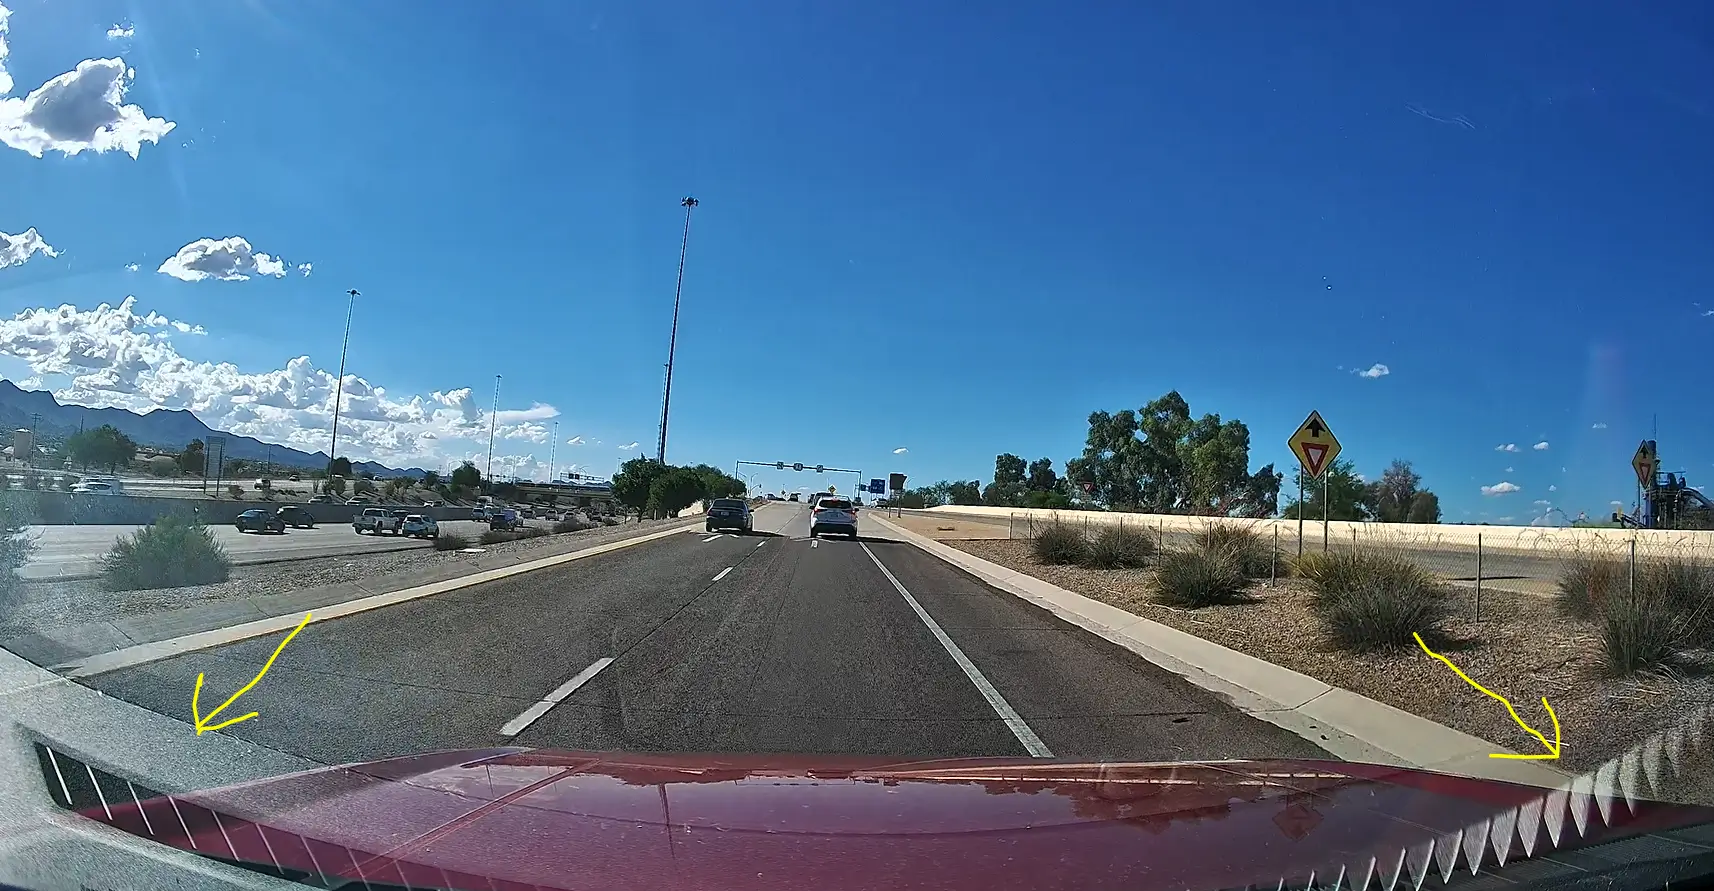
The picture quality is outstanding on the front. It handles low light and even direct sun very well.

I am a little turned off at the reflections from the dash itself, but I can live with it.

The rear camera struggled in the early morning twilight, especially when towards the sun about to poke above the mountains.

About 10 min later, it was fine and the front camera never had any problems at all. I haven't been out at full night with it yet.
There are several other features but I'm still learning and playing with it so I don't have an opinion on those yet.
Part 3: Would I buy it?
Yeah, especially with the hardwire kit. I like that I don't see any cables and if I choose to use parking mode the 12v battery will be protected. The camera quality is great. The customer support is great (that's a big one for me). Fit and finish was great. I can see why they offered to send some out for free. I'd recommend it my friends without hesitation.
If you have any questions, toss 'em my way. Big thanks to RedTiger, I turned them down initially and they pushed and found a way to meet my needs before I accepted the offer. They've got a good product and they know it. I'm not affiliated and I don't get anything if you buy from them. I'm just a happy user at this point.
I first want to say that communication with them has been top notch. For a Chinese based company, they have been very responsive and use very good English. This was a pleasant surprise after dealing with the not-as-fine folk at Creality some years back. Second, this is the first dash cam I've ever used/installed. So yeah, there are a few speed bumps I encountered.
Part 1: The Install
I spoke with my brother about installing it using the provided hardwire kit. I won't spend a great deal on describing it, it's the same hardwire kit that other videos/reviews cover. I watched many to make sure I don't screw it up. I briefly considered a rear view mirror adapter to power it, as they looked a lot easier than running the wires. However, I liked that the kit from RedTiger has a low voltage cutoff. Given the Lightning's tiny 12v battery, I thought this was very useful and opted to use the kit. The cut off has a selector to chose the voltage, 12.4/12.0/11.6, I chose 12.4.
I hooked the USB side into the wire for the mirror and easily fed the cable into the trim along the top of the window. Then things took a turn for the worse. For not fault other than my own ignorance and disorganization, mind you. I struggled to get the A pillar trim off. There is a tiny little hole at the bottom of the grab handle that you are supposed to insert a pick of some sort and pop the cover off to get to two 10mm bolts. Sounds easy enough. Except I had no pick small enough. No problem, I grabbed a nail and bent the end of it. A hook! Pro tip, don't do this.
Like the soft plastic giving way to hardened steel, I too had to give way to the install that night. My solution was a $1.99 pack from Harbor Freight.
I managed to scratch the underside a second time even with the picks. Pro tip, you really have to poke that sunnuvagun far into the hole before prying outward. Once that was off, unbolting and popping the trim off was easy. Just don't yank too hard, you'll want to disconnect it from the tweater before moving it out of the way.
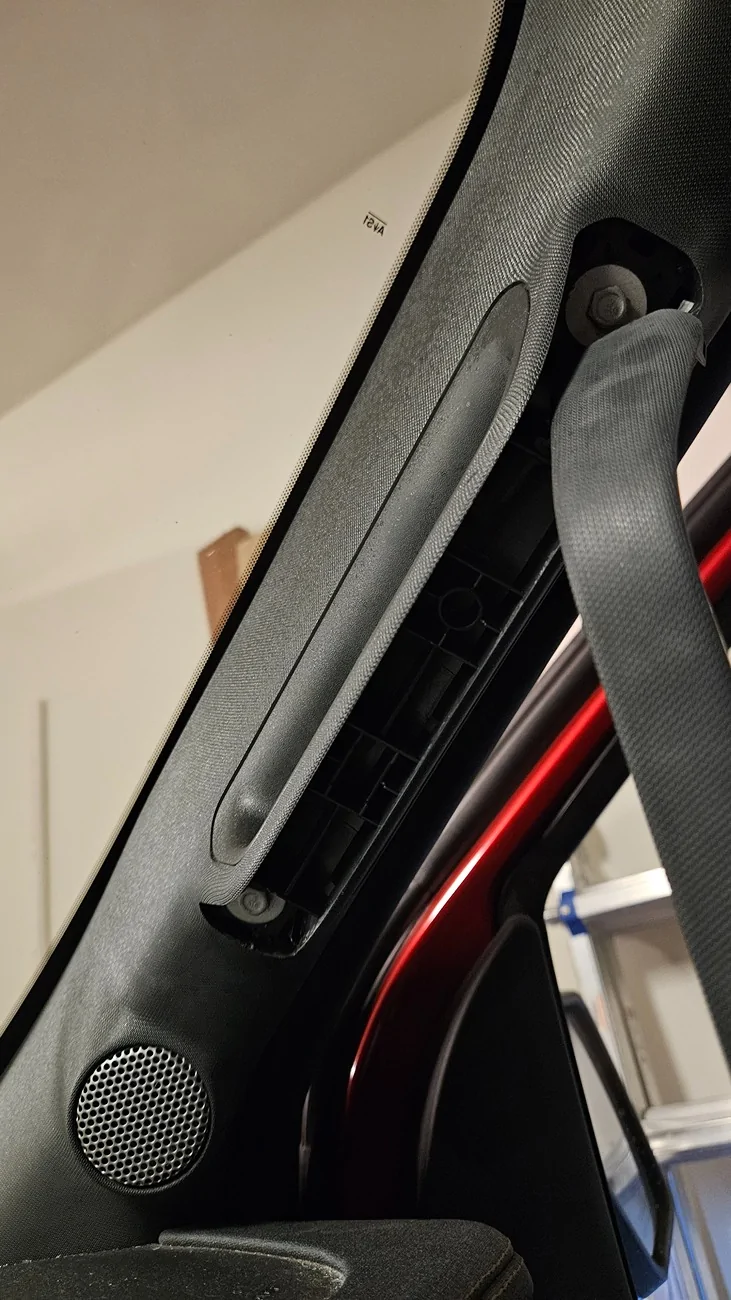
There's lots of room to run the cable behind the airbag. I ended up using a ziptie instead of the adhesive to secure the voltage selector at the bottom of the pillar. I then ran the rest of the wire to the weather stripping and down that to the fuse box in the passenger footwell.
Checking the fuses was a real pain in neck, as I wanted to use a spare/open slot so as to have less chance of interfering with anything. Thankfully, the manual showed several unused and spare slots. What was annoying is that the unused slots where missing the metal connectors so I couldn't use them. And the spares at the bottom where these weird 3 prong fuses that I guess spanned 2 slots.
Long story short, I used the provided piggyback adapter thing and placed the ACC wire in slot 17 facing down and the battery wire in slot 4 facing up. (I think, it's getting late and will double check that tomorrow with a pic) I loosened a bolt nearby that gave good ground and put tightened it back with the ground wire sandwiched between the nut and the washer. I saw one a bit closer that was painted red but assumed that was a DO NOT TOUCH ground.
I then ran the rear camera wire up to to the drivers side, then along the weatherstrip/trim to the back. That part was hassle free. The cable has tons of length left over, which I bundled and tucked down next to the rear seat for now. My daughter's car seat is installed there I've got time to figure out a better way to stow it.
I attached the cameras using the provided bit of clear plastic first, then the camera w/adhesive onto that. Getting all the air bubbles out was tedious and the end result was not perfect. But I can't see any imperfections in the resulting videos so I'm happy.
Yeah, the placement hides a good portion of the touch screen...but I wanted it out of the way. Plus, it has voice commands that work well.
Part 2: The Features
As just mentioned, you can do just about anything you want with voice commands. I tested most of them out and they all worked on the first try. The GPS tracking was accurate for both location and speed. Sound recording was sensitive enough to pick up the kids in the back seat on the front camera. The rear camera also has its own mic, as the rear video audio will play back slightly out of sync with the front when played together on RedTiger's video player app.
I don't know if it was an intended feature, but I like that the from camera mount is a bracket that the camera slides into. It's super easy to unplug and slide it out.
I have not tried the parking mode just yet. It is worth noting that the camera turns on with I remote start and when the truck turns on to prepare the cabin for a set departure time.
The provided SD card provided, a 128GB card, seems to record around 3 hours worth of video before looping and starting to overwrite old video. I'll likely upgrade that at a later time. I just lowered the resolution and will see how much extra time that captures vs the picture quality.
The picture quality is outstanding on the front. It handles low light and even direct sun very well.
I am a little turned off at the reflections from the dash itself, but I can live with it.
The rear camera struggled in the early morning twilight, especially when towards the sun about to poke above the mountains.
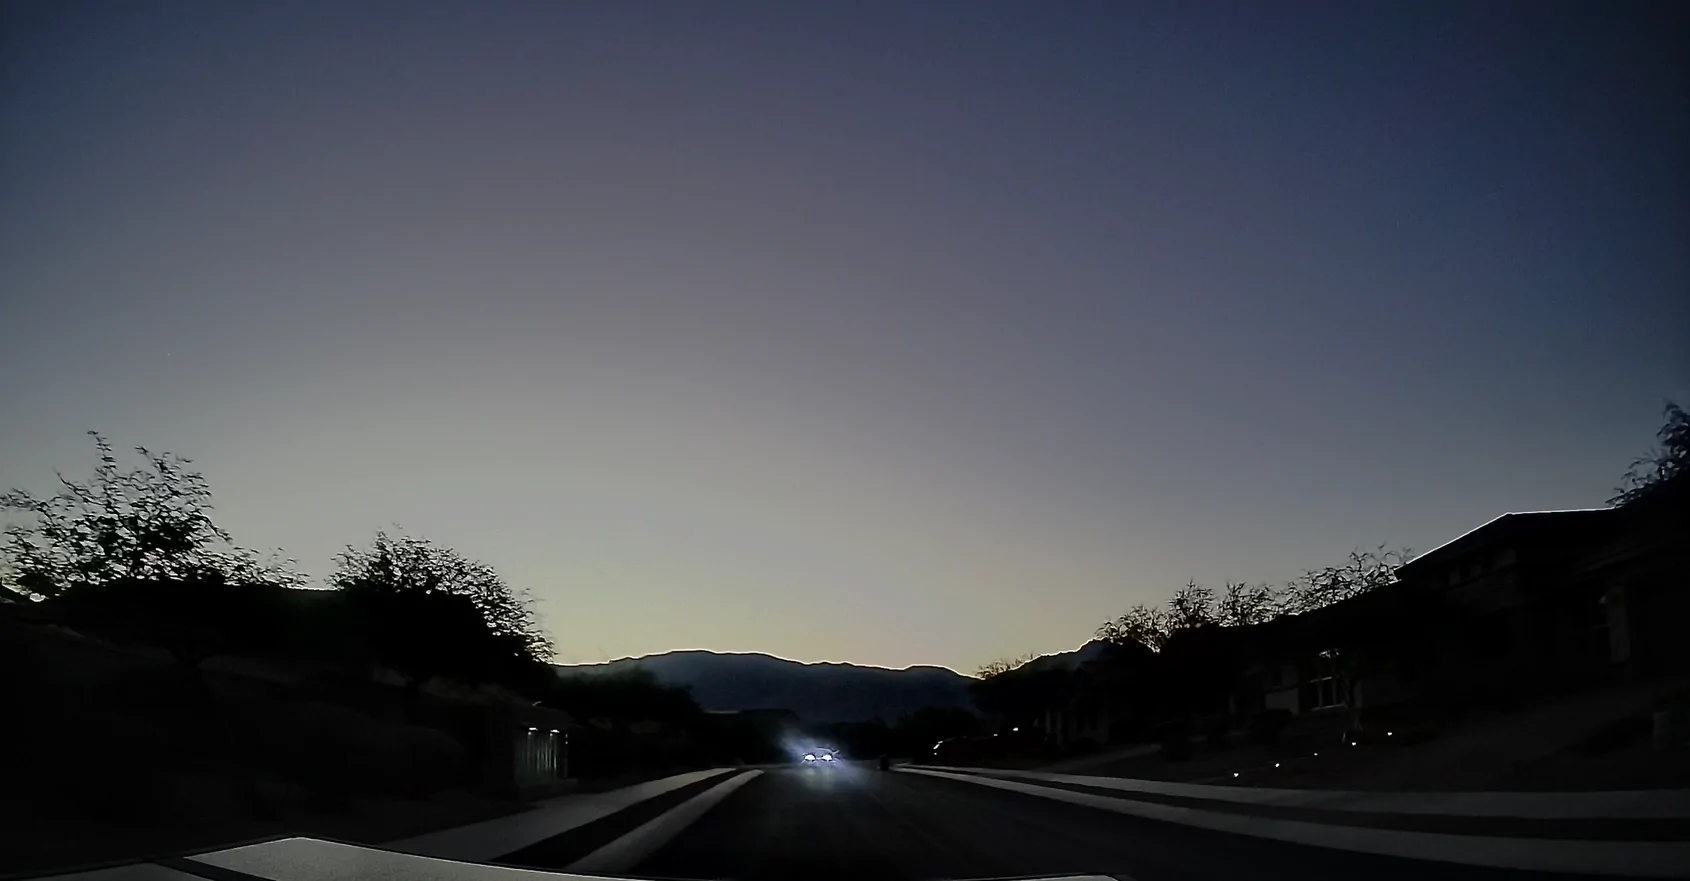
About 10 min later, it was fine and the front camera never had any problems at all. I haven't been out at full night with it yet.
There are several other features but I'm still learning and playing with it so I don't have an opinion on those yet.
Part 3: Would I buy it?
Yeah, especially with the hardwire kit. I like that I don't see any cables and if I choose to use parking mode the 12v battery will be protected. The camera quality is great. The customer support is great (that's a big one for me). Fit and finish was great. I can see why they offered to send some out for free. I'd recommend it my friends without hesitation.
If you have any questions, toss 'em my way. Big thanks to RedTiger, I turned them down initially and they pushed and found a way to meet my needs before I accepted the offer. They've got a good product and they know it. I'm not affiliated and I don't get anything if you buy from them. I'm just a happy user at this point.
Sponsored