RipInPepz
Active member
I agree totally. My truck is parked very close to my router with a gigabit connection. But it feels like it never uses my WiFi or else the commands in the app wouldn’t take forever to execute.
Sponsored
Great job....One of my grievances about new cars is how many things are moving to apps which require cloud access and often subscriptions to use them. When we bought our Subaru Crosstrek a couple of years ago, we paid an extra $400 to have the dealer install the OEM remote start module so we could use our factory key instead of the app.
When I bought my 2025 Lightning in September this year, I was pretty disappointed to see that remote start was once again an app-only feature. Here in Vermont, being able to pre-warm the vehicle is incredibly valuable during our long, cold winters. And unfortunately, where we live we have very poor cellular signal for whichever carrier the vehicle's modem is using, so the app experience is very poor. Using the app for anything that requires a vehicle connection (e.g. remote start, configuring departure times, etc) is at best hit-or-miss - sometimes it works fine, but often it will repeatedly time-out and fail.
While I can (and do) schedule departure times for regular journeys (e.g. my morning commute), doing this for one-off journeys is a painful experience. With my previous F-150, I'd just click the key fob a couple of times 10 minutes before I wanted to go out, and that was that.
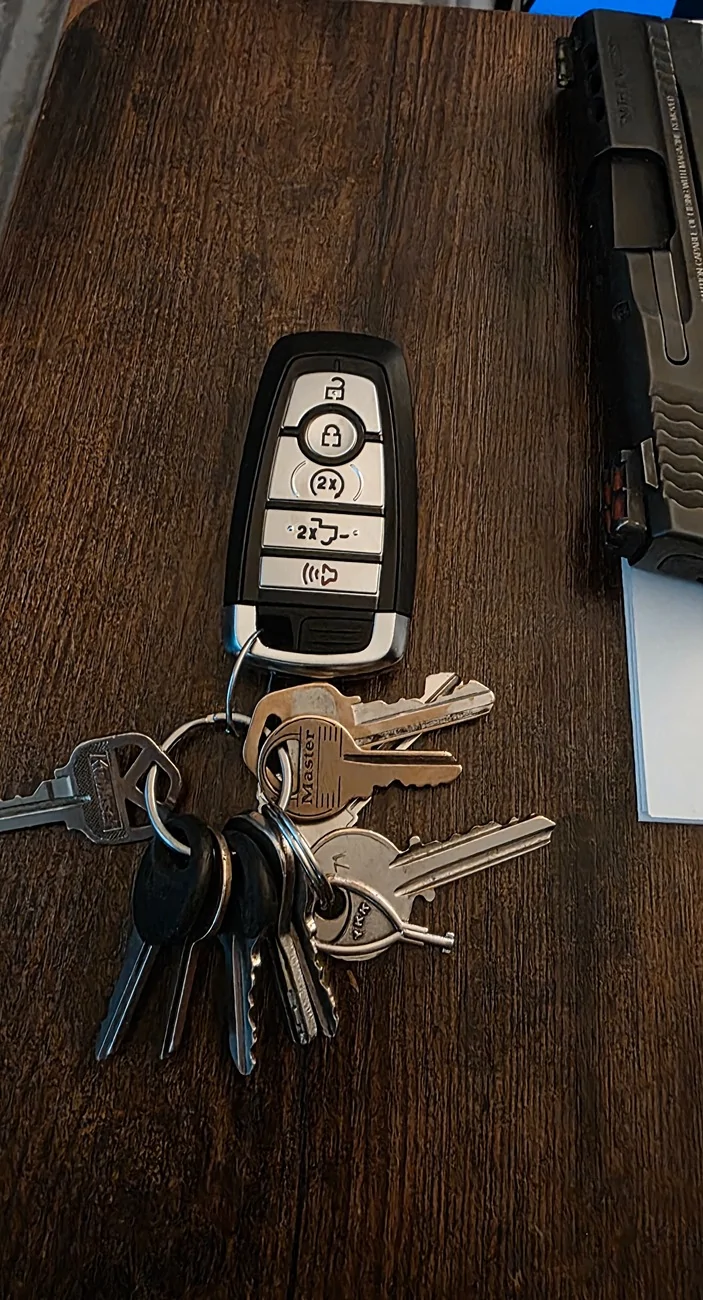
We have an extensive home automation system in the new house we're building, and integrating the truck into that was a priority for me. From research on this forum and elsewhere, I decided to buy a new key fob from North Coast Keyless for about $90 which did have the remote start feature, then wire this up to an ESP32 giving me control via Home Assistant (our home automation system).
The key was out of stock for a while, but a couple of weeks ago I checked and it was in stock, so I bought it and it arrived a few days later. I programmed the key myself using my 2 existing factory keys which only took a couple of minutes following the instructions in the owner's manual.
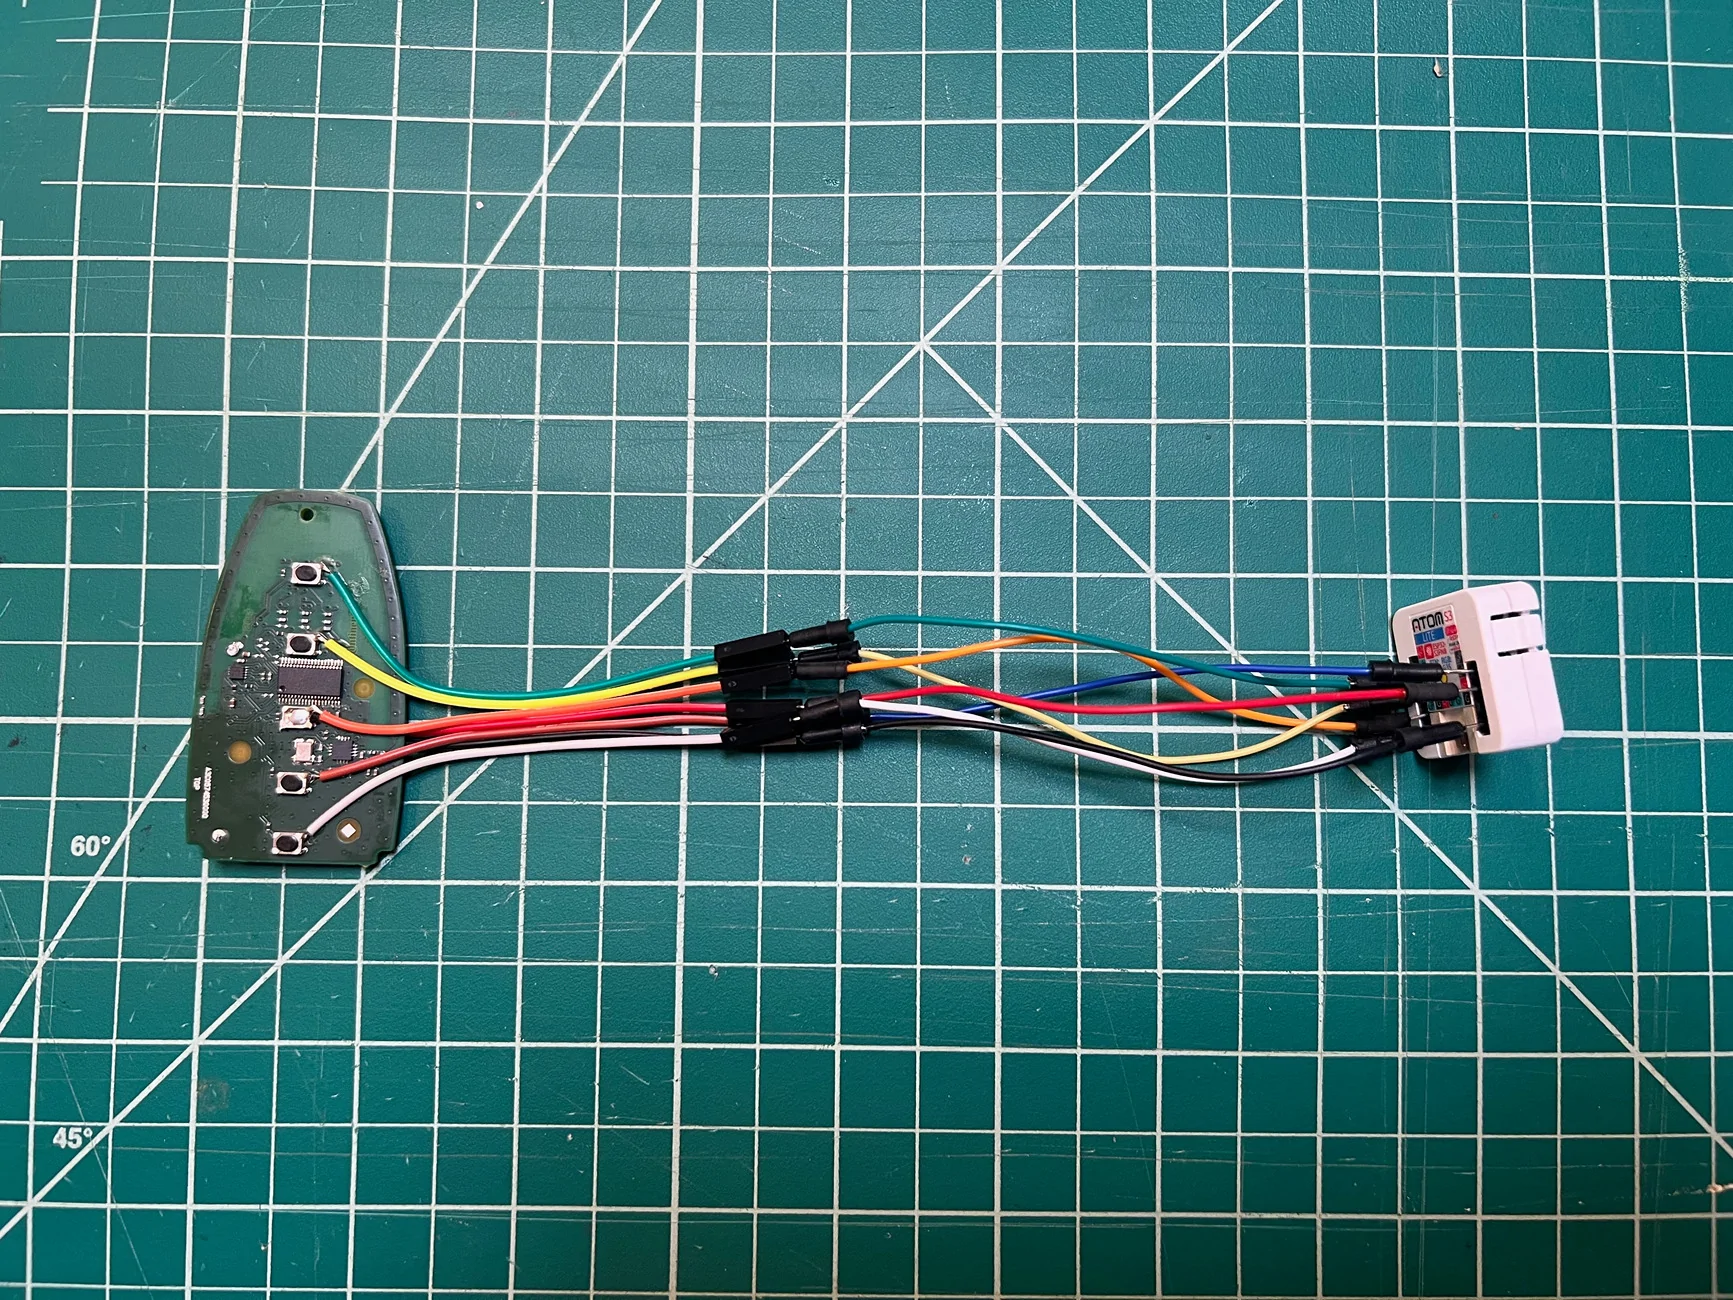
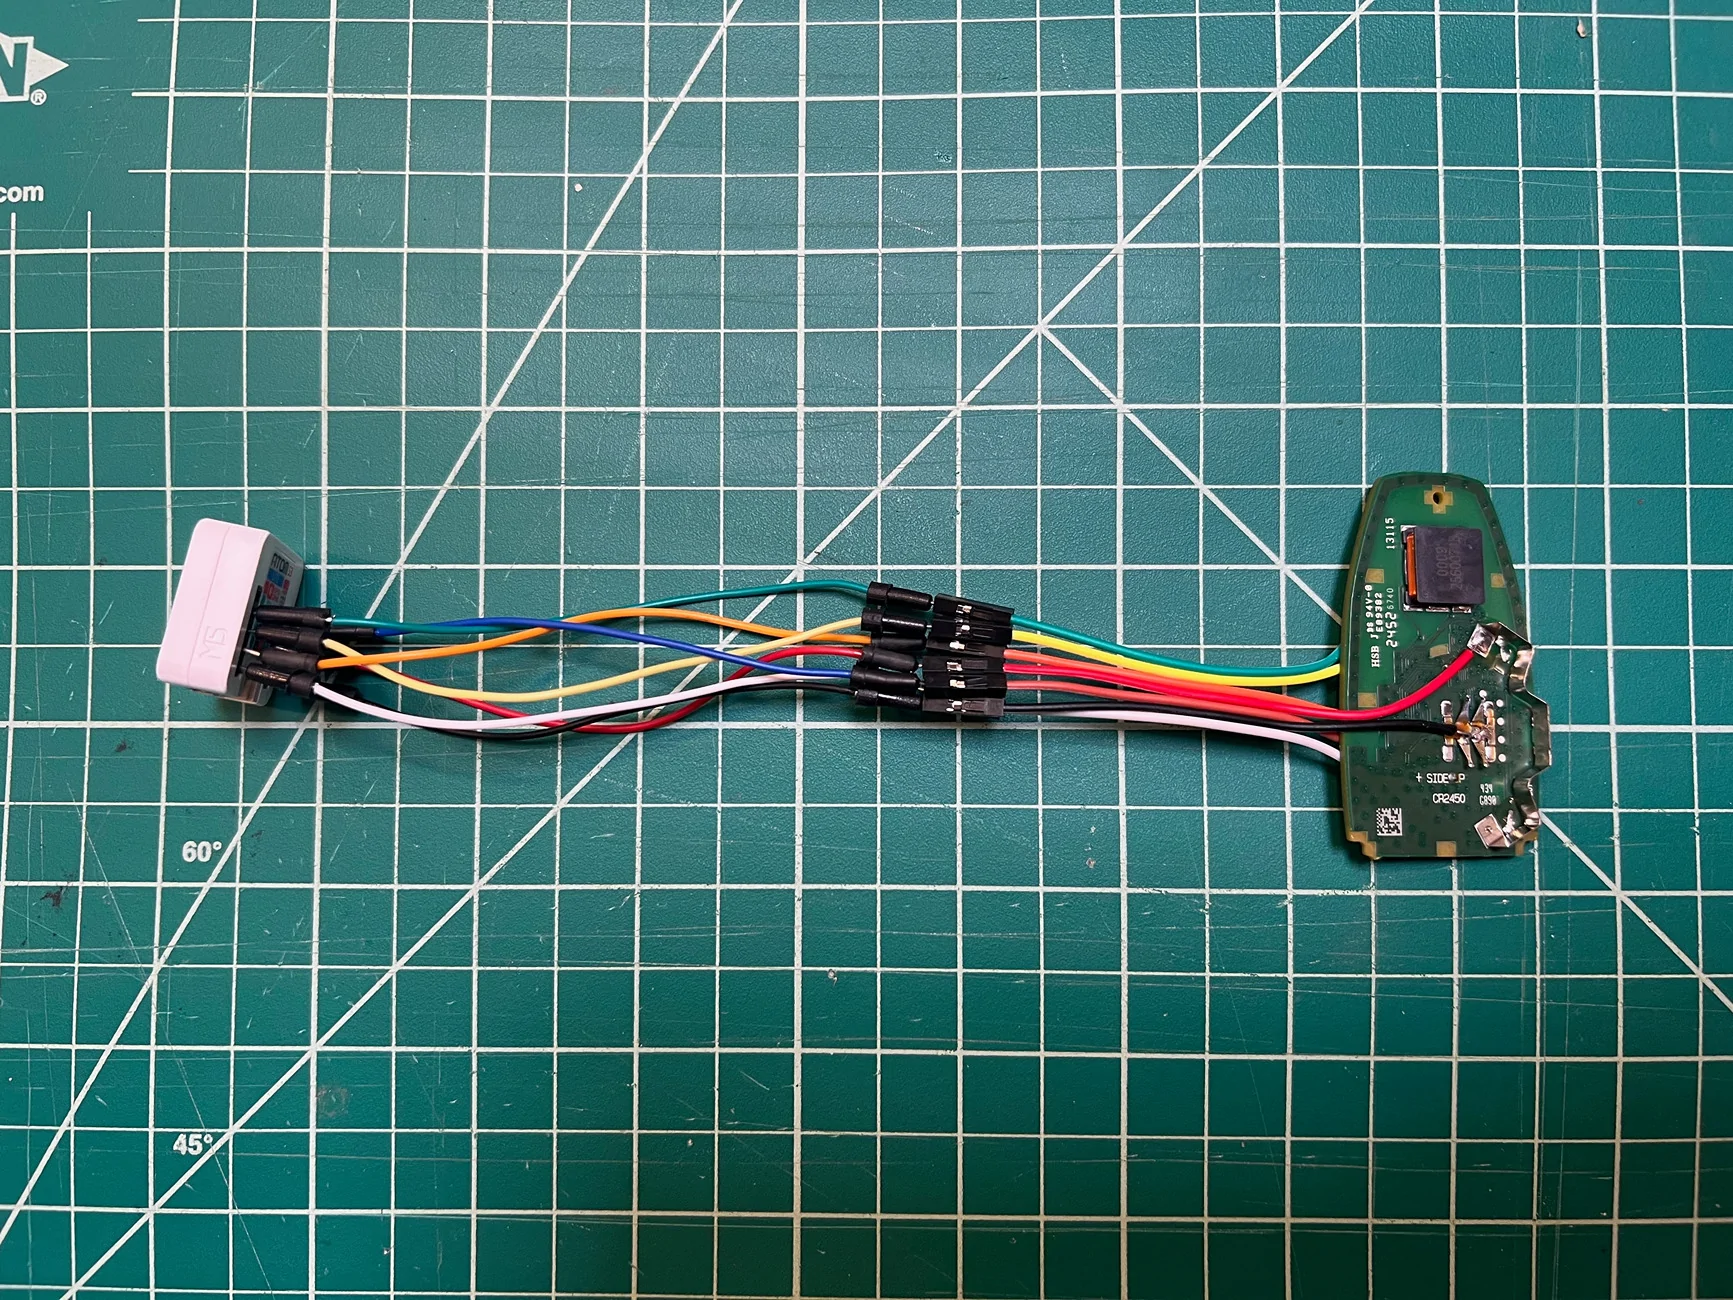
Then I tore the key apart. I had hoped that like other key fobs, it would simply clip together, but as best I can tell it was actually glued shut, so I ended up cutting and prying it open, taking care not to damage the PCB inside.
With my digital multimeter, I confirmed the behavior of the 5 small SMD buttons. Opposite pairs of legs are electrically coupled, with one pair tied to ground. So pressing the button simply pulls the other two legs to ground. All the buttons are oriented identically and work exactly the same way.
From there, it was simply a case of soldering wires onto one of the output pins on each button. I'm not the best at soldering, and these pins are tiny. 4 out of the 5 buttons were easy, but the remote start one by the chip was trickier to get to and I ended up prying off the button top to make things a little easier. I soldered a short female DuPont wire to each button, as well as to the positive and negative battery terminals on the other side of the board. I bought a small, angled soldering iron tip for my Pinecil just for this, and liberally applied solder flux. It's not the neatest job, but my DMM confirmed I had connections.

I used the female DuPont wires as they were what I had on hand and in future I may do something a little cleaner using a proper connector. For now, I simply connected them to a $7 M5Stack AtomS3 Lite I had lying around which has an ESP32-S3 and just enough exposed GPIO pins for my use case.
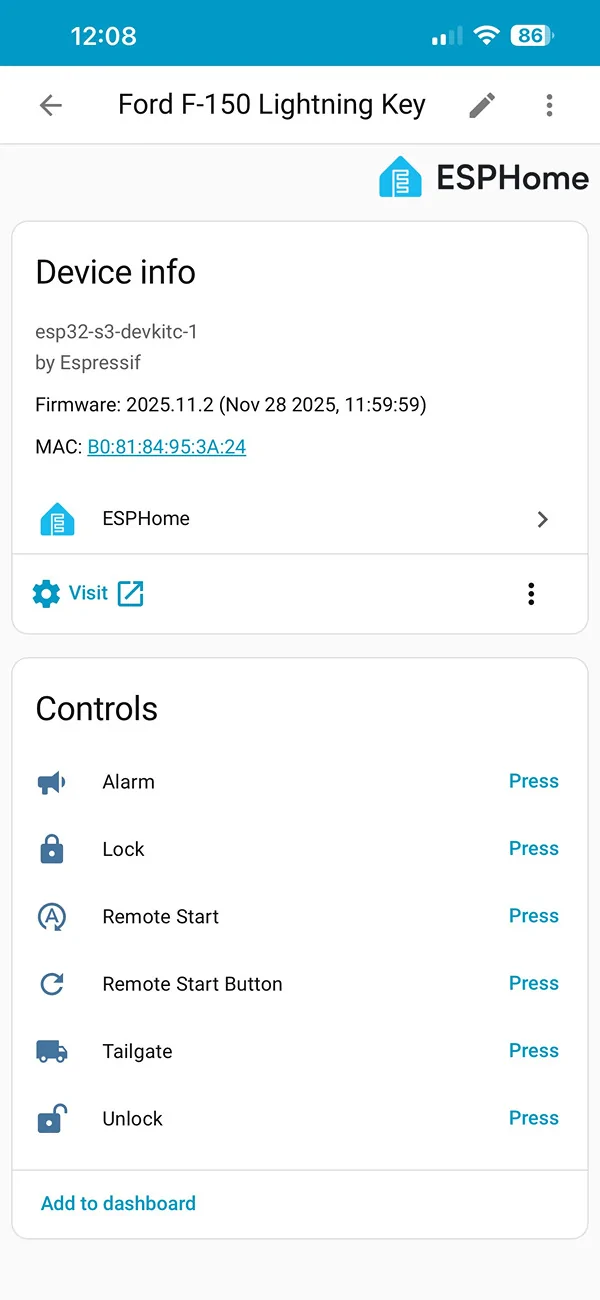
I programmed it with ESPHome, and my config is below in case anyone is interested. I'm sure this could be cleaned up and improved, but for now it works. The basic approach is that it exposes a virtual button to Home Assistant for each of the key fob functions. Pressing the button in Home Assistant pulls the GPIO to ground for 500ms, then lets it float again.

For the tailgate open / close button, I trigger it twice from one press in Home Assistant as that's what the remote requires. For the remote start, it "presses" the lock button twice, then the remote start button. I also exposed the remote start button directly so you can turn the vehicle off after it's been remote started.
Power is only sent to the key fob just before each key press, and turned off shortly after the key press has finished. I think I'm giving it enough time to maintain synchronization, but I'll report back if I run into issues. I could probably just keep the key powered on, but from a safety and security perspective I felt like only powering it on when needed is best. Also, technically the coin cell battery was delivering ~3.0V and I'm giving it 3.3V, so keeping it disconnected except when needed seems to make sense.
I've tested it and it all works exactly as expected. Unfortunately, there's no feedback other than looking at the truck to see if it worked. While the key fob fascia makes it look like it has an LED (and I swear my old truck key did), there's no LED on the actual circuit board. I was thinking of tapping into this as a feedback loop of sorts.
For now though, being able to remote start the truck from Home Assistant is huge. I can expose this feature through any number of means now - the LocalDeck by our front door, voice control, a button in Home Assistant, etc. I can also schedule it or integrate it into other scripts.
I've also done some other related "mods" too. I have a couple of automations which remind me to plug the truck in if it isn't already (using connection status from our EVSE) - it reminds me 10 minutes after I get home, or at 9:15pm each evening, but only if the truck is home.
I know this isn't new or novel and plenty of people have done this before, but I didn't see much mention of it on this forum so thought I'd share, if nothing else to confirm that it works with a 2025 Lightning Lariat.
Here's my ESPHome config for anyone interested.
YAML:esphome: name: f150-key friendly_name: Ford F-150 Lightning Key esp32: board: esp32-s3-devkitc-1 variant: esp32s3 framework: type: esp-idf logger: level: DEBUG api: encryption: key: [REDACTED] ota: - platform: esphome password: [REDACTED] wifi: ssid: !secret wifi_ssid password: !secret wifi_password switch: - platform: gpio pin: number: 38 mode: OUTPUT inverted: false id: fob_power restore_mode: ALWAYS_OFF internal: true - platform: gpio pin: number: 5 # green mode: OUTPUT_OPEN_DRAIN inverted: true id: gpio_unlock restore_mode: ALWAYS_OFF internal: true - platform: gpio pin: number: 6 # yellow mode: OUTPUT_OPEN_DRAIN inverted: true id: gpio_lock restore_mode: ALWAYS_OFF internal: true - platform: gpio pin: number: 7 # orange mode: OUTPUT_OPEN_DRAIN inverted: true id: gpio_start restore_mode: ALWAYS_OFF internal: true - platform: gpio pin: number: 8 # white mode: OUTPUT_OPEN_DRAIN inverted: true id: gpio_vehicle_alarm restore_mode: ALWAYS_OFF internal: true - platform: gpio pin: number: 39 # brown / blue mode: OUTPUT_OPEN_DRAIN inverted: true id: gpio_tailgate restore_mode: ALWAYS_OFF internal: true button: - platform: template name: "Unlock" icon: "mdi:lock-open-variant" id: unlock on_press: - switch.turn_on: fob_power - delay: 500ms - switch.turn_on: gpio_unlock - delay: 500ms - switch.turn_off: gpio_unlock - delay: 500ms - switch.turn_off: fob_power - platform: template name: "Lock" icon: "mdi:lock" id: lock on_press: - switch.turn_on: fob_power - delay: 500ms - switch.turn_on: gpio_lock - delay: 500ms - switch.turn_off: gpio_lock - delay: 500ms - switch.turn_off: fob_power - platform: template name: "Remote Start" icon: "mdi:refresh-auto" id: remote_start on_press: - switch.turn_on: fob_power - delay: 500ms - switch.turn_on: gpio_lock - delay: 500ms - switch.turn_off: gpio_lock - delay: 500ms - switch.turn_on: gpio_start - delay: 500ms - switch.turn_off: gpio_start - delay: 500ms - switch.turn_on: gpio_start - delay: 500ms - switch.turn_off: gpio_start - delay: 500ms - switch.turn_off: fob_power - platform: template name: "Remote Start Button" icon: mdi:refresh id: remote_start_button on_press: - switch.turn_on: fob_power - delay: 500ms - switch.turn_on: gpio_start - delay: 500ms - switch.turn_off: gpio_start - delay: 500ms - switch.turn_off: fob_power - platform: template name: "Alarm" icon: "mdi:bullhorn" id: vehicle_alarm on_press: - switch.turn_on: fob_power - delay: 500ms - switch.turn_on: gpio_vehicle_alarm - delay: 500ms - switch.turn_off: gpio_vehicle_alarm - delay: 500ms - switch.turn_off: fob_power - platform: template name: "Tailgate" icon: "mdi:truck" id: tailgate on_press: - switch.turn_on: fob_power - delay: 500ms - switch.turn_on: gpio_tailgate - delay: 500ms - switch.turn_off: gpio_tailgate - delay: 500ms - switch.turn_on: gpio_tailgate - delay: 500ms - switch.turn_off: gpio_tailgate - delay: 500ms - switch.turn_off: fob_power
I got the fob for an ice f150 with remote start and it came with the tailgate button but no frunk button.Great job....
I also have a house that is fully using Home Assistant with many ESPHome devices.
It took a good amount of research, but I found a cheap compatible key fob.
I found 315 MHz 4 button key fobs with remote start on Amazon for a 2017-2022 Ford Edge.
I went ahead and ordered them, they paired up with my 2020 Lightning Platinum with no issues, no tailgate button but the remote start button works.
I will be using a different ESP32 board but following your process.
If you need more Key Fobs go to Amazon and search for "B0BPH4KSVQ AUTOHAUX"
for only $23.50 each (sold in Pairs) I felt I could do without the tailgate.

")
I’m planning on buying a Bambu H2S in a couple of weeks. This will be one of my first projects to print one I get the hang of 3D printing! I was collecting far too many examples like this where a 3D printer is exactly what I needed.Time for a lovely 3D printed enclosure?
I’m planning on buying a Bambu H2S in a couple of weeks. This will be one of my first projects to print one I get the hang of 3D printing! I was collecting far too many examples like this where a 3D printer is exactly what I needed.
Luckily, there are some good alternatives too if you're so inclined (Mine is running custom firmware!)